background image

150

Configuratie en bediening

WLAN Router 300

o

Configuratie van de internetverbinding 

Om het apparaat snel in te stellen kunt u gebruik maken van de geïn

-

tegreerde assistent. 

Om de assistent te starten klikt u op de startpagina en op de 


‹

knop "Assistent".

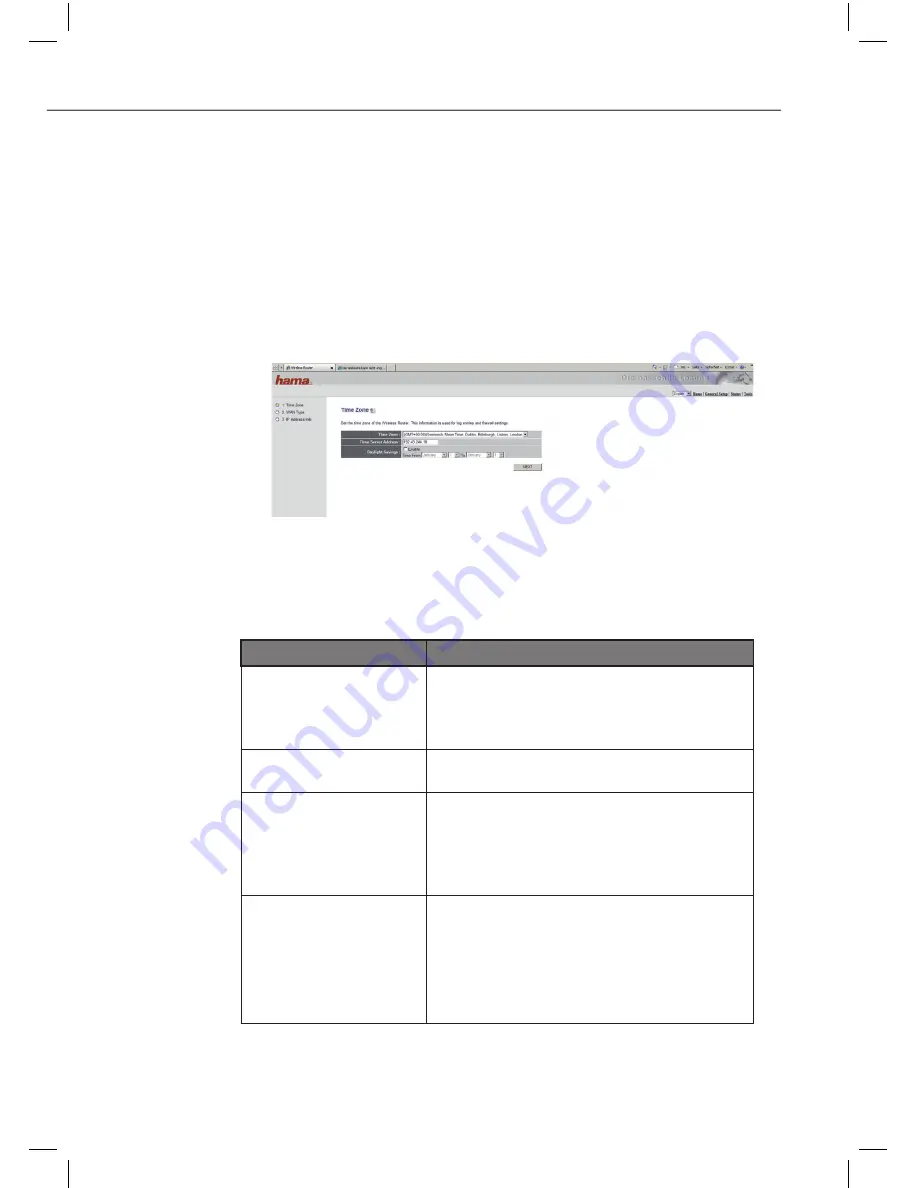
Tijdzone

Selecteer de juiste tijdzone bijv. voor Nederland "(GMT +01:00) 


‹

Amsterdam, Berlin, Rome, Stockholm, Vienna". De andere instel

-

lingen kunnen ongewijzigd worden overgenomen.

Klik op "Verder" om door te gaan.


‹

WAN-type

Selecteer een WAN-verbindingstype


‹

Type

Details

Kabelmodem

Uw IP-adres wordt automatisch bij het 

maken van de verbinding met uw ISP 

(Internet Service Provider) aan u toege

-

wezen.

Statische IP DSL

Uw ISP wijst aan u een permanent IP-

adres toe.

PPPoE DSL

Verbindingsopbouw naar de ISP alleen 

indien noodzakelijk. Het IP-adres wordt 

normaal gesproken automatisch toegewe

-

zen. Uw ISP wijst aan u een wachtwoord 

en een gebruikersnaam toe.

PPTP DSL

Verbindingsopbouw naar de ISP alleen 

indien noodzakelijk. Het IP-adres wordt 

normaal gesproken automatisch toege

-

wezen, kan echter ook statisch (vast) zijn. 

Uw ISP wijst aan u een plaatselijke IP, een 

remote IP en een verbindings IP toe. 

Содержание 53133

Страница 1: ...W I R E L E S S L A N 00053133 WLAN Router Wireless LAN 300 Mbps d Original Bedienungsanleitung g Instruction manual f Notice d utilisation o Gebruiksaanwijzing ...

Страница 2: ...2 Elektrischer Anschluss 13 Steckernetzteil anschließen 13 Überprüfung der Installation 13 Konfiguration und Bedienung 14 PC Konfiguration 14 IP Adresse konfigurieren 14 Konfiguration des Gerätes 16 Konfigurationsoberfläche starten 16 Anmeldung 16 Konfiguration der Internet verbindung 18 LAN Einstellungen 22 Wireless LAN Einstellungen 24 Einstellung der Wireless LAN Verschlüsselung 29 WPS Automati...

Страница 3: ...en Gebrauch die Sicherheit den Anschluss sowie die Bedienung des Gerätes Die Bedienungsanleitung muss ständig in der Nähe des Gerätes verfügbar sein Sie ist von jeder Person zu lesen und anzuwenden die dieses Gerät bedient oder die Störungsbehebung am Gerät durchführt Bewahren Sie diese Bedienungsanleitung auf und geben Sie diese mit dem Gerät an Nachbesitzer weiter Haftungsbeschränkung Alle in di...

Страница 4: ...en von Personen zu vermeiden WARNUNG Ein Warnhinweis dieser Gefahrenstufe kennzeichnet eine mög liche gefährliche Situation Falls die gefährliche Situation nicht vermieden wird kann dies zu Verletzungen führen Die Anweisungen in diesem Warnhinweis befolgen um Verlet zungen von Personen zu vermeiden ACHTUNG Ein solcher Warnhinweis kennzeichnet einen möglichen Sach schaden Falls die Situation nicht ...

Страница 5: ...ows und das Windows Logo sind Marken der Microsoft Corporation Alle anderen Produkt und Firmennamen sind Marken der jeweiligen Inhaber Bestimmungsgemäße Verwendung Dieses Gerät ist als Basisstation zum Aufbau eines kabellosen Netz werks sowie zur gemeinsamen Internetnutzung in geschlossenen Räumen bestimmt Eine andere oder darüber hinausgehende Benutzung gilt als nicht bestimmungsgemäß WARNUNG Gef...

Страница 6: ... der Anschlussstecker beschädigt sind Öffnen Sie auf keinen Fall das Gehäuse des Gerätes Werden spannungsführende Anschlüsse berührt und der elektrische und mechanische Aufbau verändert besteht Stromschlaggefahr Grundlegende Sicherheitshinweise Beachten Sie für einen sicheren Umgang mit dem Gerät die folgen den Sicherheitshinweise Kontrollieren Sie das Gerät vor der Verwendung auf äußere sichtbare...

Страница 7: ...ährleistet dass sie die Sicherheitsanforderungen erfüllen werden Schützen Sie das Gerät vor Feuchtigkeit und dem Eindringen von Flüssigkeiten Bei Kontakt mit Flüssigkeit sofort das Gerät von der Stromversorgung trennen Betreiben Sie das Gerät nicht in extrem staubiger Umgebung oder in der Nähe von Wärmequellen Betreiben Sie das Gerät nur mit aufgeschraubten WLAN Anten nen Reinigen Sie das Gehäuse ...

Страница 8: ...Nacht Ka belgebundene LAN Schnittstellen sind nicht betroffen 3 Reset WPS Die Reset WPS Taste hat zwei Funktionen Durch langes Drücken 10 Sekunden wird das Gerät auf die werksseitigen Voreinstellungen zurückgesetzt Durch kurzes Drücken können Geräte einem bestehen den Netzwerk hinzugefügt werden 4 LAN Buchsen 1 4 Zum Anschluss von Endgeräten wie PC oder Notebook per LAN Kabel 5 WAN Port Zum Anschl...

Страница 9: ...LAN Blinkt Wireless LAN ist aktiviert es werden Daten gesendet Aus Wireless LAN ist deaktiviert 9 WAN Leuchtet Der WAN Port hat eine korrekte Netz werkverbindung hergestellt Blinkt Datentransfer über WAN Port Aus Keine Verbindung 10 LAN 1 4 Leuchtet Der entsprechende LAN Port hat eine korrekte Netzwerkverbindung herge stellt Blinkt Datentransfer über jeweiligen LAN Port Aus Keine Verbindung 8 9 10...

Страница 10: ...chen Anschluss des Gerätes um Personen und Sachschäden zu vermeiden Auspacken Entnehmen Sie alle Teile des Gerätes und die Bedienungsanlei tung aus dem Karton Entfernen Sie vor dem Erstgebrauch alle Verpackungsmateriali en vom Gerät Lieferumfang und Transportinspektion Das Gerät wird standardmäßig mit folgenden Komponenten geliefert Breitbandrouter 2 WLAN Antennen Steckernetzteil Netzwerkkabel zur...

Страница 11: ...Sie die Schraubanschlüsse der WLAN Antennen auf den Antennenanschlüsse an der Rückseite des Gerätes auf HINWEIS Den Schraubanschluss der WLAN Antenne beim Aufsetzen nicht verkanten Das Gewinde könnte beschädigt werden Nach ca 4 Umdrehungen ist die WLAN Antenne ganz aufgeschraubt Klappen Sie die WLAN Antennen um 90 und richten Sie die Antenne durch Drehen im Uhrzeigersinn nach oben aus Vorrausetzun...

Страница 12: ...wechsel Abhilfe schaffen Setzen Sie das Gerät keiner direkten Sonneneinstrahlung aus Die Steckdose muss leicht zugänglich sein so dass das Stecker netzteil notfalls schnell aus der Steckdose gezogen werden kann Anschluss der LAN Kabel Schließen Sie die Computer und andere Netzwerkgeräte wie zum Beispiel Hub Switch an die LAN Buchsen 1 4 an Verwen den Sie hierzu das mitgelieferte Netzwerkkabel Der ...

Страница 13: ...nschlusskabel vor heißen Oberflächen und scharfen Kanten Achten Sie darauf dass das Anschlusskabel nicht straff gespannt oder geknickt wird Lassen Sie das Anschlusskabel nicht über Ecken hängen Stol perdrahteffekt Wenn Sie das Gerät für längere Zeit nicht nutzen trennen Sie das Steckernetzteil von der Stromversorgung Steckernetzteil anschließen Schließen Sie den Anschlussstecker des Steckernetztei...

Страница 14: ... 1 und ein aktivierter DHCP Server vorkonfiguriert Dadurch erhalten die ange schlossenen PCs automatisch passende Adressen und weitere Ein stellungen Es ist empfehlenswert diese Einstellung beizubehalten Um die Einstellungen an ihrem PC zu überprüfen gehen Sie wie folgt vor Wählen Sie Start Systemsteuerung Netzwerkverbindungen Wählen Sie die Netzwerkverbindung Ihres LAN aus ...

Страница 15: ... Sie Eigenschaften Wählen Sie Internetprotokoll TCP IP und klicken Sie auf Eigenschaften Wählen Sie IP Adresse automatisch beziehen und DNS Ser veradresse automatisch beziehen Bestätigen Sie anschließend mit OK und im folgenden Fenster ebenfalls mit OK Ihr PC ist nun so konfiguriert dass er seine IP Adresse automatisch vom Router bezieht ...

Страница 16: ...h der Installation des Gerätes in Ihrem LAN hoch Falls Ihr PC bereits eingeschaltet ist führen Sie einen Neustart durch Starten Sie Ihren Webbrowser Geben Sie in die Adresszeile http 192 168 2 1 ein Anmeldung Nach dem Aufruf der Konfigurationsoberfläche des Gerätes erscheint im Webbrowser zunächst das Anmeldefenster Geben Sie in das Feld Benutzername admin ein Geben Sie in das Feld Passwort 1234 e...

Страница 17: ...Anmeldung wird die Konfigurationsoberfläche Startseite des Gerätes angezeigt Menüsprache wählen Wählen Sie auf der Startseite oben rechts zwischen den Spra chen Deutsch Englisch und Französisch Die Sprache wird sofort umgestellt und kann jederzeit wieder geändert werden ...

Страница 18: ...die Schaltfläche Weiter um fortzufahren WAN Typ Wählen Sie einen WAN Verbindungstyp Typ Details Kabelmodem Ihre IP Adresse wird Ihnen automatisch beim Verbindungsaufbau zu Ihrem ISP Internet Service Provider zugeordnet Statische IP DSL Ihr ISP weist Ihnen eine permanente IP Adresse zu PPPoE DSL Verbindungsaufbau zum ISP nur nach Bedarf Die IP Adresse wird normalerwei se automatisch zugewiesen Ihr ...

Страница 19: ...arf Die IP Adresse wird automatisch zugewiesen Big Pond weist Ihnen ein Passwort und einen Benutzernamen zu Nur Australien IP Adressen Info In der folgenden Ansicht müssen Sie die Zugangsdaten für Ihren Pro vider eingeben Diese Informationen erhalten Sie entweder aus Ihren Unterlagen oder direkt vom Provider Auf Grund der weiten Verbrei tung von DSL über PPPoE bezieht sich die weitere Beschreibung...

Страница 20: ...imal zu übertragende Paketgröße an Es sind Werte zwischen 512 und 1492 möglich Sollten Sie sich bei dieser Einstellung nicht sicher sein belassen Sie den standardmäßig eingestellten Wert Verbindungstyp Wählen Sie hier das Einwahlverhalten Ihres Gerätes aus Sie haben die Wahl zwischen Permanent Das Gerät ist immer mit dem Internet verbunden Dieser Verbin dungstyp ist zu empfehlen wenn Sie z B eine ...

Страница 21: ...nen HINWEIS Bei Volumen bzw Zeittarifen ist es empfehlenswert Verbin dung bei Bedarf auszuwählen damit der Internetzugang auto matisch nach der eingestellten Leerlaufzeit getrennt wird Bei permanenter Verbindung können ansonsten hohe Verbindungs kosten entstehen Beachten Sie aber auch dass das Schließen des Browsers nicht zwingend die Abwahl aus dem Internet bedeutet Sehr viele Programme senden An...

Страница 22: ...nü links LAN IP Eingabefeld Bemerkungen IP Adresse Das Gerät ist auf die IP Adresse 192 168 2 1 voreingestellt Möchten Sie eine andere Adresse verwenden geben Sie hier eine andere IP Adresse ein Subnetzmaske Geben Sie hier die Subnetzmaske ein In der Regel wird hier der Wert 255 255 255 0 eingegeben DHCP Server Wählen Sie Aktiviert wenn die IP Adressen in Ihrem Netzwerk von einem DHCP Server verwa...

Страница 23: ...r bestimmten MAC Adresse eine IP Adresse aus dem gültigen Bereich fest zu zuordnen Meldet sich der Client am Gerät an bekommt er immer diese IP Adresse zuge wiesen Gehen Sie dafür wie folgt vor Aktivieren Sie Statische DHCP Leases Tragen Sie in die Tabelle die MAC Adress und die IP Adresse ein Klicken Sie auf die Schaltfläche Hinzufügen um den Eintrag in der Tabelle zu speichern oder löschen um de...

Страница 24: ...cess Point in Ihrem Netzwerk ist oder keine Verbindung auf Bridge Ebene zu andernen Access Points hergestellt werden soll AP Bridge Punkt zu Punkt Wenn Sie diesen Access Point mit einem zweitem Access Point drahtlos verbinden möchten Clients haben in diesem Modus nicht die Möglichkeit sich über eine drahtlo se Verbindung anzumelden AP Bridge Punkt zu Multi Punkt Wenn Sie diesen Access Point mit me...

Страница 25: ...ewiesene Clients Schalten Sie das Kontrollfeld Zeige aktive Clients ein um alle Client Computer anzu zeigen die an Ihrem Access Point angemel det sind Klicken Sie auf die Schaltfläche Anwenden um die Einstellun gen zu übernehmen Um die Verschlüsselung für Ihr Wireless LAN einzustellen Klicken Sie in der nächsten Ansicht auf die Schaltfläche Fortset zen Wählen Sie Sicherheitseinstellungen im Menü l...

Страница 26: ...nts ein zu dem die Bridge Verbindung aufgebaut werden soll Sicherheitseinstel lungen Klicken Sie auf diese Schaltfläche um die Verschlüsselung für Ihr Wireless LAN einzu stellen Die Anleitung zur Einstellung der Wireless LAN Verschlüsselung finden Sie im Kapi tel Einstellung der Verschlüsselung für Bridge Point to Point Bridge Point to Multi Point und Bridge WDS Klicken Sie in der nächsten Ansicht...

Страница 27: ...werden sollen Es stehen 13 Kanäle zur Verfügung Mac Adresse 1 4 Geben Sie hier die Adressen der Access Points ein zu dem die Bridge Verbindung aufgebaut werden soll Sicherheitseinstel lungen Klicken Sie auf diese Schaltfläche um die Verschlüsselung für Ihr Wireless LAN einzu stellen Die Anleitung zur Einstellung der Wireless LAN Verschlüsselung finden Sie im Kapi tel Einstellung der Verschlüsselun...

Страница 28: ... im 2 4 Ghz Band nach Standard 802 11b 11 Mbps 802 11g 54 Mbps oder kombiniert mit 802 11b und 802 11g arbeitet SSID Geben Sie hier den Namen des Wireless LAN ein Die Länge der SSID kann bis zu 32 Zeichen betragen und muss für alle Geräte im Netzwerk identisch sein Beispiel WLAN_Router_54Mbps Kanalnummer Wählen Sie hier den Kanal in dem die Daten übertragen werden sollen Es stehen 13 Kanäle zur Ve...

Страница 29: ...ireless LAN zur Verfügung Einstellung der Wireless LAN Verschlüsselung Folgende Begriffe sind zu unterscheiden Authentifizierung Ist ein Vorgang bei dem die Identität zum Beispiel einer Person an Hand eines bestimmten Merkmals festgestellt wird Dies kann zum Beispiel mit einem Fingerabdruck einem Passwort oder einem anderen Berechtigungsnachweis geschehen Verschlüsselung Ist ein Vorgang bei dem ei...

Страница 30: ...manipuliert werden können Wir empfehlen daher dringend WEP zu meiden und ausschließlich mit dem sicheren WPA Verfahren zu verschlüsseln Einstellung der Verschlüsselung für AP Gehen Sie wie folgt vor Klicken Sie auf der Startseite auf die Schaltfläche Einrichtung und wählen Sie dann Wireless im Menü links Wählen Sie unter Basiseinstellungen den Modus AP aus Wählen Sie anschließend Sicherheitseinste...

Страница 31: ...den Sie voreinstellen möchten Verschlüsselungs wort 1 4 Geben Sie hier Ihre beliebigen Schlüssel mit der erforderlichen Länge ein Beispiele 64 bit Hex 10 Zeichen 231074a6ef 64 bit ASCII 5 Zeichen j31n 128 bit Hex 26 Zeichen 231074a6b9773ce43f91a5bef3 128 bit ASCII 13 Zeichen urlaub2006 0 HINWEIS Achten Sie bei der Eingabe des Schlüssels auf korrekte Groß und Kleinschreibung Klicken Sie in der näch...

Страница 32: ...iebigen Zeichen wobei Buchstaben A Z Zahlen und Satzzeichen erlaubt sind Hex für einen Schlüssel mit einer Län ge von 64 Zeichen wobei nur Zeichen von 0 9 und a f verwendet werden dürfen Pre Shared Key Geben Sie hier Ihren beliebigen Schlüssel mit der erforderlichen Länge ein HINWEIS Achten Sie bei der Eingabe des Schlüssels auf korrekte Groß und Kleinschreibung Klicken Sie auf die Schaltfläche An...

Страница 33: ...go rithmus WPA2 mit AES Verschlüsselungsalgo rithmus WPA Mixed Modus RADIUS Server IP Adresse Geben Sie hier die IP Adresse des RADIUS Servers ein RADIUS Server Port Der RADIUS Server Port ist auf 1812 voreingestellt RADIUS Server Passwort Geben Sie hier das Passwort für den RADIUS Server ein HINWEIS Achten Sie bei der Eingabe des Schlüssels auf korrekte Groß und Kleinschreibung ...

Страница 34: ...kt oder AP Bridge WDS aus Wählen Sie anschließend Sicherheitseinstellungen im Menü links HINWEIS Für diese Betriebsarten können Sie die Einstellung der Verschlüsselung auch am Ende der jeweiligen Betriebsart Einstellungen durch Klick auf die Schaltfläche Sicherheits einstellungen vornehmen Für WDS muss die Verschlüsselung vorher im Menü links unter Wireless Sicherheitseinstellungen eingestellt wer...

Страница 35: ...n Sie den Schlüssel den Sie voreinstellen möchten Verschlüsselungs wort 1 4 Geben Sie hier Ihre beliebigen Schlüssel mit der erforderlichen Länge ein Beispiele 64 bit Hex 10 Zeichen 231074a6ef 64 bit ASCII 5 Zeichen j31n 128 bit Hex 26 Zeichen 231074a6b9773ce43f91a5bef3 128 bit ASCII 13 Zeichen urlaub2006 0 HINWEIS Achten Sie bei der Eingabe des Schlüssels auf korrekte Groß und Kleinschreibung Kli...

Страница 36: ...ei Buchstaben A Z Zahlen und Satzzeichen erlaubt sind Hex für einen Schlüssel mit einer Län ge von 64 Zeichen wobei nur Zeichen von 0 9 und a f verwendet werden dürfen Pre Shared Key Geben Sie hier Ihren beliebigen Schlüssel mit der erforderlichen Länge ein HINWEIS Achten Sie bei der Eingabe des Schlüssels auf korrekte Groß und Kleinschreibung Klicken Sie in der nächsten Ansicht auf die Schaltfläc...

Страница 37: ...Taste 3 Drücken Sie innerhalb von 2 Minuten im Konfigurationspro gramm des WLAN Adapters die Schaltfläche PBC auf der Registerkarte WPS Konfiguration mit Pincode Notieren Sie sich den Pincode der im Konfigurationsprogramm des WLAN Adapters angezeigt wird Wählen Sie das Zielnetzwerk in der oberen Liste und klicken Sie anschließend auf die Schaltfläche PIN Wechseln Sie zur Benutzeroberfläche des Ger...

Страница 38: ...em und anschließend Passwort Konfiguration im Menü links Eingabefeld Bemerkungen Derzeitiges Passwort Geben Sie hier das derzeitige Passwort ein Das standardmäßige Passwort ist auf 1234 gesetzt Neues Passwort Geben Sie hier ein beliebiges neues Pass wort ein Passwort bestätigen Geben Sie hier zur Bestätigung das neue Passwort noch einmal ein Klicken Sie auf die Schaltfläche Anwenden und in der fol...

Страница 39: ...ü links Klicken Sie auf die Schaltfläche Speichern Wählen Sie den Zielordner aus Legen Sie einen Dateinamen fest der es ermöglicht die Datei eindeutig zu identifizieren Klicken Sie auf die Schaltfläche Speichern um die Einstellun gen zu sichern Möchten Sie zu einem späteren Zeitpunkt die gesicherten Einstellun gen wiederherstellen Klicken Sie auf die Schaltfläche Durchsuchen und wählen danach die ...

Страница 40: ...wareaktualisierung nicht unbrauchbar zu machen Stellen Sie sicher dass die Firmwaredateien zum Gerät passen Wenden Sie sich bei Unklarheit an die Hama Produktberatung Stellen Sie vor Beginn der Aktualisierung eine Verbindung über Netzwerkkabel mit dem Gerät her wenn die Gefahr besteht dass die WLAN Verbindung während der Datenübertragung verloren gehen kann Während der Aktualisierung darf das Gerä...

Страница 41: ...e werkseitigen Voreinstellungen wiederherstellen wodurch der Benutzername wieder auf admin das Kennwort auf 1234 und die IP Adresse wieder auf 192168 2 1 zurückgesetzt werden HINWEIS Bei diesem Verfahren werden alle aktuellen Konfigurationsein stellungen gelöscht und die werkseitigen Einstellungen wieder hergestellt Gehen Sie wie folgt vor Drücken Sie die Reset WPS Taste 3 auf der Rückseite des Ge...

Страница 42: ...htet nicht Steckernetzteil nicht korrekt ange schlossen Stellen Sie sicher dass das Steckernetzteil in der Steckdose steckt und richtig am Gerät ange schlossen ist Steckdose liefert keine Spannung Überprüfen Sie die Haus sicherungen Gerät defekt Benachrichtigen Sie den Kundendienst Es kann keine Verbindung mit dem Gerät herge stellt werden um es zu konfigurie ren LAN Kabel nicht korrekt ange schlo...

Страница 43: ... Geschwindig keit der WLAN Verbindung ist sehr langsam Standort des Gerä tes ist ungünstig Verändern Sie den Standort und die Ausrich tung des Gerätes WLAN Kanal ist ungünstig Wechseln Sie den Kanal bei Störungen Hochfrequenz strahlung stört Schirmen Sie Geräte die durch Hochfrequenz strahlung stören ab oder stellen Sie sie woanders auf Passwort verges sen Führen Sie einen Reset durch Siehe Kapite...

Страница 44: ...mail produktberatung hama de Entsorgungshinweise ACHTUNG Werfen Sie das Gerät keinesfalls in den normalen Hausmüll Beachten Sie die Entsorgungshinweise im Anhang der Anlei tung Hinweise zur EG Konformitätserklärung Hiermit erklärt Hama GmbH Co KG dass sich dieses Gerät in Übereinstimmung mit den grundlegenden Anforderungen und den übrigen einschlägigen Bestimmungen der Richtlinie 1999 5 EG befindet...

Страница 45: ...1g 54 Mbps IEEE802 11b 11 Mbps WiFi Verschlüsselung WPA2 WPA WEP 64 128 Bit LAN Netzwerkanschluss 4 Port 10 100 Mbps Switch RJ 45 Kat 5 Abmessungen Gewicht Abmessungen ohne Antennen L x T x H 198 x 109 x 25 mm Gewicht inkl Netzteil u Antennen ca 413 g Elektrische Anschlusswerte Stromversorgung 12 VDC 1 0 A max Umgebungsbedingungen Arbeitstemperaturbereich 0 40 C rel Luftfeuchte Betrieb 20 85 nicht...

Страница 46: ...f the WAN cable 56 Electrical connection 57 Connecting the mains adapter 57 Checking the installation 57 Configuration and operation 58 PC configuration 58 Configuring the IP address 58 Configuration of the device 60 Starting the configuration interface 60 Login 60 Configuration of the Internet connection 62 LAN settings 66 Wireless LAN settings 68 Setting of the wireless LAN encryption 73 Automat...

Страница 47: ...e intended use safety connection and operation of the device The instruction manual must be kept near the device at all times Its contents must be read and observed by all persons using the device or remedying faults in the device Keep this instruction manual in a safe place and pass it on with the device to any future owners Liability disclaimer All technical information data and instructions on ...

Страница 48: ...f serious injury or even death WARNING A warning of this category draws attention to a potentially dangerous situation If the dangerous situation is not avoided it may lead to injuries Follow the instructions in this warning to avoid the risk of injury CAUTION A warning of this category indicates potential material dam age If the situation is not avoided it may lead to material damage Follow the i...

Страница 49: ...he Windows logo are trademarks of Microsoft Corpo ration All other product and company names are trademarks of their respective owners Intended use This device is intended as a base station for establishing a wireless network and for joint Internet access in closed rooms Use in any other or further way is not considered an intended use WARNING Danger from use for other than the intended purpose If...

Страница 50: ...er cable or plug is damaged On no account should the housing of the device be opened Electric shock hazard if live connections are touched and or the electrical and mechanical configuration is changed Fundamental safety precautions Observe the following safety precautions to ensure safe handling of the device Inspect the device for visible signs of damage before use Do not use a damaged device Do ...

Страница 51: ...the safety requirements are met Protect the device against moisture and penetration by liquids If the device comes into contact with liquids disconnect it from the power supply immediately Do not operate the device in extremely dusty environments or in the vicinity of heat sources Operate the device only with the WLAN antennae screwed on Clean the housing of the device with a slightly damp cloth D...

Страница 52: ... off the WLAN function e g over night Cable bound LAN interfaces are not affected 3 Reset WPS The Reset WPS button has two functions Holding the button depressed 10 seconds resets the device to the works default settings Pressing briefly allows devices to be added to an existing network 4 LAN jacks 1 4 For connection of devices such as PC or notebook via LAN cable 5 WAN port For connection to a br...

Страница 53: ...ashing Wireless LAN is activated data are be ing transmitted Off Wireless LAN is deactivated 9 WAN Lit The WAN port has established a correct network connection Flashing Data transfer via WAN port Off No connection 10 LAN 1 4 Lit The corresponding LAN port has estab lished a correct network connection Flashing Data transfer via respective LAN port Off No connection 8 9 10 7 ...

Страница 54: ...onnection of the appliance to avoid personal injury and material damage Unpacking Remove all parts of the device and the instruction manual from the box Remove all packing materials from the device before using for the first time Scope of supply and transport inspection The device is supplied as standard with the following components Broadband router 2 WLAN antennae Mains adapter Network cable for...

Страница 55: ...o install the WLAN antennae Screw the screw connectors of the WLAN antennae onto the antenna terminals on the rear side of the device NOTE Do not tilt the WLAN antenna when fitting it to the screw connection The thread could be damaged The WLAN antenna is completely screwed in after 4 com plete turns Push the WLAN antennae 90 to an upright position and align by turning them clockwise Preconditions...

Страница 56: ...this is not possible a change of channel can also remedy the problem Do not expose the device to direct sunlight The mains socket must be easily accessible so that the mains adapter can be quickly unplugged in the event of an emergency Connection of the LAN cables Connect the computer and other network devices such as hub switch to the LAN jacks 1 4 using the network cable supplied The integral sw...

Страница 57: ... the adapter cable from hot surfaces and sharp edges Make sure that the adapter cable is not too taut or kinked Do not allow the adapter cable to hang over edges trip wire ef fect If the device is not to be used for a longer period of time discon nect the mains adapter from the mains supply Connecting the mains adapter Connect the plug of the mains adapter to the 12 VDC jack 6 of the device Insert...

Страница 58: ...an activated DHCP server are preconfigured for the device as standard This ensures that the in terfaced PCs are automatically assigned appropriate addresses and further settings We recommend that this setting is retained Proceed as follows to check the settings on your PC Select Start Control panel Network connections Select your LAN network connection ...

Страница 59: ...n and select Properties Select Internet protocol TCP IP and click Properties Select Automatic retrieval of IP address and Automatic re trieval of DNS server address Then confirm with OK and confirm again in the following win dow with OK Your PC is now configured to retrieve its IP address automatically from the router ...

Страница 60: ... as follows Boot your PC after installing the device in your LAN If your PC is already switched on carry out a restart Start your web browser Enter http 192 168 2 1 in the address line Login After calling up the configuration interface of the device the login window first appears in the web browser Enter admin in the field User name Enter 1234 in the field Password After the input click OK to log ...

Страница 61: ...essful login the configuration interface home of the device is displayed Selecting the menu language Select the language German English or French in the top right hand corner of the home page The language is immediately set up and can be changed again at any time ...

Страница 62: ... the button Next to proceed WAN type Select a WAN connection type Type Details Cable modem Your IP address is assigned automatically on establishment of the connection to your ISP Internet Service Provider Fixed IP DSL Your ISP assigns you a fixed IP address PPPoE DSL Connection to the ISP only when required The IP address is normally assigned automatically Your ISP assigns you a password and a us...

Страница 63: ...ly when required The IP address is assigned automatically Big Pond assigns you a password and a user name Australia only IP address info In the next mask enter the access data for your Internet provider This information can be either found in your documentation or obtained directly from the provider In view of the widespread use of DSL over PPPoE the rest of this description relates to this type o...

Страница 64: ...smission Unit Enter here the maximum package size to be transmitted Values between 512 and 1492 are possible Should you not be sure about this setting leave the standard default value Connection type Select here the dialling behaviour of your device You have the choice between Permanent The device is always con nected to the Internet This connection type is recommend if you have e g a flatrate wit...

Страница 65: ...e tariffs we recommend selecting Connec tion on demand so that the Internet connection is automatically disconnected after the set idle time With a permanent con nection high connection costs can otherwise be incurred Note also however that closing the browser does not necessar ily mean disconnection from the Internet A very large number of programs send requests to the Internet or receive data fr...

Страница 66: ...n the menu on the left LAN IP Input field Comments IP address The default IP address of the device is 192 168 2 1 If you wish to use a different address enter another IP address here Subnet mask Enter the subnet mask here Normally you should enter 255 255 255 0 here DHCP server Select Activated if the IP addresses in your network are managed by a DHCP server Select Deactivated if the IP addresses ...

Страница 67: ... table Here you have the possibility of assigning a fixed IP address from the valid range to a given MAC address If the client then logs in to the device he is always assigned this IP address Proceed as follows Activate Static DHCP leases In the table enter the MAC address and the IP address Click the button Add to save the input to the table or Clear to clear the input Saving settings Confirm you...

Страница 68: ... or no connection is to be made to other access points at bridge level AP bridge point to point If you wish to make a wireless connection between this access point and a second access point In this mode clients do not have the possibility to log in via a wireless connection AP bridge point to multi point If you wish to make a wireless connection between this access point and several other access p...

Страница 69: ... via which the data are to be transmitted 13 channels are avail able Associated clients Activate the checkbox Show active clients to display all client computers logged in to your access point Click the button Apply to save the settings To set the encryption for your wireless LAN In the next mask click the button Continue Select Security settings in the menu on the left The instructions for settin...

Страница 70: ...dress 1 Enter here the address of the access point to which the Bridge connection is to be made Security settings Click this button to set the encryption for your wireless LAN The instructions for setting the wireless LAN encryption can be found in chapter Set ting of the encryption for bridge point to point bridge point to multi point and bridge WDS In the next mask click the button Apply and in ...

Страница 71: ...el number Select here the channel via which the data are to be transmitted 13 channels are avail able Mac address 1 4 Enter here the address of the access points to which the bridge connection is to be established Security settings Click this button to set the encryption for your wireless LAN The instructions for setting the wireless LAN encryption can be found in chapter Set ting of the encryptio...

Страница 72: ...e device operates in the 2 4 Ghz band to standard 802 11b 11 Mbps 802 11g 54 Mbps or combined with 802 11b and 802 11g SSID Enter the name of the wireless LAN here The length of the SSID can be up to 32 char acters and must be identical for all devices in the network Example WLAN_Router_54Mbps Channel number Select here the channel via which the data are to be transmitted 13 channels are avail abl...

Страница 73: ... immediately available Setting of the wireless LAN encryption A distinction must be made between the following terms Authentication Is a process during which the identity for example of a person is determined by means of a particular feature This can be for example by means of a finger print a password or some other proof of authorisation Encryption Is a process during which a plaint text is trans...

Страница 74: ...nd manipulated by unauthorised third parties We therefore urgently recommend that WEP is avoided and that only the secure WPA method is used for encryption Setting of the AP encryption Proceed as follows On the home page click the button General Setup and then select Wireless in the menu on the left Under basic settings select AP mode Then select Security settings in the menu on the left The follo...

Страница 75: ...ou wish to set as default Encryption key 1 4 Enter here your selected code with the req uisite length Examples 64 bit hex 10 characters 231074a6ef 64 bit ASCII 5 characters j31n 128 bit hex 26 characters 231074a6b9773ce43f91a5bef3 128 bit ASCII 13 characters holiday2006 NOTE Pay attention to the correct capitalisation when entering the code In the next mask click the button Apply and in the follow...

Страница 76: ... 8 and max 63 random char acters whereby letters A Z numbers and punctuation marks are permitted Hex for a code with a length of 64 char acters whereby only characters from 0 9 and a f may be used Pre shared key Enter here your random code with the requi site length NOTE Pay attention to the correct capitalisation when entering the code Click the button Apply and in the following mask also Apply t...

Страница 77: ...th TKIP encryption algorithm WPA2 with AES encryption algorithm WPA mixed mode RADIUS Server IP address Enter here the RADIUS Servers IP address RADIUS Server port The RADIUS Server port is preset to 1812 RADIUS Server password Enter here the password for the RADIUS Server NOTE Pay attention to the correct capitalisation when entering the code ...

Страница 78: ...dge point to multi point or AP bridge WDS Then select Security settings in the menu on the left NOTE For these operating modes you can carry out the setting of the encryption at the end of the respective operating mode settings by clicking the button Security settings For WDS the encryption must be set beforehand in the menu on the left under Wireless Security settings The following encryption met...

Страница 79: ...he code you wish to set as default Encryption key1 4 Enter here your selected code with the req uisite length Examples 64 bit hex 10 characters 231074a6ef 64 bit ASCII 5 characters j31n 128 bit hex 26 characters 231074a6b9773ce43f91a5bef3 128 bit ASCII 13 characters holiday2006 NOTE Pay attention to the correct capitalisation when entering the code Click the button Apply and in the following mask ...

Страница 80: ...ndom char acters whereby letters A Z numbers and punctuation marks are permitted Hex for a code with a length of 64 char acters whereby only characters from 0 9 and a f may be used Pre shared key Enter here your random code with the requi site length NOTE Pay attention to the correct capitalisation when entering the code In the next mask click the button Apply and in the following mask also Apply ...

Страница 81: ...iguration with button Press the Reset WPS button 3 on the device Within 2 minutes click button PBC under tab WPS in the configuration program of the WLAN adapter Configuration with pin code Note the pin code displayed in the configuration program of the WLAN adapter Select the target network in the upper list and then click button PIN Switch to the user interface of the device and select Setup Wir...

Страница 82: ... Setup and then select System followed by Password Settings in the menu on the left Input field Comments Current password Enter the current password here The stand ard password is set to 1234 New password Enter a random new password here Confirm password Enter the new password again as confirma tion Click the button Apply and in the following mask also Apply to save the settings After the restart ...

Страница 83: ...on figuration tools in the menu on the left Click the button Save Select the target directory Choose a file name that allows the file to be unambiguously iden tified Click the button Save to save the settings If you wish to restore the saved settings at a later date Click the button Search and then select the desired configura tion file Click the button Upload to upload the file The device now tak...

Страница 84: ...ice unserviceable during a firmware update Ensure that the firmware file matches the device If in doubt consult the Hama product support Before beginning a firmware update establish a connection to the device via a network cable if there is danger of loss of the WLAN connection during the data transmission The device must not be disconnected from the mains supply during updating Check the file det...

Страница 85: ...ings You can restore the works default settings so that the user name is reset to admin the password to 1234 and the IP address to 192168 2 1 NOTE With this method all current configuration settings are deleted and the works default settings are restored Proceed as follows Hold the Reset WPS button 3 on the rear side of the device de pressed for 10 seconds until the POWER LED 7 starts to flash The...

Страница 86: ...ause Remedy Power LED 7 does not come on Mains adapter not connected cor rectly Make sure the mains adapter is plugged into the mains socket and correctly connected to the device No voltage from the mains socket Check the fuses Device is defective Contact after sales service No connection can be made to the device for configuration LAN cable not con nected correctly Check that the RJ45 network cab...

Страница 87: ... of the WLAN connection is very slow Unfavourable loca tion for the device Change the location and direction of the device Unfavourable WLAN channel Change to another channel in the event of interference High frequency radiation interfer ence Screen the devices caus ing the high frequency radiation interference of locate them elsewhere Forgotten pass word Carry out a reset See chapter Restoring wo...

Страница 88: ... 502 272 E mail produktberatung hama de Notes on disposal CAUTION Do not dispose of the device as normal household waste Observe the disposal instructions in the instruction manual appendix Notes on EC Declaration of Conformity Hama GmbH Co KG hereby declares that this device is in compli ance with the basic requirements and other relevant regulations of the 1999 5 EC guideline You will find the d...

Страница 89: ...E802 11g 54 Mbps IEEE802 11b 11 Mbps WiFi Encryption WPA2 WPA WEP 64 128 Bit LAN Network connection 4 port 10 100 Mbps switch RJ 45 Cat 5 Dimensions weight Dimensions without antennae L x D x H 198 x 109 x 25 mm Weight incl power pack and anten nae approx 413 g Electrical ratings Power supply 12 VDC 1 0 A max Environmental conditions Operating temperature range 40 C Relative humidity operation 85 ...

Страница 90: ...u câble WAN 100 Branchement électrique 101 Brancher le bloc secteur 101 Contrôle de l installation 101 Configuration et utilisation 102 Configuration PC 102 Configurer l adresse IP 102 Configuration de l appareil 104 Démarrer l interface de cconfiguration 104 Connexion 104 Configuration de la connexion Internet 106 Paramètres LAN 110 Réglages des réseaux sans fil WLAN 112 Réglage du chiffrement po...

Страница 91: ...hement et la manipulation de l appareil La notice d utilisation doit toujours être disponible à proximité de l ap pareil Elle doit être lue et appliquée par chaque personne utilisant cet appareil ou procédant à des réparations de l appareil Conservez cette notice d utilisation et remettez la avec l appareil à son propriétaire ultérieur Limitation de la responsabilité Toutes les informations techni...

Страница 92: ... personnes AVERTISSEMENT Un avertissement de ce type désigne une situation dangereuse possible Si la situation dangereuse ne peut pas être évitée ceci peut entraî ner des blessures Respectez les instructions de cet avertissement afin d éviter tou tes blessures de personnes ATTENTION Un tel avertissement désigne un dommage matériel possible Si la situation ne peut pas être évitée ceci peut entraîne...

Страница 93: ...ment par la société Hama GmbH Microsoft Windows et le logo Windows sont des marques du groupe Microsoft Utilisation conforme Cet appareil est destiné comme poste de base pour la formation d un réseau sans fil ainsi qu à une utilisation commune de l Internet dans des locaux fermés Toute utilisation autre que celle décrite ci avant ou dépassant ce cadre est considérée comme non conforme AVERTISSEMEN...

Страница 94: ...s tension et si vous modifiez le montage électrique et mécanique il y a risque d électrocution Consignes de sécurité fondamentales Pour manier l appareil de manière sûre veuillez respecter les consi gnes de sécurité suivantes Avant d utiliser l appareil veuillez le contrôler pour vérifier qu il ne présente aucun dommage apparent Ne mettez pas en service un appareil endommagé Ne laissez pas les enf...

Страница 95: ... En cas de contact avec des liquides débranchez immédiatement l appareil de l alimentation en tension N opérez l appareil jamais dans un environnement très poussié rieux ou à proximité de sources de chaleur N exploitez l appareil qu avec les antennes WLAN visées dessus Nettoyez le boîtier de l appareil avec un chiffon légèrement humide N utilisez pas de produits nettoyants récurrents ni de solvant...

Страница 96: ...nt la nuit Les inter faces LAN reliés par câbles n en sont pas concernés 3 Reset WPS La touche Reset WPS a deux fonctions En appuyant longtemps 10 secondes sur cette touche l appareil est réinitialisé aux réglages par défaut En appuyant brièvement sur cette touche on peut ajouté des appareils au réseau existant 4 Ports LAN 1 4 Pour la connexion de terminaux comme p ex des ordinateurs ou notebooks ...

Страница 97: ...eau local sans filest activé des données sont en train d être envoyées Eteinte Le réseau local sans filest désactivé 9 WAN Allumée Le port WAN a établi une connexion réseau correcte Clignote Transfert de données via le port WAN Eteinte Pas de connexion 10 LAN 1 4 Allumée Le port LAN correspondant a établi une connexion réseau correcte Clignote Transfert de données via le port LAN correspondant Ete...

Страница 98: ...lectrique de l appareil afin d éviter tous risques de dommages corporels et matériels Déballage Sortez du carton toutes les pièces de l appareil et la notice d utili sation Avant la première utilisation retirez tout l emballage de l appareil Etendue de la livraison et inspection suite au transport En version standard l appareil est livré avec les composants suivants Routeur large bande 2 antennes ...

Страница 99: ...me suit Vissez les raccords à vis des antennes WLAN sur les raccords d antenne sur la face arrière de l appareil INDICATION Ne pas bloquer le raccord fileté de l antenne WLAN Le filetage pourrait être endommagé Après environ 4 tours l antenne WLAN est entièrement vissée Basculez l antenne WLAN de 90 et dirigez la vers le haut en tournant dans le sens des aiguilles d une montre Conditions requises ...

Страница 100: ...sible essayez d y remédier par un chan gement de canal N exposez pas l appareil à l ensoleillement direct La prise doit être facilement accessible de manière à pouvoir dé brancher rapidement le bloc secteur en cas d urgence Branchement des câbles LAN Connectez les ordinateurs et les autres appareils de réseau tels que concentrateur commutateur aux ports 1 à 4 A cet effet utilisez le câble résau co...

Страница 101: ...ntiques Protégez le câble de raccordement des surfaces chaudes et des bords tranchants Veillez à ce que le câble de raccordement ne soit pas trop tendu ou plié Ne laissez pas le câble suspendu à des coins risque de trébuche ment Si vous n utilisez pas l appareil pendant une période prolongée débranchez le bloc secteur de l alimentation électrique Brancher le bloc secteur Branchez la fiche du bloc ...

Страница 102: ... pré configurés pour l appareil Les ordinateurs connectés obtiennent ainsi automatiquement les adresses adéquates et d autres paramètres Nous vous recommandons de conserver ces réglages Procédez comme suit afin de vérifier les paramètres de votre ordina teur Sélectionnez Démarrer Paramètres Panneau de configura tion Connexions réseau Sélectionnez la connexion réseau de votre LAN ...

Страница 103: ...nnez Protocole Internet TCP IP et cliquez sur Pro priétés Sélectionnez Obtenir une adresse IP automatiquement et Obtenir les adresse des serveurs DNS automatiquement Confi rmez votre saisie en cliquant sur OK puis de nouveau sur OK dans la fenêtre suivante Votre ordinateur est alors configuré pour pouvoir obtenirautomatique ment son adresse IP à partir du serveur ...

Страница 104: ...démarrez l ordinateur après l installation de l appareil dans votre LAN Si votre PC est déja enclenché redémarrez le à nouveau Lancez votre navigateur Entrez http 192 168 2 1 dans la barre d adresse Connexion Après le lancement de l interface de configuration de l appareil la fenê tre d identification apparaît dans le navigateur Entrez admin dans le champ Nom d utilisateur Entrez 1234 dans le cham...

Страница 105: ... interface de configuration page d ac cueil de l appareil est affiché Sélectionnez la langue de menu Sur la page d accueil en haut à droite vous pouvez choisir entre les langues allemand anglais et français La langue se laisse commuter directement et peut être rechangée à tout moment ...

Страница 106: ... Type de WAN Sélectionnez le type de connexion WAN Type Détails Modem câble Votre adresse IP est attribuée automati quement à votre FAI fournisseur d accès Internet lors de l établissement de la connexion IP statique DSL Votre FAI vous alloue une adresse IP permanente PPPoE DSL L établissement de la connexion au FAI seulement à la demande Normalement l adresse IP est allouée automatiquement Votre ...

Страница 107: ...automatiquement Big Pond vous assigne un mot de passe et un nom d utili sateur seulement en Australie Info adresse IP Dans la fenêtre suivante vous devez entrer les données d accès pour votre fournisseur d accès Vous trouverez ces informations dans les documents qui vous été transmis par votre fournisseur d accès ou les obtiendrez directement de celui ci En raison du degré de diffusion via DSL via...

Страница 108: ...vent être saisies Nous vous conseillons de conser ver ce réglage par défaut dans le cas où vous n êtes pas sûr e de la configuration à adopter Type de connexion Vous pouvez déterminer le type d accès à internet à l aide de type de connexion Vous pouvez choisir entre Continu Le routeur est connecté en permanence à Internet Ce type de connexion est conseillé lorsque vous utilisez un tarif forfaitair...

Страница 109: ...arifs au volume ou de tarifs temporaires il est recommandé de sélectionner Connexion à la demande pour que l accès Internet soit automatiquement interrompu après la durée réglée sous l option Temps d attente Une connexion permanente serait sinon susceptibled occasionner des frais élevés Veuillez également noter que la fermeture du navigateur n im plique pas forcément la déconnexion à Internet De n...

Страница 110: ... Adresse IP réseau local Champ de saisie Remarques Adresse IP Votre routeur est préconfiguré sur à l adres se IP 192 168 2 1 Vous pouvez modifier cette adresse dans le cas où vous désirez en utiliser une autre Masque de sous ré seau Entrez ici le masque de sous ré seau En général on entre ici la valeur 255 255 255 0 Serveur DHCP Sélectionnez Activé dans le cas où vos adresses IP sont gérées par un...

Страница 111: ...rtir de la zone valide dans le tableau situé en bas Un client recevra toujours cette même adresse IP lorsqu il s annonce au routeur Pour ce faire veuillez procéder comme suit Activez les leases DHCP statiques Saisissez l adresse MAC ainsi que l adresse IP dans le tableau Votre saisie sera enregistrée dans le tableau dès que vous cliquez sur le bouton Ajouter ou effacée en cliquant sur Effacer Enre...

Страница 112: ... le seul point d accès dans votre réseau ou aucune connexion ne doit être établie vers d autres points d accès au niveau du pont Point d accès pont point à point Si vous désirez établir une connexion sans filentre ce point d accès et un autre point d accès Dans ce mode les clients ne peu vent pas s enregistrer par connexion sans fil Point d accès pont point à point Si vous désirez établir une conn...

Страница 113: ...onibles Clients attribués Activez la case de contrôle Montrer les clients actifs pour afficher tous les ordina teurs clients qui se sont enregistrés au point d accès Cliquez sur Appliquer pour appliquer les réglages Pour configurer le chiffrement de votre réseau sans fil Cliquez dans la fenêtre suivante sur le bouton Poursuivre Sélectionnez Paramètres de sécurité dans le menu à gauche Pour de plus...

Страница 114: ...AC 1 Entrez ici l adresse du point d accès avec lequel la connexion pont est possible Paramètres de sécurité Cliquez sur ce bouton pour configurer le chif frement de votre réseau local sans fil Pour de plus amples information relatives à la configuration du chiffrement de votre réseau local sans fil veuillez consulter le chapitre Réglage du chiffrement pour pont point à point pont point à multipoi...

Страница 115: ...o de canal Définissez quel canal doit être utilisé pour la transmission des données 13 canaux sont disponibles Adresse Mac 1 4 Entrez ici les adresses des points d accès avec lequel la connexion pont est possible Paramètres de sécurité Cliquez sur ce bouton pour configurer le chif frement de votre réseau local sans fil Pour de plus amples information relatives à la configuration du chiffrement de ...

Страница 116: ...us désirez que votre appareil fonctionne sur une bande de fré quence de 2 4 Ghz au standard 802 11b 11 Mbit s 802 11g 54 Mbit s ou en combinai son avec 802 11b et 802 11g SSID Entrez ici le nom du réseau local sans fil La longueur de l identifiant SSID peut compter jusqu à 32 caractères et doit être identique pour tous les appareils dans le réseau Exemple Routeur_WLAN_54Mbps Numéro de canal Défini...

Страница 117: ... après le redémarrage Réglage du chiffrement pour le réseau sans fil Il importe de distinguer les différentes notions Authentification L authentification est une procédure au cours de laquelle l identité d une personne par exemple est déterminée à l aide d une caractéristique particulière Cette caractéristique peut être une empreinte digitale un mot de passe ou un autre justificatif Chiffrement Le...

Страница 118: ...es et manipulées par des tiers Par consé quent nous recommandons urgemment d éviter d employer WEP et de ne chiffrer qu avec la méthode sûre qu est WPA Configuration du code pour PA Veuillez procéder comme suit Cliquez sur la page d accueil sur le bouton Installation puis sélectionnez Sans fil dans le menu à gauche Sélectionnez le mode PA sous Paramètres de base Sélectionnez ensuite Paramètres de ...

Страница 119: ...us souhai tez préconfigurer Mot de passe 1 4 Entrez vos clés quelconques avec la lon gueur requise Exemples 64 bits Hex 10 caractères 231074a6ef 64 bits ASCII 5 caractères j31n 128 bits Hex 26 caractères 231074a6b9773ce43f91a5bef3 128 bits ASCII 13 caractères congés2006 0 INDICATION En entrant la clé veillez à entrer correctement les majuscules et minuscules Dans la prochaine fenêtre cliquez sur l...

Страница 120: ...carac tères et au plus 63 les lettres A Z chiffres et signe de ponctuation sont admissibles ou Hex pour une clé d une longueur de 64 signes uniquement les caractères 0 9 et a f peuvent être utilisés Clé partagée Entrez votre clé quelconque avec la longueur requise INDICATION En entrant la clé veillez à entrer correctement les majuscules et minuscules Cliquez sur le bouton Appliquer et puis dans le...

Страница 121: ...e de chiffrement TKIP WPA2 avec l algorithme de chiffrement AES Mode WPA Mixed Adresse IP Serveur RADIUS Entrez ici l adresse IP de Serveur RADIUS Port Serveur RADIUS Le Port Serveur RADIUS est préconfigurer à 1812 Mot de pass Serveur RADIUS Entrez ici le mot de pass de Serveur RA DIUS INDICATION En entrant la clé veillez à entrer correctement les majuscules et minuscules ...

Страница 122: ...ltipoint ou PA pont WDS Sélectionnez ensuite Paramètres de sécurité dans le menu à gauche INDICATION Pour ces modes de fonctionnement vous pouvez aussi effectuer le réglage du chiffrement après avoir terminé les réglages de mode en clinquant sur la bouton Paramètres de sécurité Pour WDS vous devez configure le chiffrement auparavant dans le menu à gauche en dessous de Réglage sans fil de sécurité ...

Страница 123: ...nez la clé que vous souhai tez préconfigurer Mot de pass codage 1 4 Entrez vos clés quelconques avec la lon gueur requise Exemples 64 bits Hex 10 caractères 231074a6ef 64 bits ASCII 5 caractères j31n 128 bits Hex 26 caractères 231074a6b9773ce43f91a5bef3 128 bits ASCII 13 caractères congés2006 0 INDICATION En entrant la clé veillez à entrer correctement les majuscules et minuscules Cliquez sur le b...

Страница 124: ...et au plus 63 les lettres A Z chiffres et signe de ponctuation sont admissibles ou Hex pour une clé d une longueur de 64 signes uniquement les caractères 0 9 et a f peuvent être utilisés Clé partagée Entrez votre clé quelconque avec la longueur requise INDICATION En entrant la clé veillez à entrer correctement les majuscules et minuscules Dans la prochaine fenêtre cliquez sur le bouton Appliquer e...

Страница 125: ...la touche Reset WPS sur l appareil 3 En l espace de deux minutes appuyez dans le programme de configuration de l adapateur WLAN sur le bouton PBC sous l onglet WPS Configuration par code PIN Notez le code PIN affiché dans le programme de configuration de l adaptateur WLAN Sélectionnez un réseau cible dans la liste supérieure et cliquez ensuite sur le bouton PIN Passez ensuite à l interface utilisa...

Страница 126: ...puis sélectionnez Système et Configuration du mot de passe dans le menu à gauche Champ de saisie Remarques Mot de passe actuel Entrez 1234 dans le champ Mot de passe Par défaut le mot de passe est 1234 Nouveau mot de passe Entrez ici un nouveau mot de passe quelcon que Valider le mot de passe Réentrez le nouveau mot de passe Cliquez sur le bouton Appliquer et puis dans le fenêtre sui vante aussi s...

Страница 127: ...nez Outils de configuration dans le menu à gauche Cliquez sur le bouton Enregistrer Sélectionnez ensuite un dossier cible Vous devriez également définir un nom de fichier vous permettant d identifier le fichier sans équivoque Cliquez sur le bouton Enregistrer pour mémoriser les paramè tres Dans le cas où vous désirez reconstituer ultérieurement les réglages enregistrés Cliquez sur Parcourir puis s...

Страница 128: ...inutilisable avec la mise à jour du firmware Assurez vous que les fichiers du firmware sont adaptés à l appa reil En cas d ambigüités veuillez vous adresser au service de conseils des produits de Hama Avant la mise à jour connectez l appareil via le câble réseau si il existe le risque lors de la transmission des données que la connexion puisse être perdue Lors de la mise à jour l appareil ne doit ...

Страница 129: ...s par défaut Vous pouvez rétablir les réglages par défaut en remettant le nom de l administrateur à admin le mot de passe à 1234 et l adresse IP à 1 92 168 2 1 INDICATION Dans le cas de ce procédé les paramètres de configuration ac tuels sont effacés et les réglages par défaut sont restaurés Veuillez procéder comme suit Appuyez sur la touche Reset WPS 3 sur le panneau arrière de l appareil pendant...

Страница 130: ...st pas allumée Bloc secteur mal raccordé Assurez vous que le bloc secteur est branché dans la prise et qu il est correctement raccordé à l appareil La prise ne fournit pas d électricité Veuillez contrôler votre coffret à fusibles Appareil en panne Informer le service après vente Il n est pas possi ble d établir une connexion avec l appareil pour le configurer Câble LAN mal raccordé Assurez vous qu...

Страница 131: ...n sans fil est très lente L emplacement de l appareil est défa vorable Modifiez l emplacement et l orientation de l appareil Le canal WLAN est défavorable Changez de canal en cas de dérangements Perturbations suite à des rayonne ments à haute fréquence Déparasitez les appareils émettant des rayonne ments à haute fréquence ou mettez les autrepart Mot de passe oublié Effectuer une réinitia lisation ...

Страница 132: ... 502 115 Fax 49 0 9091 502 272 e mail produktberatung hama de Indications pour l élimination ATTENTION Ne jetez en aucun cas l appareil aux ordures ménagères Res pectez les indications d élimination en annexe de la notice Indications sur la déclaration de conformité CE La société Hama GmbH Co KG certifie que cet appareil est conforme aux exigences de base et aux dispositions de la directive 1999 5...

Страница 133: ...0 Mbps IEEE 802 11g 54 Mbps IEEE 802 11b 11 Mbps WiFi chiffrement WPA2 WPA WEP 64 128 Bit LAN Raccord réseau Commutateur 4 Port 10 100 Mbps RJ 45 cat 5 Dimensions poids Dimensions sans antennes L x P x H 198 x 109 x 25 mm Poids y compris bloc secteur et antennes env 413 g Valeurs de raccordement électrique Alimentation électrique 12 VDC 1 0 A max Conditions ambiantes Températures de travail 40 C H...

Страница 134: ...N kabel 144 Elektrische aansluiting 145 Stekkervoeding aansluiten 145 Controle van de installatie 145 Configuratie en bediening 146 PC configuratie 146 IP adres configureren 146 Configuratie van het apparaat 148 Configuratieoppervlak starten 148 Aanmelding 148 Configuratie van de internetverbinding 150 LAN instellingen 154 Wireless LAN instellingen 156 Instelling van de Wireless LAN codering 161 W...

Страница 135: ... van het apparaat De gebruiksaanwijzing moet altijd in de buurt van het apparaat be schikbaar zijn Hij moet door iedere persoon worden gelezen die dit apparaat bedient of storungen aan het apparaat verhelpt Bewaar deze gebruiksaanwijzing en geef haar met het apparaat door aan latere eigenaars Aansprakelijkheidsbeperking Alle in deze gebruiksaanwijzing vermelde technische informatie gegevens en opm...

Страница 136: ...waarschuwing die op deze manier is gekenmerkt wijst op een mogelijke gevaarlijke situatie Indien de gevaarlijke situatie niet wordt vermeden kan dit tot of de dood ernstige letsels leiden Volg de instructies in deze waarschuwing op om ernstig per soonlijk letsel te voorkomen ATTENTIE Zo een waarschuwing die op deze manier is gekenmerkt wijst op mogelijke materiële schade Indien de gevaarlijke situ...

Страница 137: ... logo zijn merken van de Microsoft Corporation Alle andere producten en bedrijfsnamen zijn merken van de desbetreffende eigenaars Gebruik volgens de voorschriften Dit apparaat is als basisstation van een draadloos netwerk en voor het gemeenschappelijke internetgebruik in gesloten ruimtes bedoeld Een ander of daar bovenuit gaand gebruik geldt als niet volgens voorschrift WAARSCHUWING Gevaar door ge...

Страница 138: ...ker beschadigd is Open in geen geval de behuizing van het apparaat Wanneer er onder spanning staande aansluitingen worden aangeraakt en de elektrische en mechanische opbouw worden gewijzigd heerst gevaar voor elektrische schokken Principiële veiligheidsinstructies Neem voor een veilige omgang met het apparaat de volgende veilig heidsinstructies in acht Controleer het apparaat vóór gebruik op van b...

Страница 139: ...derdelen is gewaar borgd dat ze voldoen aan de veiligheidseisen Bescherm het apparaat tegen vocht en het binnendringen van vloeistoffen Bij contact met vloeistof moet het apparaat onmiddel lijk van de spanningsvoorziening worden gescheiden Gebruik het apparaat niet in een extreem stoffige omgeving of in de buurt van warmtebronnen Gebruik het apparaat alleen met gemonteerde WLAN antennes Reinig het...

Страница 140: ...WLAN functie bijv s nachts Draadgebonden LAN interfaces zijn hieraan niet onderhevig 3 Reset WPS De Reset WPS toets heeft twee functies Door lang indrukken 10 seconden wordt het apparaat naar de fabrieksinstelling gereset Door kort indrukken kunnen apparaten aan een be staand netwerk worden toegevoegd 4 LAN bussen 1 4 Voor het aansluiten van eindapparaten als PC of notebook met een LAN kabel 5 WAN...

Страница 141: ... Knippert Wireless LAN is geactiveerd er worden gegevens verzonden Uit Wireless LAN is gedeactiveerd 9 WAN Brandt De WAN poort heeft een correcte net werkverbinding gemaakt Knippert Gegevenstransmissie via WAN poort Uit Geen verbinding 10 LAN 1 4 Brandt De betreffende LAN poort heeft een correcte netwerkverbinding gemaakt Knippert Gegevenstransmissie via betreffende LAN poort Uit Geen verbinding 8...

Страница 142: ...uiting van het apparaat in acht om persoonlijk letsel en materiële schade te vermijden Uitpakken Haal alle onderdelen van het apparaat en de gebruiksaanwijzing uit de doos Verwijder vóór het eerste gebruik al het verpakkingsmateriaal van het apparaat Leveringsomvang en transportcontrole Het apparaat wordt standaard met de volgende componenten aange leverd Breedbandrouter 2 WLAN antennes Stekkervoe...

Страница 143: ...luitingen van de WLAN antennes op de antenne aansluitingen aan de achterkant van het apparaat OPMERKING De schroefverbinding van de WLAN antenne mag bij het aanbrengen niet worden gekanteld De schroefdraad zou beschadigd kunnen raken Na ca 4 slagen is de WLAN antenne geheel vastgedraaid Kantel de WLAN antennes met 90 en lijn de antenne naar bo ven uit door hem rechtsom te draaien Voorwaarden voor ...

Страница 144: ...ing van het kanaal de oplossing zijn Stel het apparaat niet bloot aan direct zonlicht Het stopcontact moet eenvoudig toegankelijk zijn zodat de stek kervoeding ingeval van problemen snel uit het stopcontact kan worden getrokken Aansluiting van de LAN kabels Sluit de computer en andere netwerkapparaten als bijv hub switch aan de LAN bussen 1 t m 4 aan Gebruik hiervoor de meegeleverde netwekkabel De...

Страница 145: ...n optreden Bescherm de aansluitkabel tegen hete oppervlakken en scherpe randen Let erop dat de aansluitkabel niet strak gespannen of geknikt wordt Laat de aansluitkabel niet over hoeken hangen struikelgevaar Wanneer u het apparaat gedurende een langere periode niet gebruikt dient u de stekkervoeding van de spanningsvoorziening te scheiden Stekkervoeding aansluiten Sluit de aansluitstekker van de s...

Страница 146: ... 2 1 en een geactiveerde DHCP server vooraf geconfigureerd Daardoor krijgen de aangesloten PC s automatisch passende adressen en verdere instellingen Het is aan te bevelen om deze instelling te behouden Om de instellingen op uw PC te controleren gaat u als volgt te werk Selecteer Start Systeembesturng Netwerkverbindingen Selecteer de netwerkverbinding van uw LAN ...

Страница 147: ...Eigenschappen Selecteer Internetprotocol TCP IP en klik op Eigenschap pen Kies Automatisch een IP adres verkrijgen en Automatisch een DNS serveradres laten toewijzen Bevestig vervolgens met OK en in het volgende venster ook met OK Uw PC is nu zodanig geconfigureerd dat hij zijn IP adres automatisch van de router verkrijgt ...

Страница 148: ... uw PC na de installatie van het apparaat in uw LAN op Indien uw PC al is ingeschakeld moet u een herstart uitvoeren Start uw webbrowser Voer in de adresregel http 192 168 2 1 in Aanmelding Na het opvragen van het configuratieoppervlak van het apparaat verschijnt op de webbrowser eerst het login venster Voer nu in het veld Gebruikersnaam admin in Voer in het veld Wachtwoord 1234 in Klik na de invo...

Страница 149: ...met succes is voltooid wordt het configuratieoppervlak startpagina van het apparaat weergegeven Menutaal selecteren Selecteer op de startpagina rechtsboven de taal Duits Engels of Frans De taal wordt onmiddellijk omgesteld en kan op ieder tijdstip worden gewijzigd ...

Страница 150: ...electeer een WAN verbindingstype Type Details Kabelmodem Uw IP adres wordt automatisch bij het maken van de verbinding met uw ISP Internet Service Provider aan u toege wezen Statische IP DSL Uw ISP wijst aan u een permanent IP adres toe PPPoE DSL Verbindingsopbouw naar de ISP alleen indien noodzakelijk Het IP adres wordt normaal gesproken automatisch toegewe zen Uw ISP wijst aan u een wachtwoord e...

Страница 151: ...lleen indien noodzakelijk Het IP adres wordt automatisch toegewezen Big Pond wijst aan u een wachtwoord en een gebruikers naam toe Alleen Australië IP Adres Info In het volgende scherm moet u de toegangsgegevens voor uw pro vider invoeren Deze informatie staan of in uw documenten vermeld of zijnrechtstreeks bij de provider beschikbaar Vanwege de wijde verspreiding van DSL via PPPoE heeft de verder...

Страница 152: ...ingen MTU Maximum Transmission Unit Geef hier de maximaal over te brengen pakketgrootte aan Er zijn waarden van 512 en 1492 mogelijk Mocht u deze waarde niet zeker weten blijf dan bij de standaard inge stelde waarde Verbindingstype Selecteer hier het inkiesgedrag van uw ap paraat U kunt kiezen tussen Voortdurend Het apparaat is altijd met internet verbonden Dit verbindingstype is aan te bevelen al...

Страница 153: ... of tijdstarieven is het aan te bevelen om Verbinding indien gewenst te selecteren zodat de internetverbinding auto matisch na de ingestelde tijd zonder activiteit worden verbroken Bij een voortdurende verbinding kunnen er anders hoge kosten worden veroorzaakt Houd er ook rekening mee dat het sluiten van de browser niet perse de verbreking van de internetverbinding betekent Zeer veel programma s v...

Страница 154: ...in het menu links LAN IP Invoerveld Opmerkingen IP adres Het apparaat is op IP adres 192 168 2 1 vooringesteld Wanneer u een ander adres wilt gebruiken voert u hier het IP adres in Netwerkmasker Voer hier het netwerkmasker in Nor maal gesproken wordt hier de waarde 255 255 255 0 ingevoerd DHCP Server Selecteer Geactiveerd wanneer de IP adressen in uw netwerk door een DHCP server worden beheerd Sel...

Страница 155: ...an een bepaald MAC adres een IP adres uit het geldige bereik vast toe te wijzen Wanneer de client zich op het apparaat aanmeldt krijgt hij altijd dit IP adres toegewezen Ga hiervoor als volgt te werk Activeer Statische DHCP Leases Voer in de tabel het MAC Adress en het IP Adresse in Klik op de knop Toevoegen om de vermelding op de tabel op te slaan of Wissen om de vermelding te verwijderen Instell...

Страница 156: ...at het enige Access Point in uw netwerk is of er geen verbinding op Bridge niveau met andere Access Points gemaakt mogen worden AP Bridge Point to Point Wanneer u dit Access Point met een tweede Access Point draadloos wilt verbinden Clients hebben in deze modus niet de mogelijkheid om zich via een draadloze verbinding aan te melden AP Bridge Point to Multi Point Wanneer u dit Access Point met meer...

Страница 157: ...den Er staan 13 kanalen te beschikking Toegewezen clienst Vink het keuzevakje Actieve clients weer geven aan om alle client computers weer te geven die op een Access Point zijn aange meld Klik op Toepassen om de instellingen over te nemen Om de codering van uw Wireless LAN in te stellen Klik in het volgende venster op Doorgaan Selecteer Veiligheidsinstellingen in het menu links De instructies voor...

Страница 158: ...t adres van het Access Point in waarmee de Bridge verbinding moet worden gemaakt Veiligheidsinstel lingen Klik op deze knop om de codering van uw Wireless LAN in te stellen De instructies voor de instelling van de Wire less LAN codering staan in het hoofdstuk Instelling van de codering voor Bridge Point to Point Bridge Point to Multi Point en Bridge WDS Klik in het volgende venster op de knop Toep...

Страница 159: ...n de gege vens overgebracht moeten worden Er staan 13 kanalen te beschikking Mac adres 1 4 Voer hier de adressen van het Access Point in waarmee de Bridge verbinding moet worden gemaakt Veiligheidsinstel lingen Klik op deze knop om de codering van uw Wireless LAN in te stellen De instructies voor de instelling van de Wire less LAN codering staan in het hoofdstuk Instelling van de codering voor Bri...

Страница 160: ...apparaat met 2 4 Ghz band conform standaard 802 11b 11 Mbps 802 11g 54 Mbps of gecombineerd met 802 11b en 802 11g werkt SSID Voer hier de naam van het Wireless LAN in De lengte van de SSID kan 32 tekens hebben en moet voor alle apparaten in het netwerk identiek zijn Voorbeeld WLAN_Router_54Mbps Kanaalnummer Selecteer hier het kanaal waarin de gege vens overgebracht moeten worden Er staan 13 kanal...

Страница 161: ...s LAN ter beschikking Instelling van de Wireless LAN codering De volgende termen moeten worden onderscheiden Authentificatie Is een procedure waarbij de identiteit bijvoorbeeld van een per soon aan de hand van een bepaald kenmerk wordt vastgesteld Dit kan bijvoorbeeld met een vingerafdruk een wachtwoord of een ander bewijs van bevoegdheid gebeuren Codering Is een procedure waarbij duidelijke tekst...

Страница 162: ...egevens door onbevoegde derden meege lezen en gemanipuleerd kunnen worden Wij adviseren daarom met klem om WEP te vermijden en uitsluitend met de veilige WPA procedure te coderen Instelling van de codering voor AP Ga als volgt te werk Klik op de startpagina op de knop Instelling en selecteer vervol gens Wireless in het menu links Selecteer bij Basisinstellingen de modus AP Selecteer vervolgens Vei...

Страница 163: ...vooraf wilt instellen Codewoord 1 4 Voer hier een willekeurige code met de noodzakelijke lengte in Voorbeelden 64 bit Hex 10 tekens 231074a6ef 64 bit ASCII 5 tekens j31n 128 bit Hex 26 tekens 231074a6b9773ce43f91a5bef3 128 bit ASCII 13 tekens holiday2006 OPMERKING Let bij de invoer van de code op hoofdletters en kleine letters Klik in het volgende venster op de knop Toepassen en in het venster daa...

Страница 164: ...ekeurige tekens waarbij letters A Z cijfers en leestekens zijn toegestaan Hex voor een code met een lengte van 64 tekens waarbij alleen tekens van 0 9 en a f mogen worden gebruikt Pre Shared Key Voer hier uw willekeurige code met de nood zakelijke lengte in OPMERKING Let bij de invoer van de code op hoofdletters en kleine letters Klik op de knop Toepassen en in het venster daarna ook op Toepassen ...

Страница 165: ...coderingsalgoritme WPA2 mit AES coderingsalgoritme WPA Mixed Modus RADIUS server IP adres Vul hier het IP adres in van de RADIUS Server RADIUS server poort De RADIUS Server poort is op 1812 voor ingesteld RADIUS server password Voer hier uw Password in voor de RADIUS Server OPMERKING Let bij de invoer van de code op hoofdletters en kleine letters ...

Страница 166: ...Point to Multi Point of AP Bridge WDS Selecteer vervolgens Veiligheidsinstellingen in het menu links OPMERKING Voor deze bedrijfsmodi kunt u de instellingen van de code ring ook aan het einde van de betreffende bedrijfsmodus instellingen uitvoeren door een klik op de knop Veiligheids instellingen Voor WDS moet de codering vooraf in het menu bij Wire less Veiligheidsinstellingen worden ingesteld De...

Страница 167: ...ecteer de code die u vooraf wilt instellen Codewoord 1 4 Voer hier een willekeurige code met de noodzakelijke lengte in Voorbeelden 64 bit Hex 10 tekens 231074a6ef 64 bit ASCII 5 tekens j31n 128 bit Hex 26 tekens 231074a6b9773ce43f91a5bef3 128 bit ASCII 13 tekens holiday2006 OPMERKING Let bij de invoer van de code op hoofdletters en kleine letters Klik op de knop Toepassen en in het venster daarna...

Страница 168: ...bij letters A Z cijfers en leestekens zijn toegestaan Hex voor een code met een lengte van 64 tekens waarbij alleen tekens van 0 9 en a f mogen worden gebruikt Pre Shared Key Voer hier uw willekeurige code met de nood zakelijke lengte in OPMERKING Let bij de invoer van de code op hoofdletters en kleine letters Klik in het volgende venster op de knop Toepassen en in het venster daarna ook op Toepas...

Страница 169: ...oets Druk op het apparaat op de Reset WPS toets 3 Druk binnen de 2 minuten in het configuratieprogramma van de WLAN adapter op de knop PBC op het tabblad WPS Configuratie met pincode Noteer de pincode die in het configuratieprogramma van de WLAN adapter wordt weergegeven Selecteer het doelnetwerk op de bovenste lijst en klik vervolgens op de knop PIN Ga na het gebruikersoppervlak van het apparaat ...

Страница 170: ... vervol gens Systeem en dan Wachtwoord configuratie in het menu links Invoerveld Opmerkingen Huidig wachtwoord Voer hier het huidige wachtword in Het standaard wachtwoord is op 1234 inge steld Nieuw wachtwoord Voer hier een willekeurig wachtwoord in Wachtwoord beves tigen Voer hier ter bevestiging het wachtwoord opnieuw in Klik op de knop Toepassen en in het venster daarna ook op Toepassen om de i...

Страница 171: ...ecteer vervolgens Configuratiegereedschap in het menu links Klik op Opslaan Selecteer de doelmap Leg een bestandsnaam vast die het mogelijk maakt om het bestand duidelijk te identificeren Klik op Opslaan om de instellingen op te slaan Wanneer u op een later tijdstip de opgeslagen instellingen wilt her stellen Klik op de knop Zoeken en selecteer vervolgens het gewenste configuratiebestand Klik op d...

Страница 172: ...are niet onbruikbaar te maken Zorg ervoor dat de firmwarebestanden bij het apparaat passen Neem bij onduidelijkheden contact op met het Hama productad vies Maak vóór het begin van de actualisering een verbinding via netwerkkabel met het apparaat wanneer er gevaar is dat de WLAN verbinding tijdens de gegevensoverdracht verbroken kan raken Tijdens de actualisering mag het apparaat niet van het span ...

Страница 173: ...U kunt de fabrieksinstellingen herstellen waardoor de gebruikers naam weer op admin het wachtwoord op 1234 en het IP adres weer op 192168 2 1 worden gereset OPMERKING Bij deze procedure worden alle actuele configuratie instellingen gewist en de fabrieksinstellingen hersteld Ga als volgt te werk Druk op de Reset WPS toets 3 aan de achterkant van het ap paraat gedurende 10 seconden tot de POWER LED ...

Страница 174: ...ijke oorzaak Remedie Power LED 7 brandt niet Stekkervoeding niet juist aange sloten Zorg ervoor dat de stekkervoeding in het stopcontact zit en cor rect aan het apparaat is aangesloten Stopcontact levert geen spanning Controleer de zekerin gen Apparaat defect Waarschuw de klanten service Er kan geen ver binding met het apparaat worden gemaakt om het te configureren LAN kabel niet juist aangesloten...

Страница 175: ...ruiken De snelheid van de WLAN verbinding is erg langzaam Standplaats van het apparaat is ongeschikt Wijzig de standplaats en de uitlijning van het apparaat WLAN kanaal is ongeschikt Schakel bij storingen om naar een ander kanaal Hoogfrequente straling stoort Scherm de apparaten af die door hoogfrequente straling storen of plaats ze ergens anders Wachtwoord vergeten Voer een reset uit Zie hoofdstu...

Страница 176: ...produktberatung hama de Instructies voor de afvalverwijdering ATTENTIE Doe het apparaat in geen geval bij het normale huisvuil Neem de afvalverwijderingsinstructies in de bijlage van de gebruiks aanwijzing in acht Opmerkingen bij de EG conformiteitsverklaring Hiermee verklaart Hama GmbH Co KG dat dit apparaat vol doet aan de vereisten en de overige relevante voorschriften van de richtlijn 1999 5 E...

Страница 177: ...EEE802 11g 54 Mbps IEEE802 11b 11 Mbps WiFi Codering WPA2 WPA WEP 64 128 Bit LAN Netwerkaansluiting 4 Port 10 100 Mbps Switch RJ 45 Kat 5 Afmetingen gewicht Afmetingen zonder antennes L x T x H 198 x 109 x 25 mm Gewicht incl voeding en antennes ca 413 g Elektrische aansluitwaarden Voeding 12 VDC 1 0 A max Omgevingscondities Werktemperatuurbereik 0 40 C rel luchtvochtigheid werking 20 85 niet conde...

Страница 178: ...ijen op het einde van gebruik in te dienen bij openbare verzamelplaatsen speciaal opgezet voor dit doeleinde of bij een verkooppunt Verdere specificaties aangaande dit onderwerp zijn omschreven door de nationale wet van het betreffende land Dit symbool op het product de gebruiksaanwijzing of de verpakking duidt erop dat het product onderworpen is aan deze richtlijnen Door te recycleren hergebruike...

Страница 179: ...ектрические и электронные приборы а также батареи запрещается утилизировать с обычным мусором Потребитель согласно закону обязан утилизировать электрические и электронные приборы а также батареи и аккумуляторы после их использования в специально предназначенных для этого пунктах сбора либо в пунктах продажи Детальная регламентация этих требований осуществляется соответствующим местным законодатель...

Страница 180: ...g van overeenstemming conform de R TTE richtlijn 99 5 EG vindt u op internet onder www hama com u Во Франции эксплуатация изделия разрешается только в сухих закрытых помещениях Компания Hama GmbH Co KG настоящим подтверждает что данное изделие полностью соответствует основным требованиям а также предписаниям и положениям нормативов 1999 5 EG Заявление о соответствии товара нормам R TTE 99 5 EG см ...

Отзывы: