06-1491-00-12.fm
123
Attachments and Options
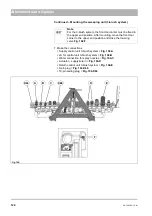
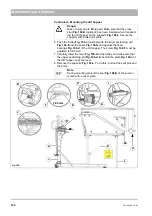
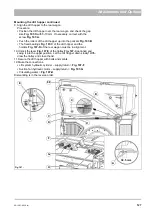
Mounting the sweeping unit (3-brush system)
and locking rod
on the
front tool carrier
. Lower the front tool carrier with the
joystick
2. With the trolley
Fig. 103-C
(optional), align the sweeping unit
centrally and in alignment with the front tool carrier.
3. With an adjustable upper link (optional), set the standard length, see
page 64 (Set the arm
of the sweeping unit parallel to the
floor).
4. Raise the front tool carrier with the joystick
and attach the
sweeping unit.
5. Lock the sweeping unit with the locking hook and locking rod. Check
the backlash on the locking hook, see
, adjust if necessary
with elongated holes.
6. Disassemble the bolts
of the trolley and pull the trolley out
from the sweeping unit.
Fig. 103:
A
B
E
E
86
C
F
D
Содержание Citymaster 1600
Страница 22: ...22 01 1491 00 12 fm Safety Instructions G A B D E F Fig 3 C F C E C D G A B A...
Страница 26: ...26 02 1491 00 11 fm Operation Fig 5 25 23 16 18 17 19 22 21 20 24 26 27...
Страница 28: ...28 02 1491 00 11 fm Operation Fig 6 28 42 44 41 43 46 47 37 36 38 39 40 35 41 48 49 34 30 32 29 33 31 45...
Страница 30: ...30 02 1491 00 11 fm Operation Fig 7 62 63 61 67 55 50 51 54 53 52 58 57 59 60 65 64 66 68 56...
Страница 32: ...32 02 1491 00 11 fm Operation Fig 8 75 69 78 73 72 79 80 81 82 83 74 77 70 71 76 84...
Страница 85: ...04 1491 00 11 fm 85 Technical Data 4 Technical Data Fig 80 3830 1600 941 1210 975 1964...
Страница 146: ...146 06 1491 00 12 fm Attachments and Options 6 1 5 Technical data Fig 144 2215 4510 1580 2250...
Страница 220: ...220 06 1491 00 12 fm Attachments and Options...


