background image

12

Description

Introduction 

| VERITY

®

 1810 Conductivity and pH Monitor

Description

The VERITY® 1810 Conductivity and pH Monitor is a state-of-the-art detection instrument for biological 

purifications with a large dynamic range and fast response time for real-time gradient monitoring. It is a 

compact, integral component for systems performing oligonucleotide, monoclonal antibody (mAb), and 

other biological separations.

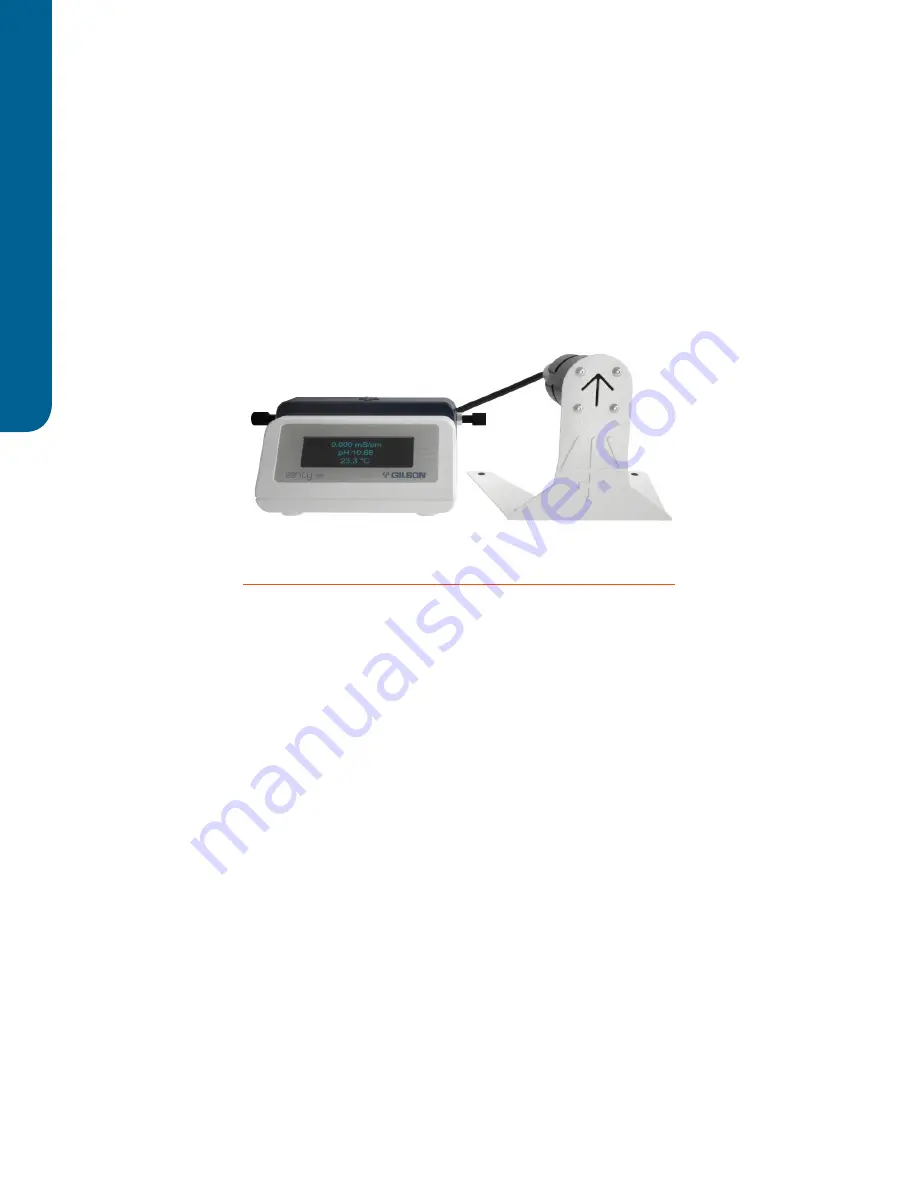
The VERITY® 1810 Conductivity and pH Monitor is a USB powered instrument with an integrated conductivity 

sensor, an external connection for an optional pH sensor, and analog output connections for conductivity 

and pH. Real-time conductivity and pH data can be viewed on an LCD display or monitored either through 

the USB connection or analog outputs.

Figure 1

VERITY® 1810 Conductivity and pH Monitor with Optional pH Flow Cell

Unpacking

The instrument is delivered with most of the major components already assembled. Retain all packing 

material so the instrument may be shipped safely in the future.

To unpack the instrument:

1.  Open the box.

2.  Remove the foam insert on the top of the instrument.

3.  Grip the instrument and lift it out of the packaging.

4.  Remove the instrument from the bag.

5.  Remove the bag of accessories from the box.

Содержание VERITY 1810

Страница 1: ...www gilson com ContactUs Conductivity and pH Monitor User s Guide LT304013 02...

Страница 2: ......

Страница 3: ...ment Parts 8 S curit Symboles et Signes 10 Notes de S curit 10 Solvants 10 Pi ces d tach es 10 1 Introduction Description 12 Unpacking 12 Standard Equipment 13 Accessories 13 Technical Specifications...

Страница 4: ...mpensation Coefficient 26 Conductivity Analog Endpoint 27 4 Maintenance Cleaning 30 Exterior 30 Conductivity Flow Cell 30 Conductivity Flow Cell 31 Calibration 31 Replacement 31 Inlet and or Outlet Tu...

Страница 5: ...ions 41 Connection to the VERITY 1810 Conductivity and pH Monitor 42 pH Sensor 42 Flow Path Diagram 42 VERITY 1810 Monitor pH Calibration Utility 43 Install the VERITY 1810 Monitor pH Calibration Util...

Страница 6: ......

Страница 7: ...nt All safety precautions must be observed during all phases of operation service and repair of the instrument Failure to comply with these precautions or with warnings described in the user s guide v...

Страница 8: ...in serious injury CAUTION CAUTION indicates a potentially hazardous situation which if not avoided may result in minor or moderate injury NOTICE NOTICE indicates a potentially hazardous situation whi...

Страница 9: ...e la maintenance de l instrument Toutes les consignes de s curit doivent tre respect es durant toutes les phases de fonctionnement d entretien ou de r paration de l instrument Le non respect de ces pr...

Страница 10: ...ment dangereuse qui si elle n est pas vit e peut entra ner des blessures mineures mod r es NOTICE AVIS indique une situation potentiellement dangereuse qui si elle n est pas vit e peut entra ner des d...

Страница 11: ...ity and pH Monitor User s Guide 1 INTRODUCTION Chapter One This chapter provides information on the following topics Description on page 12 Unpacking on page 12 Technical Specifications on page 14 Cus...

Страница 12: ...sor an external connection for an optional pH sensor and analog output connections for conductivity and pH Real time conductivity and pH data can be viewed on an LCD display or monitored either throug...

Страница 13: ...Monitor User s Guide VERITY 1810 Conductivity and pH Monitor Installation Qualification IQ Procedures Declaration of Conformity Hazardous Materials Declaration China RoHS Conductivity Flow Cell Calib...

Страница 14: ...lass A limits VERITY 1810 Conductivity and pH Monitor Technical Specification Definition Analog Outputs Two 0 1V dedicated analog outputs one for streaming conductivity data and the other for streamin...

Страница 15: ...cification Range 2 12 pH Wetted Materials Acrylic PVDF pH Glass epoxy BUNA N Volume 110 L Power Requirements USB powered instrument Instrument Power Requirement 5V DC 1W Recommended Flow Rate Range 0...

Страница 16: ...entatives provide customers with the following types of assistance sales technical support applications and instrument repair If you need assistance please contact your local Gilson representative Spe...

Страница 17: ...0 Conductivity and pH Monitor User s Guide 2 INSTALLATION Chapter Two This chapter explains the steps for setting up the instrument which includes Plumbing Connections on page 18 Rear Panel Connection...

Страница 18: ...of the ring should face towards the nut with the narrow end of the ferrule towards the ring 2 Insert the nut at each end into its port Ports are not labeled as the direction of the liquid flow is not...

Страница 19: ...s two output channels Analog pH and Analog Conductivity Optionally direct output from the monitor to an external device To connect an output channel use one of the supplied cables part number 11000023...

Страница 20: ......

Страница 21: ...more information about TRILUTION LC Software refer to its user s guide on line help and documentation supplied with the software For use in any HPLC system use the analog outputs Refer to Output Chan...

Страница 22: ...flow to the VERITY 1810 Conductivity and pH Monitor should be post column and post UV detector in an HPLC system Figure 9 Flow Path Diagram VERITY 1810 Conductivity and pH Monitor with Conductivity F...

Страница 23: ...uring an Application Run if the Use check box is selected for that data channel The Use check box for 1810 Conductivity Channel defaults selected There are three data channels available Conductivity p...

Страница 24: ...error results when any scheduled command fails to execute or if the software loses communication with an instrument Analysis Using the options in the Method Builder Analysis window indicate how collec...

Страница 25: ...each sample Results are accessed in the Project Library Click on an application and double click the results icon The Results window is displayed listing all runs for the selected application Double...

Страница 26: ...lications Utilities Gilson Ethernet Utility b When starting the Gilson Ethernet Utility the Windows Firewall may block some features of the program Click Allow access to use the Gilson Ethernet Utilit...

Страница 27: ...tility click the Start button and then select All Programs Gilson Applications Utilities Gilson Ethernet Utility b When starting the Gilson Ethernet Utility the Windows Firewall may block some feature...

Страница 28: ......

Страница 29: ...on verify the safe and good working order of the part and instrument This chapter contains the following information to help maintain the instrument Cleaning on page 30 Conductivity Flow Cell on page...

Страница 30: ...ow cell and its fittings Flow cells are considered expendable and are not covered by warranty if damaged or broken during any maintenance procedure CLEAN THE INSIDE OF THE CONDUCTIVITY FLOW CELL Incre...

Страница 31: ...g the conductivity flow cell REMOVE INSTALLED FLOW CELL 1 Disconnect the USB cable from the back of the instrument 2 Disconnect the inlet and outlet tubing from the flow cell 3 Hold the installed flow...

Страница 32: ...4 FERRULE 1 16 ANTI TWIST PEEK P 250 All Flow Rates 490410255 NUT 1 16 ANTI TWIST PEEK P 255 To replace the tubing 1 Disconnect the tubing and fittings 1 On each end of the tubing slide the nut then t...

Страница 33: ...and pH Monitor User s Guide 5 TROUBLESHOOTING Chapter Five This chapter provides information on the following topics Troubleshooting on page 34 Solvent and Buffer Compatibility on page 34 Repair and...

Страница 34: ...emical Resilience All surfaces of the VERITY 1810 Conductivity and pH Monitor housing resist limited exposure less than 30 minutes to the following solvents and buffers in addition to any vapors that...

Страница 35: ...or out of warranty repairs contact your local Gilson representative who will discuss service options with you and can assist in making arrangements to return the equipment if necessary Return Procedur...

Страница 36: ......

Страница 37: ...ll Flow Cells Part Number Description 11100001 pH Flow Cell Assembly 11000002 Conductivity Flow Cell Assembly Tubing and Fittings Flow Rate mL min Part Number Description 0 5 5 49951059 TUBING PEEK 01...

Страница 38: ...Replacement Parts and Accessories VERITY 1810 Conductivity and pH Monitor pH Sensor Part Number Description 11000025 pH Sensor Replacement 5464549103 O Ring Cables Part Number Description 32000012 US...

Страница 39: ...H Flow Cell Technical Specifications pH Flow Cell Technical Specification Definition pH Flow Cell Accuracy 0 1 units at 25 C Maximum Drift 0 1 10 hours at constant conditions Part Number 11100001 Pres...

Страница 40: ...nsor is not required for this setup and should remain in the soaker bottle cap for future storage of the pH sensor After unpacking the items do the following 1 Place the O ring on the black thinner en...

Страница 41: ...G 040 X 5FT PEEK All Flow Rates 49041034 FERRULE 1 16 ANTI TWIST PEEK P 250 All Flow Rates 490410255 NUT 1 16 ANTI TWIST PEEK P 255 To make the plumbing connections 1 On each end of the tubing slide t...

Страница 42: ...the pH Sensor input and then twist clockwise 1 4 turn to lock Flow Path Diagram The flow to the VERITY 1810 Conductivity and pH Monitor should be post column and post UV detector in an HPLC system Fig...

Страница 43: ...Insert the USB into the drive and then run SETUP EXE 2 Install the VERITY 1810 Monitor pH Calibration Utility Follow the on screen instructions If a User Account Control window appears click Yes If p...

Страница 44: ...and FW Version will be displayed Use the VERITY 1810 Monitor pH Calibration Utility Remove the pH sensor from the pH flow cell if installed or from the storage solution To remove the pH sensor from t...

Страница 45: ...2 Wipe the outside of the pH sensor with a lint free cloth 3 Use a transfer pipet to rinse the outside of the pH sensor with pH 10 solution 4 Submerge the pH sensor in the pH 10 solution 5 Click OK 6...

Страница 46: ...he rear panel of the monitor by twisting counterclockwise 1 4 turn and then pulling 2 Remove the securing nut 3 Remove the pH sensor 4 Remove the O ring from the assembly 5 Locate the new pH sensor 6...

Отзывы: