Gerber P2C™ 600
User's Manual
Operation
2-9
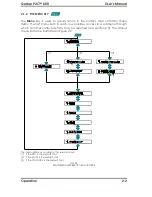
2.3.1. CONFIDENCE
The CONFIDENCE cut performs an electrical and mechanical test of the cutter
to make sure that the cutter is fully operational. A media sheet of at least
A3/A-size should be used for this cut.
Press the
key to execute the confidence cut.
2.3.2. DIN CUT
The DIN CUT also performs an electrical and mechanical test of the cutter that
checks the cut quality and provides the user with feedback about knife setting,
pressure, offset, and cutting depth.
This cut is always run as a DIN A4 portrait/A-size image, regardless of the actual
size of the media loaded. If the media loaded is smaller than DIN A 4/A -size,
part of the outer box will be cropped (not cut). This cut is always executed in
the sequence prescribed by the ISO DIN standard.
Press the
key to execute the DIN cut.
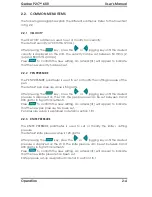
2.3.3. TOOL
The TOOL submenu is used to select the cutter’s default tool. The default tool is
the tool that is activated when the cutter is turned on.
After pressing the
key, press the
or
jogging key until the desired
tool is displayed on the LCD. Press
to confirm the new setting.
Select PEN to configure the cutter for plotting operations.
Select DRAG KNIFE to configure the cutter for cutting operations.
Select POUNCING TOOL to configure the cutter for pouncing operations.
The active tool setting is marked with an asterisk (
!
) on the LCD.
2.3.4. FLEX-CUT
FLEX-CUT can be set to OFF, Mode 1 or Mode 2. When set to Modes 1 or 2, the
cutter will alternately cut one length with full pressure and one length with
reduced pressure (length is later referred to as “HALF”). FLEX-CUT offers the
advantage of cutting completely through the material while, at the same time,
allowing the material to stay together by means of small media bridges.
MODE 1 is the quickest mode, but is less precise because the pressure changes
during the cutting. MODE 2 is slower than MODE 1, but at the same time it offers
greater precision because the cutter stops at every change of pressure.
After pressing the
key, press the
or
jogging key until the desired
mode is displayed on the LCD. Press
to confirm the new setting.
The active FLEX-CUT setting is marked with an asterisk (
!
) on the LCD.

