


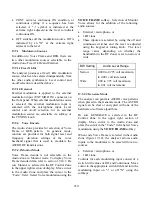


turned off. For all algorithms except software
encryption, a KVL is required to load an
External Key.
17-7.3.1 Connecting the KVL
The KVL plugs into the KVL port (figure 15-1)
on the side of the analyzer opposite the carrying
handle. Connect the key inserter to the analyzer
and then use the following instructions to load
the external key.
CAUTION
Use only DX key loaders, or any KVL 3000
with the ASN option. Other types of key
loaders (AX, BX or CX) may cause the
encryption hardware to malfunction. To
recover, press the encrypt reset softkey
under the “Special Functions” (SPF) menu.
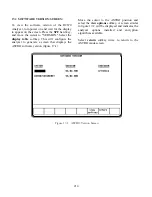
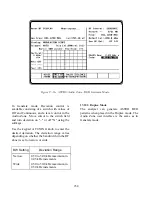
17-7.3.2 Loading External Key
To initiate loading an external key, place cursor
in "Display:" field in Display Zone and select
SET UP mode display using
SET UP
softkey.
Move cursor to "Algorithm Sel:" field and
select desired algorithm using softkeys (figure
17-8).
Move cursor to "Key Type:" field.
Press the
load ext key
softkey to initiate the
key load sequence.
If the Software Algorithm was selected, the
“Key:” field will be displayed and a key can be
entered using the softkeys for alpha characters
and the keypad for numerics. Press the
STORE KEY
softkey to load. For the other
algorithms (DES-XL, DVP-XL, or DVI-XL),
the External Key must be loaded from a KVL.
Push the switch on the KVL to begin loading.
This activates the programming function. When
programming is complete, the KVL displays
"pass" if the key load procedure was successful.
The analyzer displays a message “Ext key
passed." If the key load procedure was
unsuccessful, the KVL displays "fail."
If key load procedure was successful,
disconnect the KVL. Be sure to press the EXT
KEY softkey after loading an External Key
from the KVL to transfer the External Key into
the analyzer’s key storage memory. This
completes external key loading. You can exit
the SET UP screen at this time.
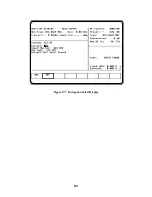
17-7.3.3 Erasing External Key
To erase an external key, place cursor in
"Display:" field in the Display Zone and select
SET UP
softkey. This will access the SET UP
display screen (figure17-6).
Move cursor to "Algorithm Sel:" field. Using
softkey, select the algorithm associated with the
external key you want to erase.
Move cursor to "Key Type:" field and select
External Key using softkeys. Press
erase ext
key
softkey (figure 17-10). The analyzer will
erase the stored external key and display "key
erased" in the message area.
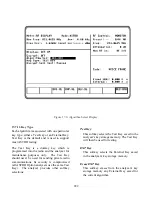
17-8 ASTRO RF OPERATING MODES
Select the RF operating mode by placing the
cursor in the "RF Control:" field in the RF
Zone. Use the desired softkey to select
MONITOR, GENERATE, or DUPLEX.
17-8.1 MONITOR Mode
The Monitor mode (figure 17-11) provides the
analyzer test receiver function which is used in
the testing of radio transmitters. In ASTRO
Monitor mode, the RF Zone is similar to the RF
Zone in standard mode. It is capable of setting
up the analyzer to monitor RF input through its
antenna or direct connection to the transmitter.
The RF Zone in Monitor mode contains fields
for choosing the monitor bandwidth, frequency,
attenuation, and source of the ASTRO RF
signal. All of these fields operate as described
under the General Operations tab of this manual
except the Modulation Type field is not
required.
225
Содержание R2600 Series
Страница 1: ...GENERAL DYNAMICS R2670 R2625 Series Communications System Analyzer OPERATOR S MANUAL CG 1089 Rev A...
Страница 2: ...CG 1089 Rev A R2670 R2625 Series Communications System Analyzer OPERATOR S MANUAL GENERAL DYNAMICS...
Страница 8: ...3 7 1 3 AC DC Voltmeter 41 3 7 1 4 INT DIST EXT DIST Meter 43 v...
Страница 46: ...This Page Intentionally Left Blank xxxvi...
Страница 66: ...DISPLAY ZONE RF ZONE AUDIO ZONE Figure 3 1 Screen Zone Arrangement 20...
Страница 68: ...Figure 3 2 System Help 22...
Страница 83: ...Figure 3 11 General Sequence Mode Select 37...
Страница 85: ...39 Figure 3 12 RF Display Zone...
Страница 88: ...Figure 3 14 Digital Voltmeter Screens 42...
Страница 102: ...Figure 3 22 Bar Graphs 56...
Страница 107: ...Figure 3 24 Memory Screens 61...
Страница 128: ...This Page Intentionally Left Blank 82...
Страница 202: ...This Page Intentionally Left Blank 156...
Страница 205: ...Figure 11 1 R 2670 with SECURENET Option Housing 159...
Страница 206: ...This Page Intentionally Left Blank 160...
Страница 218: ...Figure 13 8 Test Key Programming Display Figure 13 9 External Key Programming Display 172...
Страница 225: ...Figure 13 12 Duplex Mode Display Zone 179...
Страница 228: ...Figure 13 13 SECURENET Audio Zone Voice Generate Mode Figure 13 13 SECURENET Audio Zone Voice Generate Mode 182 182...
Страница 234: ...VOICE Figure 13 17 CLEAR SCOPE Markers 188...
Страница 236: ...This Page Intentionally Left Blank 190...
Страница 240: ...Figure 14 1 Radio BER Test Mode Audio Zone Figure 14 2 Radio BER Test Mode BER Meter Sample 194...
Страница 249: ...Figure 14 8 SECURENET CLEAR SCOPE Display of Output Modulation 203...
Страница 252: ...This Page Intentionally Left Blank 206...
Страница 255: ...1100 3 RS 232PORT KEYVARIABLE LOADER KVL PORT A S STRO OPTIONHOUSING Figure 15 1 ASTRO Option Housing 209...
Страница 256: ...210 This Page Intentionally Left Blank...
Страница 267: ...Figure 17 7 Encryption Select Display Figure 17 7 Encryption Select Display 221 221...
Страница 286: ...This Page Intentionally Left Blank 240...
Страница 291: ...Figure 18 1 Radio BER Test Mode Audio Zone Figure 18 2 Radio BER Test Mode BER Meter 245...
Страница 293: ...Figure 18 4 Receive BER 247...
Страница 298: ...Figure 18 6 ASTRO CLEAR SCOPE Display of Output Modulation 252...
Страница 304: ...Figure 21 1 PROJ 25 Version Screen Figure 21 2 PROJ 25 Options Screen 258...
Страница 309: ...Figure 21 6 SET UP Display Screen Figure 21 7 Encryption Select Display 263...
Страница 335: ...Figure 22 4 PROJ 25 CONV CLEAR SCOPE Display of Output Modulation 289...
Страница 339: ...Figure 24 1 PROJ 25 Version Screen Figure 24 2 PROJ 25 Options Screen 293...
Страница 354: ...Figure 25 3 Encryption Select Display Figure 25 4 Algorithm Select Display 308...
Страница 369: ...B 6 This Page Intentionally Left Blank...
Страница 379: ...This Page Intentionally Left Blank F 4...
Страница 383: ...This Page Intentionally Left Blank H 2...
Страница 389: ...J 4 This Page Intentionally Left Blank...
Страница 393: ...This Page Intentionally Left Blank K 4...
Страница 399: ...M 2 Table M 3 Registration Call Alert Dispatch Voice Error Messages Error Test Terminated by User Timeout Test Halted...
Страница 401: ...N 2 This Page Intentionally Left Blank...


