


Section 4 — Measurement Types and their Uses
94
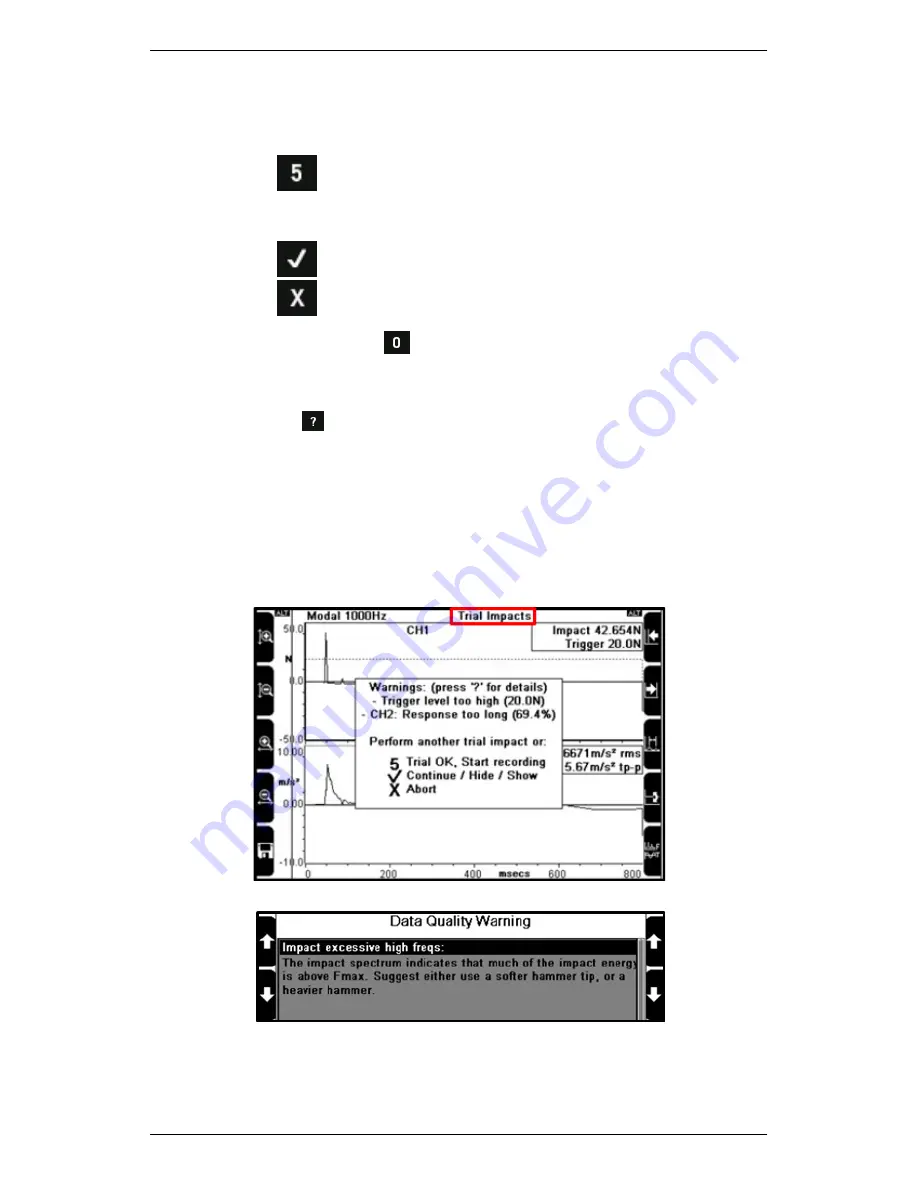
9.
Review the message that displays on the screen to determine
whether you are ready to take real recordings, or whether you need
to execute more trial impacts:
•
Press
Start Recording
if you are satisfied with the trial
impact you have executed and wish to start taking actual
recordings in
Run
mode.
•
Press
to take another trial impact.
•
Press
to discard the impact you have just taken.
NOTE: You can press
to toggle between displaying impact and
response waveforms; and impact and response spectra. All these
graphs display in real time while you are acquiring data.
TIP: Press
to access more detail about the warning message
while it displays.
TIP: You do NOT need to press a button to retain an impact. You
can simply execute a new impact to achieve this.
TIP: You might need to change the end of your impact hammer to
improve the frequency content of the impact — Your instrument
will suggest this if necessary.
Executing a trial impact
Pressing
?
while a warning message displays to access more detail about it
Содержание SCOUT100-Ex
Страница 1: ...SCOUT vbSeries Instrument Reference Guide SCOUT100 Ex SCOUT140 Ex vb5 vb6 vb7 vb8 25 September 2014 ...
Страница 18: ...Section 1 Introduction 7 Installation Control Drawing for Hazardous Locations ...
Страница 20: ...Section 1 Introduction 9 Installation Control Drawing GE2214VBX for ATEX Hazardous Locations ...
Страница 21: ...Section 1 Introduction 10 IECEx ATEX Declaration of Conformity ...
Страница 40: ...Section 2 Instrument Fundamentals 29 Viewing hint labels Accessing more detailed help ...
Страница 44: ...Section 2 Instrument Fundamentals 33 Using the advanced options ...
Страница 54: ...Section 3 Sensors 43 Selecting the appropriate voltage for your tachometer and machine ...
Страница 85: ...Section 4 Measurement Types and their Uses 74 Selecting the required parameter settings ...
Страница 111: ...Section 4 Measurement Types and their Uses 100 Using the keypad to enter measurements ...
Страница 116: ...Section 4 Measurement Types and their Uses 105 Example of tracked measurement ...
Страница 120: ...Section 4 Measurement Types and their Uses 109 Saving multi channel measurements ...
Страница 124: ...Section 5 Set Measurement Options 113 Spectral lines submenu ...
Страница 164: ...Section 8 Send and Receive Information 153 Transferring recordings to Ascent ...
Страница 175: ...Section 8 Send and Receive Information 164 Selecting your Wi Fi region Creating a Wi Fi connection ...
Страница 194: ...Section 9 Working with Routes 183 Linear Speed ...
Страница 241: ...Section 11 Balancing Rotors 230 Splitting a weight ...
Страница 247: ...Section 12 Balancing Walkthrough 236 Taking an initial reading ...