GMX 200 Installation Manual
Page 5-3
190-00607-04 Revision
D
5.2 Post-Installation Power Check
Verify that all cables are properly secured and shields are connected to the shield block of the connector.
Check the movement of the flight and engine controls to verify that there is no interference. Ensure
wiring is installed in accordance with AC 43.13-1B, Chapter 11. Verify that the power and ground leads
are correct.
5.3 Initial Configuration of the GMX 200 and GMX 200 I/O
As part of the initial configuration, the GMX 200 functions must be enabled/disabled as desired, external
data sources must be configured, and miscellaneous options must be set up.
1.
Turn on power to the GMX 200.
2.
Immediately after the self-test is complete, press line select keys 1, 4, and 6 in sequence before
pressing any other keys (where 1 is the top line select key, 4 is the fourth key down, and 6 is the
lower most line select key). If other keys are pressed before or during this sequence, the GMX 200
will be in the normal operational mode. To enter the install mode, turn off the GMX 200 and start
again at step 1.
3.
Press the
FN
key until the
INSTL
function is present. If the
INSTL
function is not found, restart
the unit. Carefully press line select keys 1, 4, and 6 in sequence. Do not press any other buttons
before pressing the 1, 4, 6 line select key sequence.
4.
Select the
INSTL
function by pressing the smart key directly below the
INSTL
label. The
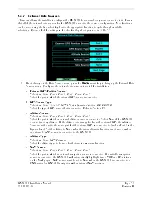
Enable/Disable Functions will be the first screen to appear.
NOTE
GMX 200 power must be cycled before configuration changes will take
affect. All changes made to configuration items are immediately stored
in the configuration module so there is no need to wait to cycle power
after making the final configuration change.
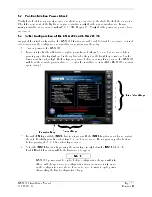
Line Select Keys
-
1
-2
-3
-4
-5
-6
Function Key
Smart Keys
Содержание GMX 200
Страница 1: ...190 00607 04 March 2007 Revision D GMX 200 Installation Manual ...
Страница 4: ...Page ii GMX 200 Installation Manual Revision D 190 00607 04 This Page Intentionally Left Blank ...
Страница 18: ...Page 2 4 GMX 200 Installation Manual Revision D 190 00607 04 This Page Intentionally Left Blank ...
Страница 26: ...Page 3 8 GMX 200 Installation Manual Revision D 190 00607 04 Figure 3 3 Configuration Module Installation ...
Страница 34: ...Page 4 6 GMX 200 Installation Manual Revision D 190 00607 04 This Page Intentionally Left Blank ...
Страница 64: ...Page 5 30 GMX 200 Installation Manual Revision D 190 00607 04 This Page Intentionally Left Blank ...
Страница 72: ...Page 7 2 GMX 200 Installation Manual Revision D 190 00607 04 This Page Intentionally Left Blank ...
Страница 74: ...Page 8 2 GMX 200 Installation Manual Revision D 190 00607 04 This Page Intentionally Left Blank ...
Страница 76: ...Page A 2 GMX 200 Installation Manual Revision D 190 00607 04 This Page Intentionally Left Blank ...
Страница 78: ...Page B 2 GMX 200 Installation Manual Revision D 190 00607 04 This Page Intentionally Left Blank ...
Страница 82: ...Page C 4 GMX 200 Installation Manual Revision D 190 00607 04 This Page Intentionally Left Blank ...
Страница 90: ...Page D 8 GMX 200 Installation Manual Revision D 190 00607 04 This Page Intentionally Left Blank ...
Страница 92: ...Page E 2 GMX 200 Installation Manual Revision D 190 00607 04 This Page Intentionally Left Blank ...
Страница 102: ...Page E 12 GMX 200 Installation Manual Revision D 190 00607 04 This Page Intentionally Left Blank ...
Страница 104: ...Page E 14 GMX 200 Installation Manual Revision D 190 00607 04 This Page Intentionally Left Blank ...
Страница 105: ......
Страница 106: ......

