Chapter 1 LED
58
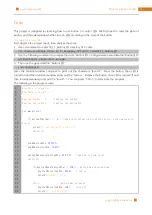
mode (output low level).
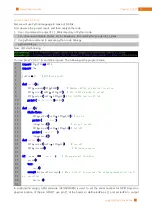
ledPin
=
11
# RPi Board pin11
d e f
setup
( ):
GPIO
.
setmode
(
GPIO
.
BOARD
)
# Numbers GPIOs by physical location
GPIO
.
setup
(
ledPin
,
GPIO
.
OUT
)
# Set ledPin to output mode
GPIO
.
output
(
ledPin
,
GPIO
.
LOW
)
# Set ledPin to low level to turn off led
p r int
(
'using pin%d'
%
ledPin
)
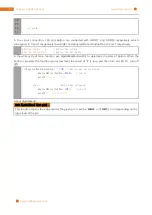
In loop(), there is a while cycle, which is an endless loop. That is, the program will always be executed in this
cycle, unless it is ended outside. In this cycle, set ledPin output high level, then LED is turned on. After a period
of time delay, set ledPin output low level, then LED is turned off, which is followed by a delay. Repeat the
cycle, then LED will start blinking.
d e f
loop
( ):
w h ile
T r ue
:
GPIO
.
output
(
ledPin
,
GPIO
.
HIGH
)
# led on
p r int
(
'...led on'
)
time
.
sleep
(
1
)
GPIO
.
output
(
ledPin
,
GPIO
.
LOW
)
# led off
p r int
(
'led off...'
)
time
.
sleep
(
1
)
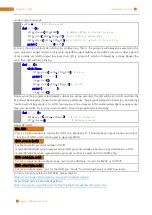
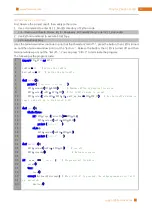
Finally, when the program is terminated, subfunction will be executed, the LED will be turned off and then the
IO port will be released. If close the program terminal directly, the program will be terminated too, but destroy()
function will not be executed. So, GPIO resources won’t be released, in the warning message may appear next
time you use GPIO. So, it is not a good habit to close the program terminal directly.
d e f
destroy
():
GPIO
.
output
(
ledPin
,
GPIO
.
LOW
)
# led is turned off
GPIO
.
cleanup
()
# Release resource
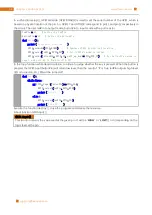
About RPi.GPIO:
R P i.GPIO
This is a Python module to control the GPIO on a Raspberry Pi. It includes basic output function and input
function of GPIO, and function used to generate PWM.
G P IO
.
setmode
(
mode
)
Set the mode for pin serial number of GPIO.
mode=GPIO.BOARD, which represents the GPIO pin serial number is based on physical location of RPi.
mode=GPIO.BCM, which represents the pin serial number is based on CPU of BCM chip.
G P IO
.
setup
(
pin
,
mode
)
Set pin to input mode or output mode. “pin” for the GPIO pin, “mode” for INPUT or OUTPUT.
GPIO
.
output
(
pin
,
mode
)
Set pin to output mode. “pin” for the GPIO pin, “mode” for HIGH (high level) or LOW (low level).
For more functions related to RPi.GPIO, please refer to:
https://sourceforge.net/p/raspberry-gpio-python/wiki/Examples/
“import time” time is a module of python.
https://docs.python.org/2/library/time.html?highlight=time%20time#module-time
Содержание Ultimate Starter Kit
Страница 1: ...Free your innovation Freenove is an open source electronics platform www freenove com ...
Страница 116: ...Chapter 9 Potentiometer RGBLED 116 www freenove com support freenove com Circuit Schematic diagram ...
Страница 117: ...117 Chapter 9 Potentiometer RGBLED www freenove com support freenove com Hardware connection ...
Страница 136: ...Chapter 12 Joystick 136 www freenove com support freenove com Circuit Schematic diagram Hardware connection ...
Страница 155: ...155 Chapter 14 Relay Motor www freenove com support freenove com Hardware connection OFF 3 3V ...
Страница 173: ...173 Chapter 16 Stepping Motor www freenove com support freenove com Hardware connection ...
Страница 182: ...Chapter 17 74HC595 LEDBar Graph 182 www freenove com support freenove com Circuit Schematic diagram Hardware connection ...
Страница 197: ...197 Chapter 18 74HC595 7 segment display www freenove com support freenove com Circuit Schematic diagram ...
Страница 198: ...Chapter 18 74HC595 7 segment display 198 www freenove com support freenove com Hardware connection ...
Страница 239: ...239 Chapter 22 Matrix Keypad www freenove com support freenove com Circuit Schematic diagram ...
Страница 240: ...Chapter 22 Matrix Keypad 240 www freenove com support freenove com Hardware connection ...
Страница 270: ...Chapter 26 WebIOPi IOT 270 www freenove com support freenove com Circuit Schematic diagram Hardware connection ...

