71
10.1.4 200 Hour Lubrication Interva
l
Wheel Bearings
Every 200 hours (or yearly), repack the wheel bearings
using a good quality wheel bearing grease.
10.2 Maintenance
10.2.1 General
Repair or replace damaged or broken parts immediately.
Check all safety and operating decals. If any decals are
illegible or missing, replace any decals immediately. DO
NOT operate sprayer with missing or damaged decals.
Refer to the “Safety Decal” section of this manual for all
safety decal locations. Refer to your parts manual for all
operating decals.
10.2.2 Fasteners
After the first hour of use, check all the fasteners and tighten
any found to be loose. Thereafter, check all fasteners
periodically and tighten as required.
10.2.3 Tire Pressure
Check the tire pressure daily.
The recommended tire pressure is:
12.4-24 6 ply tires .............................. 24 psi
11.2-38 4 ply tires .............................. 18 psi
13.6-38 12 ply tires ............................ 42 psi
10.2.4 Filters
Remove and clean the water filters daily. Clean the filters on
the optional foam marking system at intervals as specified
in the foam system owner’s manual.
IMPORTANT: Always wear gloves and eye protection while
servicing the sprayer.
To manually clean the self cleaning filter:
1. Make sure the product pump is turned OFF.
2. Close the emergency shut off valve under the product
tank.
3. Make sure the agitation valve and self cleaning filter
bypass agitation valve are both closed.
4.
Place a clean empty container under the filter base to
catch any water and chemicals.
5.
Very carefully disconnect the bypass line from the
bottom of the filter and allow the water and chemicals to
flow into the container.
6.
Remove the canister from the filter head by rotating
counter clockwise.
7. Rinse the canister and screen in clean water.
8. Before reinstalling the canister to the filter head, lubricate
the canister O-ring with clean engine oil. Reinstall the
canister and hand tighten only.
9. Connect the bypass hose to the bottom of the filter, open
the bypass and agitation valves. Open the emergency
shut off valve at the bottom of the product tank.
10. Start the sprayer pump with water in the tank and check
for leaks.
11. This procedure also applies to sprayer equipped with
the standard filter.
10.2.5 Sprayer Tips
Refer to the information “Spray Tip Wear” for tip cleaning.
10.3 Storing and Winterizing
Storing your sprayer properly during the off season will help
reduce the time needed to get the sprayer ready for the next
spraying season. If at all possible, store your prayer in a dry
building to protect it from the harmful effects of the weather.
Ultraviolet light in the sun’s rays softens and weakens
rubber used for hoses and tires.
^
WARNING
Wear protective clothing (such as goggles,
rubber or chemical resistant gloves and a
respirator) while handling or working with
chemicals. Keep protective clothing clean and
in good condition or discard.
IMPORTANT: It is very important that you thoroughly clean
the sprayer inside and out.
Cleaning the Inside of the sprayer
1. Add about 50 gallons of clean water along with a
Neutralizing agent into the sprayer product tank. Refer
to “Cleaning the Sprayer” in this manual.
2. Start the product pump and run at rated volume.
3. Open and close ALL valves on the sprayer to ensure
you have clean water through the entire system.
NOTE: The pressure gauge hose is supplied from the rear
of the sprayer and is a “dead end” circuit. The following
procedure is recommended for cleaning.
Содержание BW750
Страница 18: ...18...
Страница 19: ...19 Decal A Decal B Decal C Decal D...
Страница 20: ...20 Decal E Decal F Decal G Decal H Decal I Decal J...
Страница 21: ...21 Decal K Decal L...
Страница 36: ...36 9 6 Spray Tip Wear...
Страница 43: ...43 9 8 TeeJet Air Induction Spray Tips 9 8 1 20 Inch Spacing At Various Speeds And Pressures...
Страница 49: ...49 9 10 TeeJet FloodJet Wide Angle Flat Spray Tips 9 10 1 40 Inch Spacing At Various Speeds And Pressures...
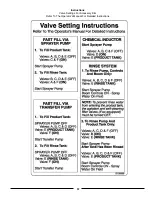
Страница 57: ...57 Instructions Valve Settings For Accessory Kits Refer To The Operator s Manual For Detailed Instructions...
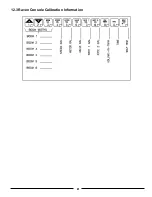
Страница 81: ...81 12 3 Raven Console Calibration Information...
Страница 83: ...83 Notes...

