background image

Operating manual (MC).  

CNC 8060
CNC 8065

3.

WORKING 

WITH OPERATIONS OR

 CYCLES

Ra

ndom multipl

e

 ma

ch

ini

ng.

·158·

(R

EF

: 1709)


3.27

Random multiple machining.

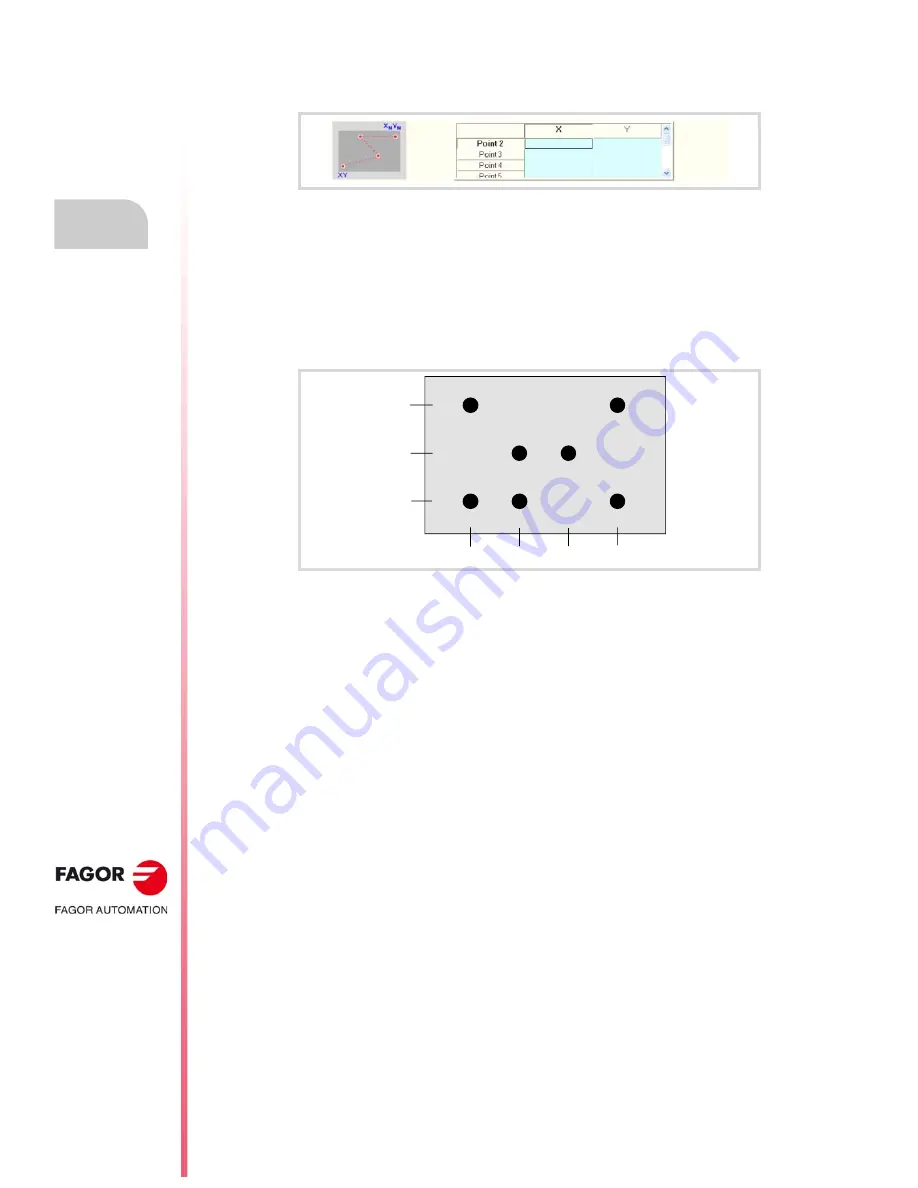
The starting point is the cycle defining point.

The rest of the points (P2) to (P12) must be defined in the area for multiple machining.

When not using all the points, define the first unused point with the same coordinates as those
of the last point of the profile.

Programming example:

The canned cycle defined at point X25, Y25 is to be repeated at the rest of the points.

The canned cycle is defined at point (P1) X25, Y25

The rest of the points (P2) to (P7) must be defined in the area for multiple machining.

Since there are only 7 points, you must define (P8) = (P7). 

(P2)

X 50

Y 25

(P3)

X 100

Y 25

(P4)

X 75

Y 50

(P5)

X 50

Y 50

(P6)

X 25

Y 75

(P7)

X 100

Y 75

(P8)

X 100

Y 75

( P 1 )

( P 2 )

( P 3 )

( P 4 )

( P 5 )

( P 6 )

( P 7 )

2 5

5 0

7 5

1 0 0

7 5

5 0

2 5

Содержание CNC 8060

Страница 1: ...Ref 1709 8060 8065 CNC Operating manual MC...

Страница 2: ...to the user to keep the unit virus free in order to guarantee its proper operation Computer viruses at the CNC may cause it to malfunction FAGOR AUTOMATION shall not be held responsible for any perso...

Страница 3: ...s and the fixture offsets 44 2 7 Tool calibration 45 2 7 1 Manual calibration Calibration without a probe 46 2 7 2 Semi automatic calibration Calibration with a probe 49 2 7 3 Automatic calibration wi...

Страница 4: ...3 21 Free profile milling 143 3 21 1 Basic operation 146 3 22 Slot milling 147 3 22 1 Basic operation 151 3 23 Multiple machining in straight line 153 3 24 Multiple machining in arc pattern 154 3 25 M...

Страница 5: ...heels 1 to 3 Type of servo system Analog Sercos Digital Communications RS485 RS422 RS232 Ethernet Integrated PLC PLC execution time Digital inputs Digital outputs Marks Registers Timers Counters Symbo...

Страница 6: ...the dimensions of the tool that will be used later on This avoids having to calculate and define the tool path based on the tool radius SOFT PROFILE EDITOR Profile editor Allows for the part profiles...

Страница 7: ...g canned cycles The CNC may have two probes usually a tabletop probe to calibrate tools and a measuring probe to measure the part This option activates the functions G100 G103 and G104 for probe movem...

Страница 8: ...BLANK PAGE 8...

Страница 9: ...Basic Pack 1 Basic Pack 1 Number of execution channels 1 1 to 2 1 to 2 1 to 4 Number of axes 3 to 5 5 to 7 5 to 12 8 to 28 Number of spindles 2 2 3 to 4 3 to 4 Maximum number of axes and spindles 7 9...

Страница 10: ...ication with the remote modules CANopen CANopen CANfagor CANopen Sercos Digital inputs per module 8 24 48 16 48 Digital outputs per module 8 16 32 16 32 Analog inputs per module 4 4 8 Analog outputs p...

Страница 11: ...plication has been installed it is recommended to close the CNC in order to prevent the operators from installing other kinds of applications that could slow the system down and affect the machining o...

Страница 12: ...d programs the element SOFT KINEMATIC CALIBRATION Kinematics calibration This work mode may be used to calibrate kinematics for the first time and to re calibrate it every so often to correct any poss...

Страница 13: ...nformity for the CNC is available in the downloads section of FAGOR S corporate website http www fagorautomation com Type of file Declaration of conformity WARRANTY TERMS The warranty conditions for t...

Страница 14: ...BLANK PAGE 14...

Страница 15: ...a list of the features added to each manual reference Ref 1402 Ref 1412 Ref 1709 Software V01 00 First version Software V01 10 User cycles Software V01 10 03 The editor lets associate a multiple machi...

Страница 16: ...BLANK PAGE 16...

Страница 17: ...anned cycles The DEL key deletes a profile from the list Canned cycles Pressing RECALL on a tool gives access to the tool table Keyboard shortcuts CTRL C and CTRL V may be used on the programs list to...

Страница 18: ...BLANK PAGE 18...

Страница 19: ...not handle the connectors with the unit connected to AC power Before handling these connectors I O feedback etc make sure that the unit is not powered Interconnection of modules Use the connection ca...

Страница 20: ...ts relay coils contactors motors etc uncoupled Use the proper power supply Use an external regulated 24 Vdc power supply for the keyboard operator panel and the remote modules Connecting the power sup...

Страница 21: ...C 8065 21 REF 1709 Symbols that the product may carry Ground symbol This symbol indicates that that point must be under voltage ESD components This symbol identifies the cards as ESD components sensit...

Страница 22: ...BLANK PAGE 22...

Страница 23: ...170 Kg 375 lb 2 Attach a label to the device indicating the owner of the device along with contact information address telephone number email name of the person to contact type of device serial numbe...

Страница 24: ...BLANK PAGE 24...

Страница 25: ...igh pressure to clean the unit because it could cause the accumulation of electrostatic charges that could result in electrostatic shocks The plastics used on the front panel are resistant to grease a...

Страница 26: ...BLANK PAGE 26...

Страница 27: ...conversational mode Once the CNC has been started up press the key sequence SHIFT ESC to switch to conversational mode Press SHIFT ESC again to return to M mode SHIFT ESC SHIFT ESC The CNC setup must...

Страница 28: ...Operating manual MC CNC 8060 CNC 8065 1 GENERAL CONCEPTS Accessing the conversational mode 28 REF 1709...

Страница 29: ...CNC 8060 CNC 8065 2 29 REF 1709 OPERATING IN JOG MODE The standard screen of the MC mode is the following When pressing the two colored key the CNC shows the auxiliary screen of the MC mode...

Страница 30: ...cted the of F being applied and the real F value When selecting an incremental jog or a handwheel this window will also show the selected with the corresponding icon and the selected 8 Window showing...

Страница 31: ...ariables Partc It indicates the number of consecutive parts executed with the same part program Every time a new program is selected this variable is reset to 0 CyTime It indicates the time elapsed wh...

Страница 32: ...related information COMMAD It indicates the programmed coordinate or position that the axis must reach ACTUAL It indicates the actual current position of the axis TO GO It indicates the distance whic...

Страница 33: ...with the available cycles Once the cycle to be edited has been selected enter the data in the windows corresponding to each parameter of that cycle To validate each parameter and go on to the next one...

Страница 34: ...e vertical softkey Simulate cycle 1 Softkey to start cycle simulation 2 Softkey to stop cycle simulation 3 Softkey to reset the simulation 4 Softkey to simulate the cycle block by block 5 The horizont...

Страница 35: ...2 Introduction 35 REF 1709 2 1 5 Cycle execution Toexecuteaneditedcycle presstheverticalsoftkey Executecycle Aniconwillthenappear with the start symbol to warn the user that it is going to execute the...

Страница 36: ...atic home search with subroutine This homing method is only available if the machine manufacturer has previously defined a homing subroutine The axis by axis home search cancels the zero offset the fi...

Страница 37: ...ove it in the negative direction To move a single axis press the axis key and the one for its jogging direction The keypad has a key for each axis and two keys for moving direction common to all the a...

Страница 38: ...the incremental jog positions Each position will move the axis a fixed distance the typical values are the following 2 Jog the desired axis using the JOG panel keypad Every time the JOG panel is acted...

Страница 39: ...to follow for moving one or several axes with the general handwheel 1 Select the axis or axes to be jogged The CNC will highlight the selected axes When selecting an axis or quitting the handwheel mod...

Страница 40: ...he general handwheel may be involved When moving several axes at the same time the feedrate of each axis depends on how fast its associated handwheel is turned Feed handwheel Usually when machining a...

Страница 41: ...eset The coordinates must be preset one axis at a time The preset may be canceled by homing the axes one by one or by means of function G53 1 Select the axis to be moved using the alphanumeric keyboar...

Страница 42: ...the operator panel it is possible to change the percentage of spindle speed using a jog keyboard or a switch depending on model Key Meaning Start the spindle clockwise same as M03 function at the acti...

Страница 43: ...and automatic modes Follow these steps to set a new feedrate 1 Press F at the alphanumeric keyboard The CNC will highlight the relevant data indicating that it is selected 2 Enter the new feedrate 3 P...

Страница 44: ...set use the cursor to select an offset from the list and press ENTER to save the current offset in that zero offset The position of all the axes of the channel are updated at the selected zero offset...

Страница 45: ...ration Calibration without a probe It is done without the table top probe A reference part is required to calibrate the tool All the movements are carried out manually Semi automatic calibration Calib...

Страница 46: ...atingthecalibration on each axis After validating them the new values are saved in the tool table Selecting a tool The tool and the active tool offset may be changed from the calibration mode After de...

Страница 47: ...rate a tool it must be the active tool When selecting a tool and pressing ENTER the CNC only shows the data for that tool Press CYCLE START for the CNC to make the tool change so it becomes the active...

Страница 48: ...fset The same is true for the tool length When calibrating the offsets of a milling tool the length value is deleted but not the radius value Sign criteria for the offsets and their wear The sign crit...

Страница 49: ...fter defining the new tool or tool offset in the cycle data press CYCLE START and the CNC will execute the tool change Bear in mind that in this calibration mode the CYCLE START key has two functions...

Страница 50: ...point if not the radius will be calculated wrong 4 Calibratethetool Selecttheaxisandtheprobingdirectiononthesoftkeymenuandpress START The probe moves in parallel to the axis and in the selected direc...

Страница 51: ...incremental or absolute Using incremental wear the value entered by the user will be added or subtracted if it is negative to the absolute value of the wear After pressing ENTER to accept the new val...

Страница 52: ...edron The calibration begins when pressing the CYCLE START key When the CNC finishes the calibration on the selected axes it updates the tool table with the measured values Also the CNC assumes the ne...

Страница 53: ...spindle turning speed must be 0 If defined with a value other than 0 all cutters will be calibrated The CNC makes an initial movement to locate a cutter then stops the spindle and makes a precise meas...

Страница 54: ...to the spindle the CNC carries out this operation if necessary 2 Define the data defining the calibration To calibrate a milling tool use the horizontal softkey menu to select the desired operation 3...

Страница 55: ...d circular pocket rectangular boss and circular boss 2D 3D profile pockets 2D profile pocket and 3D profile pocket with islands Roughing Point to point profile milling free profile milling surface mil...

Страница 56: ...unctions Function Canned cycle G281 Center punching G282 Drilling G283 Deep hole drilling G284 Tapping G285 Reaming G286 Boring G287 Rectangular pocket with rounding G288 Circular pocket G289 Simple r...

Страница 57: ...oach distance Activate the possibility to program the part surface approach distance This option is available for the center punching drilling threading reaming and boring cycles Select axis configura...

Страница 58: ...the axes directly from the keyboard or they may be assigned the actual position of the axes Both editing methods may be used indistinctly even while defining a cycle To assign the position of its axis...

Страница 59: ...cle Zi It is not necessary to define this plane Safety plane for the first approach to the part and to move the tool between machining operations This plane is defined by parameter Zs of the cycle Pla...

Страница 60: ...under the safety plane right figure it first moves along the longitudinal axis and then in the plane Then the tool moves in rapid G0 to the approach plane and finally at working feedrate to carry out...

Страница 61: ...levant window and press the RECALL key For the X axis parameters it will take the coordinate of the first axis of the channel where the edit simulation mode is active For the Y axis parameters the coo...

Страница 62: ...tion Penetration angles 0 and 0 In both cases when programming 0 it takes the value assigned to the table in the tool table If the table value is also 0 it penetrates vertically without inclination 90...

Страница 63: ...and circular boss How to select multiple machining Whenthecannedcycletakesupthewholescreen themultiplemachiningoperationissuper imposed on it as shown in the figure In these cases while editing the c...

Страница 64: ...enabled the cycle assumes an approach distance of 1 mm Programming the total depth Programming the angle and the diameter P Total depth Center punching angle Center punching diameter With Z Zs the ma...

Страница 65: ...KING WITH OPERATIONS OR CYCLES 3 Center punching 65 REF 1709 Next tool Activating or deactivating the preparation of the next tool The editor will only show this option if the user has configured the...

Страница 66: ...and the safety plane Zs Depending on the starting plane it first moves in XY and then in Z or vice versa 3 Rapid movement G0 up to the approach plane 4 Penetration at feedrate F 5 Dwell t 6 Rapid wit...

Страница 67: ...st step thatmachines the rest Zr Relief coordinate it returns to in rapid G0 after each drilling step If it has not reached the Zr coordinate it returns to the approach plane F Feedrate S Spindle spee...

Страница 68: ...istance I at the feedrate F 5 Drilling loop until reaching the total depth P First rapid withdrawal G0 up to the relief coordinate Zr If it has not reached the Zr coordinate yet the tool returns to th...

Страница 69: ...thelast step thatmachines the rest B Relief distance it withdraws in rapid G0 after each drilling step If set to 0 zero the tool returns to the approach plane located 1 mm off the surface F Feedrate...

Страница 70: ...distance I at the feedrate F 5 Drilling loop until reaching the total depth P First rapid withdrawal G0 a relief distance B If B 0 return to the approach plane located 1 mm off the surface Then rapid...

Страница 71: ...ordinate Zs Safety plane coordinate P Total depth Dp Part surface approach distance The editor will only show this data if the user has configured the editor to allow it If this option is not enabled...

Страница 72: ...unctions before machining The cycle allows editing up to 4 M functions To execute only some of them define them first and leave the rest of the data unprogrammed The editor will only show this option...

Страница 73: ...g the longitudinal axis 4 Tangential entry to the helical path of the drilling 5 Helical movement with the pitch given by parameter B and in the direction given by the icon down to the bottom of the h...

Страница 74: ...if the user has configured the editor to allow it If this option is not enabled the cycle assumes an approach distance of 1 mm P Total depth Kf Feedrate factor for the exit Rigid tapping allows a rap...

Страница 75: ...cle allows editing up to 4 M functions To execute only some of them define them first and leave the rest of the data unprogrammed The editor will only show this option if the user has configured the e...

Страница 76: ...drate override percentage may be changed and even stopped 0 override 5 If t other than 0 spindle stop M05 and dwell 6 If tapping with a clutch it reverses the spindle turning direction 7 Withdrawal ex...

Страница 77: ...the part surface It depends on the type of tool being used X Y Machining point Z Part surface coordinate Zs Safety plane coordinate P Total depth Dp Part surface approach distance The editor will only...

Страница 78: ...ockwise Activating or deactivating the execution of M functions before machining The cycle allows editing up to 4 M functions To execute only some of them define them first and leave the rest of the d...

Страница 79: ...one revolution 2 Helical thread exiting movement tangent to the previous helical path It must be borne in mind that in the exit tangent to the helical path the exit point will exceed the coordinate o...

Страница 80: ...assumes an approach distance of 1 mm P Total depth F Feedrate S Spindle speed T Tool D Tool offset t Dwell at the bottom in seconds Clockwise Counterclockwise Activating or deactivating the execution...

Страница 81: ...ending on the starting plane it first moves in XY and then in Z or vice versa 3 Rapid movement G0 up to the approach plane 4 Penetration at feedrate F 5 Dwell t 6 Withdrawal at feedrate F to the appro...

Страница 82: ...nce of 1 mm P Total depth F Feedrate S Spindle speed T Tool D Tool offset t Dwell at the bottom in seconds At feedrate F and the spindle turning In rapid G0 with the spindle stopped Clockwise Counterc...

Страница 83: ...apid movement G0 up to the approach plane 4 Penetration at feedrate F 5 Dwell t 6 Withdrawal If it has a multiple machining operation associated with it it executes the following steps as often as nec...

Страница 84: ...he editor will only show this data if the user has configured the editor to allow it If this option is not enabled the cycle assumes an approach distance of 1 mm P Total depth Spindle position in degr...

Страница 85: ...ining The cycle allows editing up to 4 M functions To execute only some of them define them first and leave the rest of the data unprogrammed The editor will only show this option if the user has conf...

Страница 86: ...approach plane 4 Penetration at feedrate F 5 Dwell t 6 The spindle stops and the tool is oriented in the position M19 7 It gets the cutter off the wall It moves the distance indicated by x y 8 Rapid...

Страница 87: ...ing parameters X Y Coordinates of the starting point of the pocket Starting point at one corner of the pocket Starting point at the center of the pocket L H Pocket dimensions When the starting point o...

Страница 88: ...ned with the given pass step except the last pass that machines the rest In either case the cycle limits the step to the cutting length assigned to the tool in the tool table Fz Penetration feedrate F...

Страница 89: ...WITH OPERATIONS OR CYCLES 3 Simple rectangular pocket 89 REF 1709 Next tool Activating or deactivating the preparation of the next tool The editor will only show this option if the user has configured...

Страница 90: ...edrate F with the passes defined by and up to a distance from the pocket wall The finishing pass is carried out with tangential entry and exit and at feedrate F 6 Rapid withdrawal G0 to the center of...

Страница 91: ...the corner with the instruction ROUNDPAR Geometric parameters Starting point of the pocket icon X Y Coordinates of the starting point of the pocket Starting point at one corner of the pocket Starting...

Страница 92: ...al with the same value as or smaller than the one programmed If programmed with a 0 value it assumes a value of 3 4 of the diameter of the selected tool I Penetration step If programmed with a positiv...

Страница 93: ...M functions before machining The cycle allows editing up to 4 M functions To execute only some of them define them first and leave the rest of the data unprogrammed The editor will only show this opti...

Страница 94: ...F Surface and side milling feedrate S Spindle speed T Finishing tool If programmed T 0 there is no finishing D Tool offset Clockwise Counterclockwise Clockwise Counterclockwise Activating or deactivat...

Страница 95: ...drawal G0 to the center of the pocket 1 mm off the machined surface 5 Rapid withdrawal G0 up to the safety plane Zs 6 It selects the finishing tool and it approaches in rapid G0 down to 1 mm from the...

Страница 96: ...m of the pocket Maximum milling pass or width The cycle recalculates the pass so that all the passes are identical with the same value as or smaller than the one programmed If programmed with a 0 valu...

Страница 97: ...and ending at the center of the pocket If defined with a value greater than the one assigned to the tool in the tool table it assumes the table value F Surface milling feedrate S Spindle speed T Roug...

Страница 98: ...es a value of 3 4 of the diameter of the selected tool N Number of penetration passes steps for the side finishing If the resulting step is greater than the cutting length assigned to the table in the...

Страница 99: ...ctions before machining The cycle allows editing up to 4 M functions To execute only some of them define them first and leave the rest of the data unprogrammed The editor will only show this option if...

Страница 100: ...rawal G0 to the center of the pocket 1 mm off the machined surface 5 Rapid withdrawal G0 up to the safety plane Zs 6 It selects the finishing tool and it approaches in rapid G0 down to 1 mm from the r...

Страница 101: ...alls z Finishing stock at the bottom of the pocket Maximum milling pass or width The cycle recalculates the pass so that all the passes are identical with the same value as or smaller than the one pro...

Страница 102: ...e data unprogrammed The editor will only show this option if the user has configured the editor to allow programming M functions Finishing stock on the side walls z Finishing stock at the bottom of th...

Страница 103: ...ise Counterclockwise Clockwise Counterclockwise Activating or deactivating the execution of M functions before machining The cycle allows editing up to 4 M functions To execute only some of them defin...

Страница 104: ...out atfeedrate F and ifnecessary itrecalculatesthepass soallthepassesareidentical Andlast rapidwithdrawal G0 tothecenterofthepocket 1mmoffthemachinedsurface 5 Rapid withdrawal G0 up to the safety pla...

Страница 105: ...OPERATIONS OR CYCLES 3 Pre emptied circular pocket 105 REF 1709 If it has a multiple machining operation associated with it it executes the following steps as often as necessary 11 Rapid movement G0 t...

Страница 106: ...finish because the finishing passes are carried out in G05 Geometric parameters The composition of the pocket and the profile in the plane is stored in Cnc8070 Users Profile pocket P2D Pocket composit...

Страница 107: ...hing stock on the side walls z Finishing stock at the bottom of the pocket Maximum milling pass or width The cycle recalculates the pass so that all the passes are identical with the same value as or...

Страница 108: ...s option if the user has configured the editor to allow programming M functions Finishing stock on the side walls z Finishing stock at the bottom of the pocket Milling pass or width at the bottom of t...

Страница 109: ...Counterclockwise Activating or deactivating the execution of M functions before machining The cycle allows editing up to 4 M functions To execute only some of them define them first and leave the rest...

Страница 110: ...of the pocket parameter P 2D and the extension C2D These files must not be deleted moved to another location or tampered with in any way If when executing or simulating the pocket the CNC cannot find...

Страница 111: ...ncentric to the profile in the same direction as the outside profile was defined The islands are machined in the opposite direction And last rapid withdrawal G0 up to 1 mm off the machined surface 6 R...

Страница 112: ...tozoom Yes Validate Starting point X 20 Y 8 Validate Straight X 20 Y 40 Validate Straight X 145 Y 40 Validate Straight X 145 Y 25 Validate Clockwise arc Xf 145 Yf 25 R 25 Validate Straight X 145 Y 40...

Страница 113: ...tozoom Yes Validate Starting point X 20 Y 0 Validate Straight X 20 Y 40 Validate Straight X 145 Y 40 Validate Straight X 145 Y 40 Validate Straight X 20 Y 40 Validate Straight X 20 Y 0 Validate Chamfe...

Страница 114: ...REF 1709 New profile island End Save profile Starting point X 115 Y 25 Validate Straight X 115 Y 0 Validate Clockwise arc Xf 90 Yf 25 Xc 115 Yc 25 R 25 Validate Straight X 50 Y 25 Validate Straight X...

Страница 115: ...profiles will be vertical The 3D pocket of the figure has 2 contours with vertical profile C and E and 4 contours with non vertical profile A B D and F Since only 4 contours may be defined with non ve...

Страница 116: ...ntour For the outside contour one for the surface 1 For the islands one for the base 2 All the profiles must be open and without direction changes along their travel not zigzagging Verticaldepthprofil...

Страница 117: ...aving the finishing stock on the side walls This stock is defined as finishing parameter The roughing operation defining parameters are Z Part surface coordinate Zs Safety plane coordinate P Total dep...

Страница 118: ...his angle until the corresponding depth is reached If defined with a value greater than the one assigned to the tool in the tool table it assumes the table value F Surface milling feedrate S Spindle s...

Страница 119: ...achined with the given pass step except the last pass that machines the rest In either case the cycle limits the step to the cutting length assigned to the tool in the tool table F Milling feedrate S...

Страница 120: ...ining The cycle allows editing up to 4 M functions To execute only some of them define them first and leave the rest of the data unprogrammed The editor will only show this option if the user has conf...

Страница 121: ...pocket parameter P 3D and the extension C3D These files must not be deleted moved to another location or tampered with in any way If when executing or simulating the pocket the CNC cannot find these f...

Страница 122: ...l The pocket is machined following paths concentric to the profile in the same direction as the outside profile was defined The islands are machined in the opposite direction And last rapid withdrawal...

Страница 123: ...Configuration Profile outside profile End Save profile Pocket P 3D FAGOR A Profile P XY FAGOR 110 RECALL Abscissa axis X Ordinate axis Y Autozoom Yes Validate Starting point X 20 Y 0 Validate Straight...

Страница 124: ...with islands 124 REF 1709 Configuration Profile depth profile End Save profile Abscissa axis X Ordinate axis Z Autozoom Yes Validate Starting point X 20 Z0 Validate Straight X 30 Z 20 Validate Pocket...

Страница 125: ...e axis Y Autozoom Yes Validate Starting point X 20 Y 0 Validate Straight X 20 Y 40 Validate Straight X 145 Y 40 Validate Straight X 145 Y 40 Validate Straight X 20 Y 40 Validate Straight X 20 Y 0 Vali...

Страница 126: ...he shape of the corner with the instruction ROUNDPAR Geometric parameters Type of corner icon X Y Corner of the boss L H Boss dimensions The sign indicates the orientation referred to the XY point Z P...

Страница 127: ...lue as or smaller than the one programmed If programmed with a 0 value it assumes a value of 3 4 of the diameter of the selected tool I Penetration step If programmed with a positive sign I the cycle...

Страница 128: ...allows editing up to 4 M functions To execute only some of them define them first and leave the rest of the data unprogrammed The editor will only show this option if the user has configured the edit...

Страница 129: ...he cycle allows editing up to 4 M functions To execute only some of them define them first and leave the rest of the data unprogrammed The editor will only show this option if the user has configured...

Страница 130: ...the pass so all the passes are identical And last rapid withdrawal G0 to the starting point 5 Rapid withdrawal G0 up to the safety plane Zs 6 It selects the finishing tool and it approaches in rapid G...

Страница 131: ...eration defining parameters are Xc Yc Center of the boss R Boss radius Z Part surface coordinate Zs Safety plane coordinate P Total depth Q Amount of stock to be removed Finishing stock on the side wa...

Страница 132: ...to the cutting length assigned to the tool in the tool table Fz Penetration feedrate F Surface milling feedrate S Spindle speed T Roughing tool If programmed T 0 there is no roughing D Tool offset Cl...

Страница 133: ...deactivating the execution of M functions before machining The cycle allows editing up to 4 M functions To execute only some of them define them first and leave the rest of the data unprogrammed The...

Страница 134: ...the pass so all the passes are identical And last rapid withdrawal G0 to the starting point 5 Rapid withdrawal G0 up to the safety plane Zs 6 It selects the finishing tool and it approaches in rapid G...

Страница 135: ...Machining direction icon Corner where the surface milling begins icon Bidirectional machining along the abscissa axis Bidirectional machining along the ordinate axis Unidirectional machining along the...

Страница 136: ...etrations are identical with the same value as or smaller than the one programmed If programmed with a negative sign I the milling is carried out with the given pass step except the last pass that mac...

Страница 137: ...functions before machining The cycle allows editing up to 4 M functions To execute only some of them define them first and leave the rest of the data unprogrammed The editor will only show this optio...

Страница 138: ...ishing distance z First penetration I at feedrate Fz Then milling at feedrate F and if necessary it recalculates the pass so all the passes are identical In bidirectional and spiral milling all the mo...

Страница 139: ...nded or chamfered For rounded or chamfered corners indicate the rounding radius or chamfer size When not using all 25 points define the first unused point with the same coordinates as those of the las...

Страница 140: ...or smaller than the one programmed If programmed with a negative sign I the milling is carried out with the given pass step except the last pass that machines the rest In either case the cycle limits...

Страница 141: ...indle speed T Finishing tool If programmed T 0 there is no finishing D Tool offset Clockwise Counterclockwise Activating or deactivating the execution of M functions before machining The cycle allows...

Страница 142: ...drate Fz Then profile milling at feedrate F and tangential entry if it has been programmed If roughing was defined with tool radius compensation the milling is carried out at a distance from the wall...

Страница 143: ...g parameters The roughing operation mills the profile leaving the finishing stock This stock is defined as finishing parameter The roughing operation defining parameters are X Y Profile entry point Z...

Страница 144: ...hing D Tool offset Clockwise Counterclockwise Without compensation Left hand compensation Right hand compensation Activating or deactivating the execution of M functions before machining The cycle all...

Страница 145: ...tion of M functions before machining The cycle allows editing up to 4 M functions To execute only some of them define them first and leave the rest of the data unprogrammed The editor will only show t...

Страница 146: ...ach plane 4 Roughing operation It is carried out in layers until the total depth is reached First penetration I at feedrate Fz Then profile milling at feedrate F If roughing was defined with tool radi...

Страница 147: ...ere are 6 possible types 4 for slot mill each corner of the part 2 for milling a slot across the part Roughing parameters The roughing operation leaves the following finishing stocks Both stocks are d...

Страница 148: ...lculates the step so all the penetrations are identical with the same value as or smaller than the one programmed If programmed with a negative sign I the slot milling is carried out with the given pa...

Страница 149: ...illing pass or width at the bottom of the slot The cycle recalculates the pass so that all the passes are identical with the same value as or smaller than the one programmed If programmed with a 0 val...

Страница 150: ...cycle allows editing up to 4 M functions To execute only some of them define them first and leave the rest of the data unprogrammed The editor will only show this option if the user has configured th...

Страница 151: ...or vice versa 3 Rapid movement G0 up to the approach plane 4 Roughing operation It is carried out in layers until reaching the total depth minus the finishing distance z First penetration I atfeedrate...

Страница 152: ...7 Finishing of the bottom of the slot Penetration at feedrate Fz Milling of the bottom of the slot up to a distance from the pocket It is carried out at finishing feedrate F and if necessary it recal...

Страница 153: ...cycle defined at point X25 Y25 is to be repeated at the rest of the points We now show the 5 possible ways to define it 1 Coordinates of the end point Xn 100 Yn 100 Total number of machining operation...

Страница 154: ...0 is to be repeated at the rest of the points We now show the 9 possible ways to define it 1 Center coordinates Xa 50 Ya 50 Total number of machining operations N 7 Angle of the end point 270 2 Center...

Страница 155: ...g operations N 7 Angle of the starting point 0 Angular distance between machining operations 45 8 Center coordinates Xa 50 Ya 50 Radius R 40 Total number of machining operations N 7 Angle of the start...

Страница 156: ...he number of machining operations N must also include the one for the cycle defining point Programming example The canned cycle defined at point X25 Y25 is to be repeated at the rest of the points We...

Страница 157: ...er of machining operations N must also include the one for the cycle defining point Programming example The canned cycle defined at point X25 Y25 is to be repeated at the rest of the points We now sho...

Страница 158: ...irstunusedpointwiththesamecoordinatesasthose of the last point of the profile Programming example The canned cycle defined at point X25 Y25 is to be repeated at the rest of the points The canned cycle...

Страница 159: ...n pressing this softkey are Open program Operations with blocks Undo Redo Insert the cycle being edited 5 Replace or insert the edited cycle 6 Window that shows the cycles and ISO coded blocks that ma...

Страница 160: ...ottom of the screen will show a message requesting confirmation of the deleting operation If ENTER is pressed the CNC will delete the selected program and will update the list of saved programs If ESC...

Страница 161: ...a used to define it This way the simulation may be used to check the part program or the operation before executing it or saving it and therefore correct or modify its data It is possible to execute o...

Страница 162: ...e CNC shows the graphics screen in execution 4 Once the desired screen has been selected press START 5 1 1 Execute a portion of a part program Proceed as follows to execute a portion of a part program...

Страница 163: ...shows the status of the G functions C Window that shows the selected tool T the tool offset D the real F and the programmed F as well as the real S and the programmed S D Softkeys with graphic display...

Страница 164: ...s softkey the CNC shows the graphics screen in simulation 4 Press the vertical softkey Start simulation 5 2 1 Simulate a portion of a part program Proceed as follows to simulate a portion of a part pr...

Страница 165: ...imulate the program block by block E Simulation options F Window that informs about the position of the axes during the execution of the program G Window that shows the status of the G functions H Win...

Страница 166: ...zones the CNC interrupts simulation and issues the corresponding error message Having this option deactivated the CNC will ignore the software limits and the work zones during simulation The CNC igno...

Страница 167: ...EDIT to access the list of part programs stored 2 Select the program that contains it from the left column and the operation to be simulated or executed from the right column 3 Press the RECALL key 4...

Страница 168: ...SIMULATION Simulating or executing an operation that has been saved 168 REF 1709 5 3 2 Cycle execution To execute the edited cycle press the vertical softkey Execute cycle For further information on e...

Страница 169: ...Operating manual MC CNC 8060 CNC 8065 169 User notes REF 1709...

Страница 170: ...Operating manual MC CNC 8060 CNC 8065 170 User notes REF 1709...

Страница 171: ...Operating manual MC CNC 8060 CNC 8065 171 User notes REF 1709...

Страница 172: ...Fagor Automation S Coop B San Andr s 19 Apdo 144 E 20500 Arrasate Mondrag n Spain Tel 34 943 719 200 34 943 039 800 Fax 34 943 791 712 E mail info fagorautomation es www fagorautomation com...

Отзывы: