Quadro4Li Manual II: Administrator's Guide
Administrator’s Menus
Quadro4Li; (SW Version 5.3.x)
54
The
Extension to forward
drop down list is used to choose the extension where the incoming FAX addressed to the Quadro’s Auto Attendant will be
forwarded. The list contains only those extensions that have FAX support enabled. FAX support can be enabled from the
page.
Please Note:
FAX forwarding is applicable only for incoming calls from PSTN and IP networks. It is not valid for PBX calls.
With the
Show on Public Directory
checkbox enabled, the details of the corresponding auto attendant extension will be displayed in the User
Settings table on the Main Page of the Extension’s Quadro Web Management (accessed by the extension’s login, see Manual III – Extension User’s
Guide). Besides this, the details of the extension will be displayed in the Public Directories on the Snom and Aastra SIP phones. Leave this checkbox
unselected if this auto attendant extension is reserved or not used.
The
Percentage of System Memory
drop down list is used to define the space for the Auto Attendant’s system messages. The maximum value in
the drop down list is equal to the maximum available space for voice messages on Quadro.
2.
Attendant Scenario
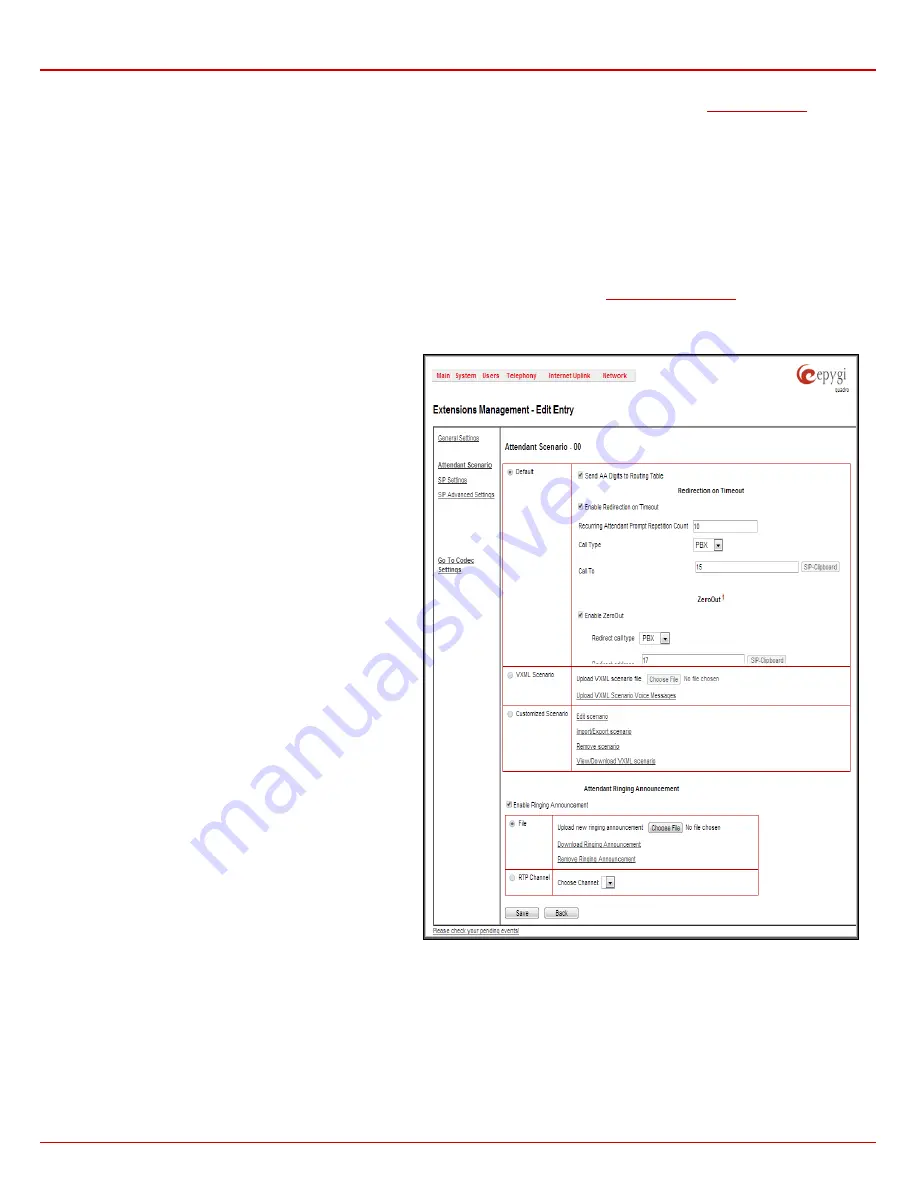
This group is used to select between default and custom attendant functionality scenarios. When the
Default
scenario is selected, a group of settings
should be adjusted. Here, the user defined Auto Attendant system messages can be uploaded and the list of
Friendly Phones
can be configured.
For
Custom
scenario, a scenario script file (in EpygiXML coding, the coding standard can be found atand the custom voice messages can be uploaded.
The
Default
manipulation radio button selection enables the following components:
•
The
Send AA Digits to Routing Table
checkbox selection
switches the Auto Attendant to the routing mode. Any
inserted digits on the Auto Attendant prompt will be passed
through the Routing Table on the Quadro.
•
Redirection on Timeout -
this group allows automatic call
redirection in case no action has been performed by the
caller.
The group offers the following options:
Enable Redirection on Timeout
checkbox is used to
enable/disable the automatic call redirection.
Recurring Attendant Prompt Repetition Count
text field
indicates the number of Recurring Attendant Prompts to be
consecutively played to the caller with no action from
his/her side. When the Recurring Attendant Prompt is
played the number of times indicated in this text field, the
call will be automatically redirected to the defined
destination.
•
Call Type
drop down list includes possible incoming call
types (PBX, PSTN, SIP or Auto). PBX selection means that
the call will be redirected to the local extension.
SIP
selection means that the call will be redirected to the SIP
destination correspondingly.
PSTN
selection means that
the call will be redirected to the PSTN destination.
Auto
selection is used for undefined call types: destination
(independent on whether it is a PBX number, SIP address
or PSTN number) will be reached through Routing.
Call To
text field requires the destination number dialed in
the format depending on the selected Call Type. The
wildcard is supported in this field.
•
Attendant Welcome Message
-
this group allows updating
the active Auto Attendant welcome message (played only
once when entering Auto Attendant), downloading it to the
PC, or restoring the default one. The group offers the
following components:
Enable Welcome Message
checkbox is used to
enable/disable the Auto Attendant welcome message (the
default one or the custom one uploaded from this page or
recorded from the handset (see Feature Codes) being
played when callers enter Quadro’s Auto Attendant.
Fig. II-100: Extensions Management - Edit Entry – Attendant Scenario page
Upload new welcome message
indicates the file name used to upload a new welcome message. The uploaded file needs to be in PCMU
(CCITT u-law, 8 kHz, 8 bit Mono) wave format, otherwise the system will prevent uploading it and the “Invalid audio file, or format is not
supported” warning message will appear. The system also prevents uploading if there is not enough memory available for the corresponding
extension and the “You do not have enough space” warning message will appear.
Browse
opens the file chooser window to browse for a new welcome message file.
The
Download Welcome Message
and
Remove Welcome Message
links appear only if a file has been uploaded previously. The
Download
Welcome Message
link is used to download the message file to the PC and opens the file-chooser window where the saving location may be
specified. The
Remove Welcome Message
link is used to restore the default welcome message.


