Section 3: Getting Started
9
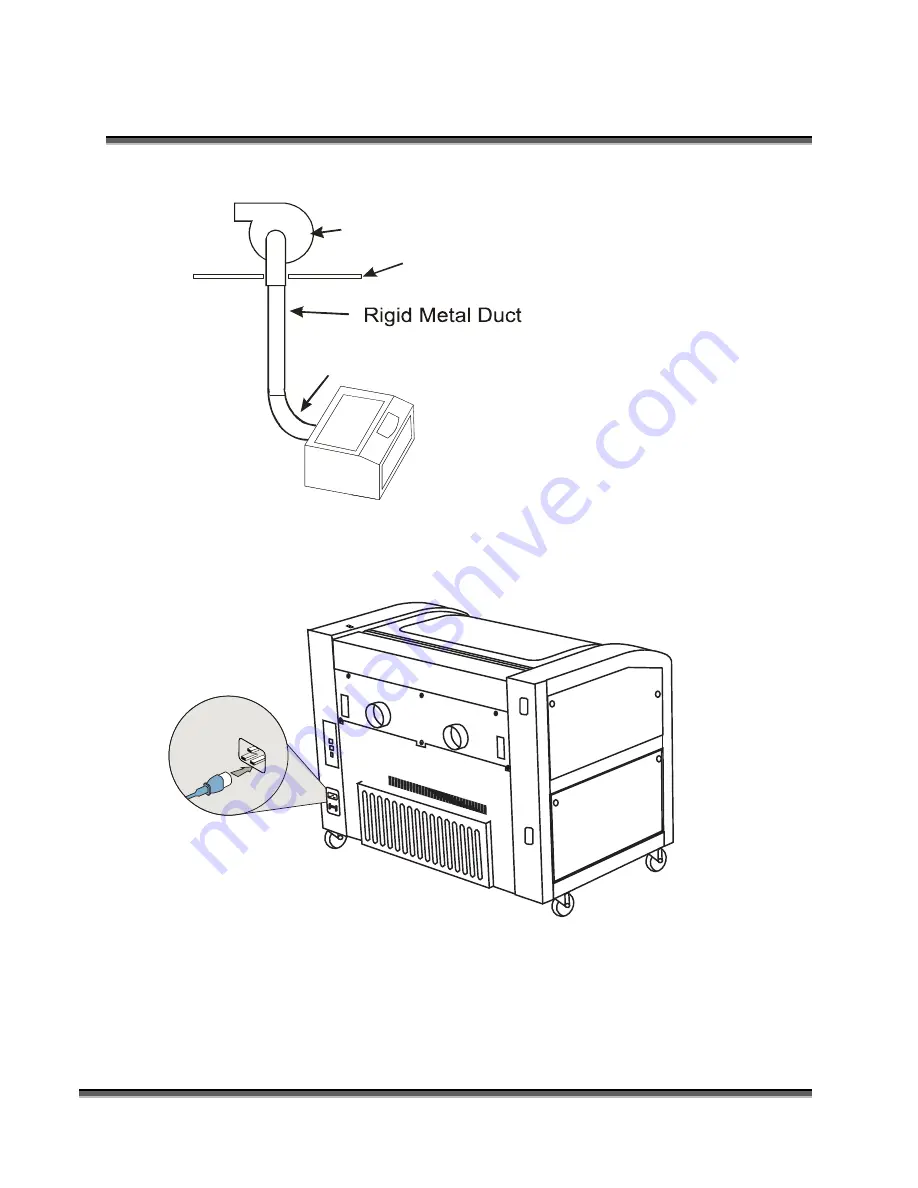
4” (100 mm) flexible aluminum duct
or rigid galvanized sheet
metal (Do not use vinyl,
plastic or “soft” flexible duct).
Exhaust Blower
Roof or exterior wall
Connecting Electrical Power
All Epilog laser systems have an auto-switching power supply that detects the
incoming voltage and automatically switches itself to operate properly at any
single-phase voltage between 100 and 240 VAC. The power supply will also
automatically compensate for either 50 or 60 Hz. Epilog supplies the appropriate
power cord for all of our equipment. The electrical cord is found in the accessory
package with your machine. It is recommended that a dedicated 15 amp circuit be
used if available, but it is not required.
The 60 watt and 75 watt machines draw more current than the lower wattage
lasers. These two systems can operate on 110 volts, but most users find that a 200
V connection is more efficient.
The electrical connection is found at the lower back of the machine.
Electrical
Connection
(110/220V - 50/60 Hz)
Содержание Fusion 13000
Страница 2: ...ii THIS PAGE WAS INTENTIONALLY LEFT BLANK ...
Страница 4: ...Contents at a Glance iv THIS PAGE WAS INTENTIONALLY LEFT BLANK ...
Страница 8: ...Table of Contents viii INDEX 195 THIS PAGE WAS INTENTIONALLY LEFT BLANK ...
Страница 10: ...Fire Warning x SEE PREVIOUS PAGE ...
Страница 14: ...Introduction xiv THIS PAGE WAS INTENTIONALLY LEFT BLANK ...
Страница 15: ...1 Manual Epilog Laser Setup ...
Страница 16: ...2 THIS PAGE WAS INTENTIONALLY LEFT BLANK ...
Страница 26: ...Section 1 Safety 10 ...
Страница 27: ...Section 1 Safety 11 ...
Страница 28: ...Section 1 Safety 12 THIS PAGE WAS INTENTIONALLY LEFT BLANK ...
Страница 41: ...Section 3 Getting Started 11 THIS PAGE WAS INTENTIONALLY LEFT BLANK ...
Страница 44: ...Section 4 Installing the ECC 14 ...
Страница 51: ...Section 4 Installing the ECC 21 THIS PAGE WAS INTENTIONALLY LEFT BLANK ...
Страница 57: ...Section 5 Installing the Epilog Dashboard Print Driver 27 8 Click on Change Settings 9 Click on the Driver tab ...
Страница 58: ...Section 5 Installing the Epilog Dashboard Print Driver 28 10 Click on Update Driver ...
Страница 68: ...Section 5 Installing the Epilog Dashboard Print Driver 38 Click on Add Local Printer ...
Страница 76: ...Section 5 Installing the Epilog Dashboard Print Driver 46 THIS PAGE WAS INTENTIONALLY LEFT BLANK ...
Страница 108: ...Section 6 Using the Epilog Dashboard 78 THIS PAGE WAS INTENTIONALLY LEFT BLANK ...
Страница 109: ...79 Manual Basic Operations ...
Страница 110: ...80 THIS PAGE WAS INTENTIONALLY LEFT BLANK ...
Страница 130: ...Section 8 Using the Front Control Panel 100 THIS PAGE WAS INTENTIONALLY LEFT BLANK ...
Страница 136: ...Section 9 Using the ECC Epilog Control Center 106 THIS PAGE WAS INTENTIONALLY LEFT BLANK ...
Страница 148: ...Section 10 Standard Optional Machine Features 118 ...
Страница 152: ...Section 11 Engraving Machine Cleaning 122 Crash Bar and locating pins ...
Страница 160: ...Section 11 Engraving Machine Cleaning 130 ...
Страница 184: ...Section 13 Material Engraving Techniques 154 THIS PAGE WAS INTENTIONALLY LEFT BLANK ...
Страница 191: ...161 Manual Technical Support Troubleshooting and Specifications ...
Страница 192: ...162 THIS PAGE WAS INTENTIONALLY LEFT BLANK ...
Страница 194: ...Section 15 In Case of Difficulty 164 THIS PAGE WAS INTENTIONALLY LEFT BLANK ...
Страница 200: ...Section 16 Specifications 170 THIS PAGE WAS INTENTIONALLY LEFT BLANK ...
Страница 208: ...APPENDIX A 178 THIS PAGE WAS INTENTIONALLY LEFT BLANK ...
Страница 214: ...Appendix C Additional Dashboard Instructions 184 Click on Network and Sharing Center Click on Change adapter settings ...
Страница 218: ...Appendix C Additional Dashboard Instructions 188 ...

