


128
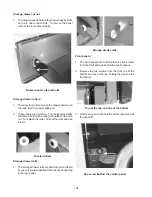
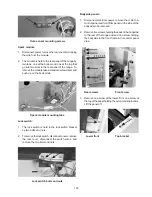
Oven light socket:
1. Remove the cover from the rear of the range.
2. Squeeze the spring clips on the side of the light
socket and push it into the oven.
Socket spring clips
Rear cover:
1. The rear cover is held to the back of the range by
two screws. Disconnect power, remove the screws
and lift the cover off.
Rear cover screws
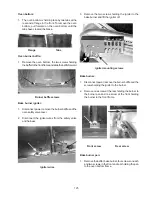
Oven sensor:
1. Remove the rear cover, unplug the sensor wires,
remove the two screws holding the sensor to the
rear wall and pull out the rear.
Oven light cover:
1. The oven light cover is held in place by a spring
loaded wire. Snap the wire to either side to release
the cover.
Oven light cover wire
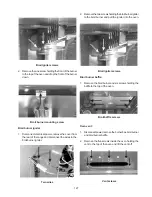
Oven light bazel:
1. Disconnect power, remove the cover from the rear of
the range and disconnect the wires from the light
socket.
2. From inside the oven remove the two screws holding
the bazel to the oven liner and pull the bazel and
light socket into the oven.
Bazel screws
Содержание 30" GAS FREESTANDING RANGES
Страница 43: ...43 SAMPLE SCHEMATIC FOR ES100 CONTROL SYSTEM ...
Страница 50: ...50 SAMPLE SCHEMATIC FOR ES 200 CONTROL SYSTEM ...
Страница 60: ...60 SAMPLE SCHEMATIC FOR ES 300 CONTROL SYSTEM ...
Страница 72: ...72 SAMPLE SCHEMATIC FOR ES 400 CONTROL SYSTEM ...
Страница 84: ...84 SAMPLE SCHEMATIC FOR ES 450 CONTROL SYSTEM ...
Страница 93: ...93 Sample schematic for 36 gas range ...
Страница 130: ...130 NOTES ...
Страница 131: ...131 NOTES ...
Страница 132: ...132 ...


