


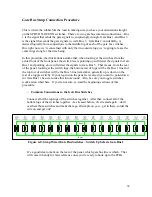


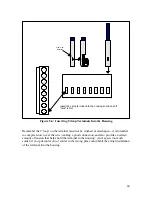


J13
Clock Signal
Input
Ground
Lug
Tip
Lug
SW39
Clock Enable
SPST ON-OFF
Figure 4-11: Wiring the Clock Input Jack to the Clock Enable Switch
o
Glide Pot Bits and Pieces
The three glide pots are not strapped to anything; their inputs and outputs come from
and go straight to the Analogue Board. However, there is a connection that is not
utterly necessary, but is a connection that is often put on pots that are acting as
variable resistors rather than voltage dividers. The connection is made between the
center tap of the pot and the “maximum resistance” lug, in respect to the signal input.
In this case, our signal input will be connected to the lug on the right (as viewed from
the back) and the output will be taken from the center tap. The lug on the left will
have the same resistance to the lug on the right as the lug on the center has to the lug
on the right when the glide is cranked all the way up. So, the connection here is made
from the center tap to the lug on the right.
So, why connect the center tap to the lug on the left – what does it accomplish? Not a
whole lot, except that it serves as a form of “protection” should the pot suffer
catastrophic failure, and, internally, the center tap disconnects from the rest of the pot.
If this happens, even without the wire put in, nothing truly “destructive” would
happen – there wouldn’t be any magic smoke or pretty flashes of light. Instead, your
CV output would just go dead (drop to 0V). With this wire in place, your CV output
would still be there if the center tap somehow failed, though it the glide would be
stuck at max setting, so your Klee could only moan and wail from that output, which
is cool if that is your thing. In other words, it’s more of a standard practice than
anything terribly useful (in this instance) so you can either put the connection in or
not, your choice.
If you do put it in, it’s helpful to solder the jumper to the left lug, then loop the other
end around the center tap, but leave it unsoldered – that tap will connect to the
Analogue Board, so when that wire is attached to the center lug, it can be attached
easily and both wires will be soldered at once.
35