24
l
The portable lamp must not be opened in the potentially explosive zone!
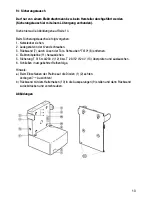
5.1 Replacement of battery
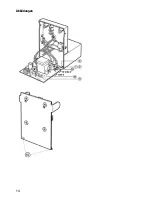
For that see illustrations on page 26.
. Unscrew 3 Torx screws on the left and right at the housing and on the bottom (5).
2 Draw the back panel of casing (8) from the headlamp casing.
3. Release plug-in cable lugs + and – at the battery (4) (5).
4. Draw out old battery (23) from the cas-ing and push in the new one.
5. Contact the new battery b) with cable connections (4) red = + positive pole and (5) black =
- negative pole.
Do not confound the connections!
6. Close and screw up the casing.
Attention:
a) Take care of a good sealing (protec-tion provided by enclosures)!
Is the sealing still okay?
b) Insert absolutely an original ecom instruments-battery-pack. Other batteries are
not allowed and abolish the explosion proofness!
Remember environmental protection!
Used batteries must be disposed of in accordance with environmental require-ments. If this is
not possible we take them back and have the battery cells recycled correctly and completely, i.e.
potentially pollutive materials are recovered and used for the production of new battery cells.
5.2 Replacement of lamp
For that see illustrations on page 26.
. Release and draw out the red inset (9) at the head of lamp by removing of Torx-screw
*TX0* (8)
2. Main and economy lamp (3) and (2) are easily accessible and be removed by pressing
and rotating.
3. Re-insert lamps and inset (9) in re-versed order.
Attention:
a) Touch new filament lamps only with a protective rag!
b) At the inset (19) take care that the locating studs engage properly at the top of the head
of lamp and that the sealing of the complete part is okay. Do not crush lines in
closing!
Содержание SHL 100-EX
Страница 10: ... Vor Inbetriebnahme Pluspol 14 stecken ...
Страница 15: ...14 Abbildungen ...
Страница 17: ...16 12 EG Baumusterprüfbescheinigung ...
Страница 18: ...17 ...
Страница 27: ...26 Plug the positive pole 14 preoperational ...
Страница 32: ...31 Illustrations ...
Страница 34: ...33 12 EC type examination certificate ...
Страница 35: ...34 ...
Страница 44: ...43 Fichez le pôle positif 14 avant la mise en fonctionnement ...
Страница 49: ...48 Illustrations ...
Страница 51: ...50 12 Attestation d examen CE de type ...
Страница 52: ...51 ...
Страница 61: ...60 Sluit voor gebruik de positieve pool aan 14 ...
Страница 66: ...65 Afbeeldingen ...
Страница 68: ...67 12 EG verklaring van typeonderzoek ...
Страница 69: ...68 ...
Страница 78: ...77 Prima della messa in funzione inserire il polo positivo 14 ...
Страница 83: ...82 Illustrazioni ...
Страница 85: ...84 12 Attestato di certificazione ...
Страница 86: ...85 ...
Страница 95: ...94 Conecte el polo positivo 14 antes del uso ...
Страница 100: ...99 Ilustraciones ...
Страница 102: ...101 14 Certificado de ensayo de tipo de construcción CE ...
Страница 103: ...102 ...
Страница 112: ...111 Ligue o pólo positivo 14 antes da colocação em funcionamento ...
Страница 117: ...116 Desenhos ...
Страница 119: ...118 15 N do Certificado do modelo CE ...
Страница 120: ...119 ...
Страница 129: ...128 Innan du startar skall pluspolen anslutas ...
Страница 134: ...133 Bilder ...
Страница 136: ...135 14 EG konstruktionskontrollintyg ...
Страница 137: ...136 ...

