23
Head of lamp
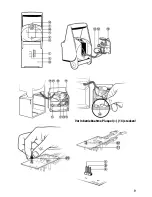
It can be tipped ahead by 20° and back-wards by 90°. At the light outlet frame are guiding grooves
() for the pick-up of a C-washer (lens of the headlight).
Lenses
The lens is added to the portable lamp. It can always be carried along in the pocket (2). Coloured
lens of the headlight will be possible if required.
Belt hook
At the back of head of lamp a stable belt hook of high-grade steel can be installed (). It makes
possible the hanging up of the portable lamp into the belt; a carabine swivel can be also hung up
by a ring eye-let.
Plug-in sign
The plug-in sign (3) can be engraved. These signs can be bought later, too. The sign is interchan-
geable with a brass sign.
4. Charging
The charging must be executed only with the ecom instruments charging set SHL 00-Ex. It is
charged optimally and in due form by the I/U charging characteristic line prescribed for lead-gel
accumulators.
Other charging sets could damage the battery, so explosion proofness of port-able lamp
is endangered or/and abol-ished.
The battery should be charged at tempera-tures over 0 °C. Charging duration about 2 hours.
Contact to the charging set is made by 3 naked contact pins (6) at the back of port-able lamp
– please keep visible end faces clean.
The portable lamp is not charged on delivery.
5. Repair and Maintenance
Maintenance work at wearing parts must be executed only by authorised and prop-erly trained
staff.
In order to ensure the blameless working of the portable lamp only original spare parts given in
the spare part list are replaced.
Damages at the casing or at the electricity endanger the explosion-proofness and require repair
in the plant.
Содержание SHL 100-EX
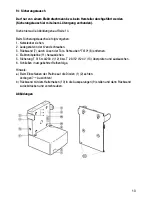
Страница 10: ... Vor Inbetriebnahme Pluspol 14 stecken ...
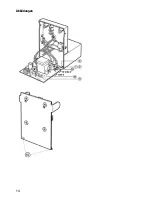
Страница 15: ...14 Abbildungen ...
Страница 17: ...16 12 EG Baumusterprüfbescheinigung ...
Страница 18: ...17 ...
Страница 27: ...26 Plug the positive pole 14 preoperational ...
Страница 32: ...31 Illustrations ...
Страница 34: ...33 12 EC type examination certificate ...
Страница 35: ...34 ...
Страница 44: ...43 Fichez le pôle positif 14 avant la mise en fonctionnement ...
Страница 49: ...48 Illustrations ...
Страница 51: ...50 12 Attestation d examen CE de type ...
Страница 52: ...51 ...
Страница 61: ...60 Sluit voor gebruik de positieve pool aan 14 ...
Страница 66: ...65 Afbeeldingen ...
Страница 68: ...67 12 EG verklaring van typeonderzoek ...
Страница 69: ...68 ...
Страница 78: ...77 Prima della messa in funzione inserire il polo positivo 14 ...
Страница 83: ...82 Illustrazioni ...
Страница 85: ...84 12 Attestato di certificazione ...
Страница 86: ...85 ...
Страница 95: ...94 Conecte el polo positivo 14 antes del uso ...
Страница 100: ...99 Ilustraciones ...
Страница 102: ...101 14 Certificado de ensayo de tipo de construcción CE ...
Страница 103: ...102 ...
Страница 112: ...111 Ligue o pólo positivo 14 antes da colocação em funcionamento ...
Страница 117: ...116 Desenhos ...
Страница 119: ...118 15 N do Certificado do modelo CE ...
Страница 120: ...119 ...
Страница 129: ...128 Innan du startar skall pluspolen anslutas ...
Страница 134: ...133 Bilder ...
Страница 136: ...135 14 EG konstruktionskontrollintyg ...
Страница 137: ...136 ...

