


22
Total discharge protection
In case of almost discharged battery (dis-play yellow/red) automatic change-over from main to
economy lamp.
Residual luminosity period: about h
Note: When LED’s are flashing the total discharge of battery is come up to
(Avoid that by all means!).
Network-automatic contactor function (emergency lamp function) –ON-
Should the line supply voltage is failing in the charging set during the charging the main lamp of
portable lamp will light up until the line supply voltage is coming back or the discharging limit of
battery is reached.
Only possible with charging set SHL 100-Ex!
A bridge b/c (22) is set onto the printed card, which ensures that emergency lamp function –
delivering condition.
Network-automatic contactor function –OFF-
If a emergency lamp function is not desi-red, e.g. in case of installation into motor vehicles with 2
V/24 V, the bridge (22) must be put onto the pins a/b. Including the following function:
a) no network-automatic contactor function
b) In case of abating of vehicle battery the charging operation will be interrupted by tension
regulation. So the battery of mo-tor vehicle will be preserved. Cut-off tensions at .7 V
or 23 V.
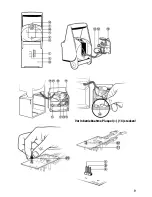
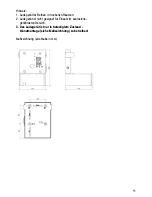
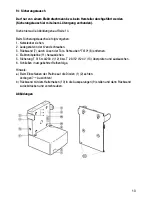
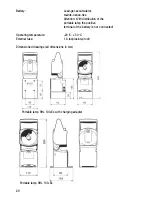
Operation „Plug into a different socket of bridge“
see illustrations on page 26.
. Unscrew 3 Torx screws on the left and right at the housing and on the bottom (5).
2. Draw the back panel of casing (8) from the headlamp casing.
3. Bridge (22) on the electronic plate (2) is situated on b/c.
Draw the bridge off and pin it up on a/b.
4. Close and screw down the casing.
Attention: Take care of a good sealing (protection provided by enclosures)!
Is the sealing still okay?
Содержание SHL 100-EX
Страница 10: ... Vor Inbetriebnahme Pluspol 14 stecken ...
Страница 15: ...14 Abbildungen ...
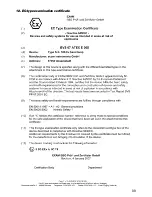
Страница 17: ...16 12 EG Baumusterprüfbescheinigung ...
Страница 18: ...17 ...
Страница 27: ...26 Plug the positive pole 14 preoperational ...
Страница 32: ...31 Illustrations ...
Страница 34: ...33 12 EC type examination certificate ...
Страница 35: ...34 ...
Страница 44: ...43 Fichez le pôle positif 14 avant la mise en fonctionnement ...
Страница 49: ...48 Illustrations ...
Страница 51: ...50 12 Attestation d examen CE de type ...
Страница 52: ...51 ...
Страница 61: ...60 Sluit voor gebruik de positieve pool aan 14 ...
Страница 66: ...65 Afbeeldingen ...
Страница 68: ...67 12 EG verklaring van typeonderzoek ...
Страница 69: ...68 ...
Страница 78: ...77 Prima della messa in funzione inserire il polo positivo 14 ...
Страница 83: ...82 Illustrazioni ...
Страница 85: ...84 12 Attestato di certificazione ...
Страница 86: ...85 ...
Страница 95: ...94 Conecte el polo positivo 14 antes del uso ...
Страница 100: ...99 Ilustraciones ...
Страница 102: ...101 14 Certificado de ensayo de tipo de construcción CE ...
Страница 103: ...102 ...
Страница 112: ...111 Ligue o pólo positivo 14 antes da colocação em funcionamento ...
Страница 117: ...116 Desenhos ...
Страница 119: ...118 15 N do Certificado do modelo CE ...
Страница 120: ...119 ...
Страница 129: ...128 Innan du startar skall pluspolen anslutas ...
Страница 134: ...133 Bilder ...
Страница 136: ...135 14 EG konstruktionskontrollintyg ...
Страница 137: ...136 ...


