background image

05/10

30

Inbetriebnahme des Modells

Getting started with the model

Verwendung eines Balancers

Ein  Balancer  überwacht  die  Ladespannung  jeder  einzelnen 

Zelle  (bei  mehrzelligen  LiPo-Akkupacks).  Sollte  an  einer  Zelle 

die  Spannung  4,2  V  übersteigen,  so  wird  je  nach  Bauart  des 

Balancers  entweder  die  Zelle  entladen  oder  der  Ladevorgang 

der einzelnen Zelle beendet. Dies sichert die einzelne Zelle vor 

Überladung.

Verwendung eines Equalizers

Ein Equalizer gleicht bereits zu Beginn des Ladevorgangs unter-

schiedliche  Spannungslagen  der  einzelnen  Zellen  innerhalb 

des Akkupacks aus. Somit sind die einzelnen Spannungen der 

Zellen während des ganzen Ladevorgangs absolut identisch.

Tiefentladung

Da eine Entladung  unter 2,5 V pro Zelle zu einer dauerhaften 

Schädigung des Akkus führt, ist diese Tiefentladung in jeden Fall 

zu vermeiden. Aus Sicherheitsgründen sollten Sie programmier-

bare Fahrt- und Flugregler so einstellen, dass bereits bei einer 

Spannung  von  3,0  V  pro  Zelle  die  Unterspannungserkennung 

anspricht. Alternativ dazu sind optische Unterspannungsanzeigen 

ebenfalls sehr empfehlenswert.

Handhabung des LiPo-Akkus

Lithium ist ein sehr reaktionsfreudiges chemisches Element mit 

hoher  Energiedichte.  Durch  Überladung  können  LiPo-Akkus 

zerplatzen oder sich sogar entzünden.

Aus diesem Grund müssen Sie LiPo-Akkus zum Laden immer 

auf  einen  feuerfesten  Untergrund  legen  und  den  Ladevorgang 

beaufsichtigen.

Wird  ein Akku  durch  einen Absturz  oder  Crash  verformt  oder 

beschädigt,  darf  er  nicht  mehr  weiter  eingesetzt  werden.  Der 

Akku muss vorschriftsmäßig entsorgt werden.

Weiterhin  gelten  auch  für  LiPo-Akkus  die  allgemeinen 

Gefahrenhinweise im Umgang mit Akkus und Batterien.

Abnehmen der Trainerhaube

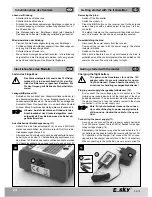
Zum  Einsetzen  des  Flugakkus  muss  nur  der  vordere  Teil  des 

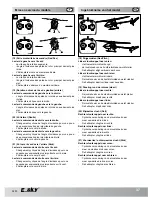
Rumpfes, bzw. die Trainerhaube abgenommen werden (14).

Hebeln Sie dazu die beiden Gummiösen von den Haltestiften  

rechts und links unterhalb des Rotorkopfes .
Ziehen Sie die Haube nach vorne ab.

Einsetzen des Flugakkus 

Schieben  Sie  den  geladenen  Flugakku  zwischen  Landegestell 

und Motor in den Akkuschacht (

15)

Die  Anschlusskabel  müssen  in  Flugrichtung  vorn  nach  rechts 

weisen,  um  verspannungsfrei  mit  dem  Flugregler  verbunden 

werden zu können.

Befestigen Sie den Flugakku vorläufig mit dem Klettband.


Ausbalancieren des Modells


ACHTUNG!  Der  Helikopter  muss  korrekt  aus-

balanciert sein. Bei falscher Schwerpunktlage 

verlieren Sie die Kontrolle über das Modell!

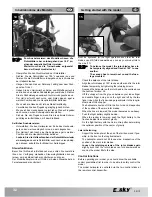
Der Schwerpunkt des Heli-Modells sollte exakt auf der Drehachse 

des Hauptrotors (Hochachse) liegen (16). 

Im  Schwerpunkt  kreuzen  sich  alle  Drehachsen  (Hoch-/Längs-

Querachse) des Modells (a).

Während  des  Fluges  müssen  sich  die  Rotorblätter  durch  die 

Fliehkraft von selbst ausrichten können. Darum dürfen für den 

Flugbetrieb die Halteschrauben nur so fest angezogen werden, 

dass  die  Rotorblätter  noch  nach  unten  abklappen  können, 

sobald Sie Ihr Modell zur Seite kippen (17).

-

-

-

-

Use of a balancer

A balancer monitors the charging voltage of each single cell (in 

the  case  of  multi-cell  LiPo  rechargeable  battery  packs).  If  the 

voltage at one cell exceeds 4.2 V, either the cell is discharged 

or the charging process of the single cell is stopped, depending 

on the type of balancer. This protects the single cell from over-

charging.

Use of an equalizer

An equalizer equalises different voltage levels of the individual 

cells within the rechargeable battery pack already at the begin-

ning  of  the  charging  process.  The  individual  voltages  of  the 

cells are thus absolutely identical during the complete charging 

process.

Total discharge

Since a discharging below 2.5 V per cell leads to a permanent 

damaging of the rechargeable battery pack, this total discharging 

is to be prevented at any rate. For safety reasons, programmab-

le  cruise  controls/flight  control  systems  should  be  set  in  such 

a  way  that  the  undervoltage  detection  responds  already  at  a 

voltage of 3.0 V per cell. Alternatively, the optical undervoltage 

displays are also recommendable.

Handling of the LiPo rechargeable battery pack

Lithium is a highly reactive chemical element with a high energy 

density. In the case of overcharging, the LiPo rechargeable bat-

tery packs might burst or even inflame.

Therefore, LiPo rechargeable battery packs always have to be 

put on a fire-proof ground for charging and the charging process 

be  supervised.  If  a  rechargeable  battery  pack  is  deformed  or 

damaged, it must not be used any longer. The rechargeable bat-

tery pack has to be disposed of according to regulations.

Furthermore,  the  general  danger  warnings  for  the  handling  of 

rechargeable  battery  packs  and  batteries  also  apply  for  LiPo 

rechargeable battery packs.

Taking off the canopy

To put in the flight battery, only the front part of the fuselage or 

the canopy has to be taken off (14).

To do so, pry the two rubber eyelets from the holding pins on 

the left and right beneath the rotor head.
Pull off the cabin, doing so toward the front.

Installing the flight battery

Push  the  charged  flight  battery  between  the  landing  gear  and 

motor in the battery shaft (15).

The connecting cable must point in the flight direction, i.e. in front 

to the right, so that it can be connected with the speed controller 

without any distortion.

Fasten the flight battery temporarily with the Velcro strap.

Counterbalancing the model


ATTENTION! The helicopter must be correctly 

counterbalanced. If the position of the center of 

gravity is not correct, you will lose control over 

the model!

The center of gravity of the helicopter model should be exactly 

on the axis of rotation of the main rotor (yaw axis) (16).

All the axes of rotation will cross in the center of gravity (vertical 

/ longitudinal / lateral axis) of the model (a).

During  the  flight,  the  rotor  blades  must  be  able  to  align  them-

selves  with  the  centrifugal  force.  Hence,  the  retaining  screws 

-

-

-

-

Содержание HoneyBee CP3

Страница 1: ...H licopt re lectrique RC pr t voler avec radiocommande de 2 4 GHz 6 voies RC elektro helikopter RTF met 2 4 GHz 6 kanaal remote stuurzender RC Elektro Helikopter RTF mit 2 4 GHz 6 Kanal Fernsteuersend...

Страница 2: ...64 Ersatzteile 68 Prescribed use 4 Declaration of Conformity 4 Product description 4 Control system 4 Drive 4 Remote control set 6 Technical data 6 Scope of delivery 8 Safety instructions 8 General 8...

Страница 3: ...on 55 Entretien 55 Elimination 57 Diagnostic d erreur 59 Vue eclat e Honey Bee CP3 61 Vue eclat e Honey Bee CPX 65 Pi ces de rechange 69 Gebruik conform de voorschriften 5 Conformiteitsverklaring 5 Pr...

Страница 4: ...Versorgungsspannung wird von dem 11 1 V 1000 mA LiPo Flug Akku bereit gestellt Ein separater Elektromotor greift ber das Motorritzel auf das This product is an electrically driven model helicopter whi...

Страница 5: ...gime en position m diane pas de ralenti Entra nement L arbre principal du rotor est entra n via une roue dent e prin cipale par un moteur lectrique de la s rie 370 Bij dit product gaat het om een elek...

Страница 6: ...und 12 6V 2 oder 3zellige LiIon LiPo Packs Ladestrom Max 800 mA Abm L x B x H 68 x 46 x 20 mm rotor via the motor pinion The operation of the tail is controlled by the second speed con troller integra...

Страница 7: ...type Mignon accus de 4 8 6 V Dimensions L x H x P 185 x 200 x 85 mm Poids env 800 g Bloc d alimentation Tension de service 230 V 50 Hz Tension de sortie 12 V Courant de sortie max 1500 mA Adaptateur...

Страница 8: ...darf nur von Fachleuten ausgef hrt werden Bei eigenm chtigen Eingriffen in die Elektronik erlischt die Zulassung der Fernsteueranlage Scope of delivery Electric helicopter ready to fly 6 channel remot...

Страница 9: ...commande d fectueux ne doit tre effectu e que par du personnel qualifi En cas de r paration sur les composants lectronique de votre propre initiative l habilitation pour la t l commande sera annul e...

Страница 10: ...Schaltzustand Ihres Senders und Empf n gers kann der Motor durch einen St rimpuls spontan anlau fen Der Rotor kann so schwere Verletzungen hervorrufen Before starting Please learn the operation and u...

Страница 11: ...nce de s curit vis vis des rotors d s que l accu est branch Ind pendamment de l tat de commande de l metteur et du r cepteur le moteur peut s allumer spontan ment par une impulsion parasite Le rotor p...

Страница 12: ...er tzungen verursachen benutzen Sie deshalb in diesem Fall geeignete Schutzhandschuhe Laden Sie ausschlie lich daf r vorgesehene Akkus verwen den Sie dazu geeignete Akkuladeger te CAUTION Change over...

Страница 13: ...rrod s ou endommag s peuvent au toucher causer des br lures sur la peau mettez donc dans un tel cas des gants de protection appropri s Ne rechargez que les accus pr vus cet effet utilisez pour leur re...

Страница 14: ...die Betriebsdauer des Senders weit ber der des Flugakkus liegt The delivered charger which includes the plug in power supply unit and charge adapter ba lancer should only be used for charging the LiPo...

Страница 15: ...sible avec des ac cus ou avec des piles La faible tension piles 1 5V accus 1 2V et la faible ca pacit des accus cause toutefois une diminution de la dur e d utilisation Ceci ne joue toutefois aucun r...

Страница 16: ...en Sie dabei unbedingt die richtige Polung der Zellen Ein entsprechender Hinweis befindet sich am Boden des Batteriefaches When using rechargeable batteries there can be a decrease in range If you use...

Страница 17: ...ement pr vu cet effet 2 Respectez la polarit correcte des cellules La polarit est signal e au fond du logement van de helikopter Bij het gebruik van accu s kan de reikwijdte eventueel ver minderen Als...

Страница 18: ...ers entladen und danach wie der voll aufgeladen werden Charging rechargeable batteries in the transmitter The transmitter is equipped with a charge socket to charge the inserted rechargeable batteries...

Страница 19: ...nt pas com pl tement vides leur capacit diminue avec le temps Pour cette raison de tels accus doivent tre d charg s au moyen d un chargeur appropri en dehors de l metteur puis doivent tre nouveau comp...

Страница 20: ...vice de l metteur El ments de commande de l metteur Antenne Basculeur 1 mode 3D Affichage DEL par barre tension de fonctionnement de l metteur Levier de commande pour les fonctions Pas Pitch et Arri r...

Страница 21: ...05 10 21 5...

Страница 22: ...rlischt ist die Bindung fehlgeschlagen Die Verbindung zwi schen Sender und Empf nger muss komplett getrennt und erneut hergestellt werden Switching on off Switch on the transmitter using the functiona...

Страница 23: ...dica teur d tat de l metteur ne clignote que une fois pour ensuite s teindre la liaison n aura pas t tablie La liaison entre metteur et r cepteur doit alors tre enti rement arr t e puis tablie nouveau...

Страница 24: ...s Laders schliessen Sie zuerst das 12V Anschlusskabel an den Lader und erst dann an die 12V Removing the bind Switch off the transmitter Switch the model on Press the BIND button on the receiver next...

Страница 25: ...n de service d s allume 12 Le compensateur peut en option tre raccord une batte rie12V de voiture avec l adaptateur contenu dans la livraison De verbinding teniet doen Schakel de zender uit Schakel he...

Страница 26: ...15 V beginnt der Ladevorgang erneut so dass der Akku nicht tiefentladen werden kann polarity Then connect the LiPo battery to the charger and start the charging process Charging the flight battery 13...

Страница 27: ...ateur de charge compensateur Retirez l adaptateur secteur de la prise de cou rant Si l accu reste branch au chargeur apr s le processus de chargement maximum 360 minutes risque de d charge Si la tensi...

Страница 28: ...k nnen m ssen folgende elektro nische Hilfsmittel eingesetzt werden If the flight battery is empty please wait for at least 10 minutes before starting with the next flight to allow the drive and elect...

Страница 29: ...accupack geen te hoge schadelijke spanningen van meer dan 4 2 V per cel kunnen optreden bij het opladen moeten de volgende elektronische hulpmiddelen gebruikt worden Apr s le processus de charge ne r...

Страница 30: ...torbl tter noch nach unten abklappen k nnen sobald Sie Ihr Modell zur Seite kippen 17 Use of a balancer A balancer monitors the charging voltage of each single cell in the case of multi cell LiPo rech...

Страница 31: ...uvoir se positionner d elles m mes sous l action de la force centrifuge Pour le vol donc les vis Een balancer gebruiken Een balancer bewaakt de laadspanning van elke afzonderli jke cel bij LiPo accupa...

Страница 32: ...k nnen Der Modellhelikopter wird mit Hilfe der beiden Steuerhebel am Fernsteuersender kontrolliert must be tightened for the flight operation such that the rotor blades can still fold downwards as soo...

Страница 33: ...us devriez vous familiariser avec les possibilit s de pilotage afin de pouvoir con tr ler le mod le de mani re fiable L h licopt re est command au moyen des deux leviers de com mande sur l metteur de...

Страница 34: ...te des Rotorumlaufes am gr ten Das Heck wird angehoben und die Nase abgesenkt Der Helikopter fliegt nach vorne The following steering functions are available Throttle function The flight height of a h...

Страница 35: ...Roulis cette man uvre s effectue par le r glage de pales du rotor Cette man uvre se commande galement l aide du levier de droite Si le levier de commande est d plac vers l avant la pouss e ascensionne...

Страница 36: ...stellwinkels zu mehr Auftrieb vor ne Helikopter fliegt nach hinten 18 Lifting lowering Throttle Take the left control lever to the front Speed increases The angle of attack of the main rotor blades be...

Страница 37: ...pouss e ascensionnelle plus importante sur l arri re L h licopt re vole vers l avant Levier de commande de droite vers l arri re Changement cyclique de l angle d incidence pour une pouss e ascensionn...

Страница 38: ...Nick und Heck Hebel in Neutralstellung Die vier Trimmschieber m ssen in der Mittelposition stehen CCPM Collective Cyclic Pitch Mix control The Pitch Aileron and Elevator functions are simultaneously e...

Страница 39: ...d bray e moteur arr t Placez le levier Gaz Pas en position ralenti et les leviers Roulis Nick et Arri re en position neutre Les quatre interrupteurs coulissant de compensation doivent tre en position...

Страница 40: ...dem Modell Motor l uft nicht Bet tigen Sie nacheinander die Fernsteuerhebel Nick Roll und Heck und beobachten Sie dabei die Reaktionen des Modells Assignment of the receiver plug in positions Channel...

Страница 41: ...nt de l h licopt re le moteur ne tourne pas encore Actionnez dans l ordre les leviers de t l commande Nick Roulis et Arri re et familiarisez vous avec et observez les r actions du mod le Belegging van...

Страница 42: ...uslenkungen des Hecks f hren The RC system is working flawlessly if in a free field with the antenna pushed in the model still responds correctly to the remote control sys tem at a distance of approx...

Страница 43: ...ctionnement Gain peut tre r gl e au moyen du r gulateur b Plus l on tourne le r gulateur vers la droite plus les corrections sont importantes vitesse de rotation diff rente des deux rotors Cela signif...

Страница 44: ...mmung der Roll Funktion rechter Fernsteuerhebel nach rechts bzw links Wenn sich der Heli nach hinten bzw nach vorne neigt korri gieren Sie die Trimmung der Nick Funktion rechter Fern steuerhebel vorw...

Страница 45: ...s la droite ou vers la gauche Si l h licopt re s incline vers l arri re ou vers l avant corrigez le trimmer de la fonction Nick levier de commande de dro ite en l actionnant vers l avant ou l arri re...

Страница 46: ...Transport oder Lagerung Andernfalls kann der Akkupack tiefentladen werden dadurch wird er zerst rt unbrauchbar Wenn Sie nach einigen Fl gen ein Gesp r f r Ihren Helikop ter haben k nnen Sie weitere Op...

Страница 47: ...trement le pack d accus pourra tre totalement d charg et de par l d truit inutilisable Quand au bout de quelques vols vous commencez vous familiariser avec votre h licopt re vous pouvez alors entre pr...

Страница 48: ...er Eine Drehung gegen den Uhrzeigersinn vermindert den An stellwinkel und damit den Auftrieb das Blatt l uft niedriger Trainer Pupil Operation You should enlist the help of an experienced model pilot...

Страница 49: ...ence la pale re oit plus de pouss e ascensi onnelle et tourne plus haut Un tour dans le sens contraire des aiguilles d une montre r duit l angle d incidence et ainsi la pouss e ascensionnelle la pale...

Страница 50: ...tion Entnehmen Sie zun chst die Batterien Akkus aus dem Batteriefach Schieben Sie den linken DIP Schalter nach oben Check and correct the pitch on both the rotor blades till both the blades are in one...

Страница 51: ...sir en tout quatre occupa tions diff rentes des fonctions de levier selon que vous changez un seul ou les deux commutateurs DIP A la livraison les deux commutateurs DIP sont en position Controleer de...

Страница 52: ...n kleiner Fanghaken gebogen wurde ACHTUNG F hren Sie zum Abschluss eine Funktions kontrolle des Senders durch und machen Sie sich unbedingt mit der ver nderten Bedienung des Senders vertraut Push the...

Страница 53: ...r mit s pour former un crochet de retenue avec une pince pointue ATTENTION V rifiez la fin des op rations au bon fonction nement de l metteur et familiarisez vous avec le maniement invers de l metteur...

Страница 54: ...n Sie Starts und Landungen in hohem Gras da sich dieses im Heckrotorsystem verfangen und es besch digen kann Maintenance A regular inspection and maintenance of the components of the helicopter as wel...

Страница 55: ...pales de rotor d fectueuses provoquent un d s quilibrage et des vibrations Rien qu un l ger contact avec le sol peut endom mager les pales Onderhoud Een regelmatige inspectie en onderhoud van de compo...

Страница 56: ...abgeben wo Batterien Akkus verk auft werden Sie erf llen damit die gesetzlichen Verpflichtungen und leisten Ihren Beitrag zum Umweltschutz Cleaning Clean the exterior of the model and the remote cont...

Страница 57: ...iles accus usag s peuvent tre remis gratuitement au centre de collecte de votre commune nos filia les et partout ou des piles accus sont en vente Vous satisferez ainsi aux obligations de la loi et con...

Страница 58: ...or ist defekt Motorkabel lose Motor wird zu hei RC system does not function Transmitter receiver batteries are discharged Batteries rechargeable batteries are wrongly inserted The plug of the receiver...

Страница 59: ...ns les roulements Le rotor de queue est l che Le rotor ne tourne pas bien que les servos r agissent Le mode 3D est activ Le moteur est d fectueux C ble moteur l che Le moteur chauffe trop De RC instal...

Страница 60: ...Vue eclat e Verbrandingstekening Explosionszeichnung Exploded view 05 10 60 Honey Bee CP3 mit Trainerhaube with canopy avec cabine met trainerkap...

Страница 61: ...sher 021 Lager 3x6x2 5 8 Bearing 3x6x2 5 022 Rotorblattbefestigung 2 Main blade clamp 023 Schraube M2x12 2 Socket head cap screw M2x12 No Bezeichnung Description Anzahl 024 Hauptrotorverbinder 1 Main...

Страница 62: ...r joiner 061 Akkupack 1 Battery pack 062 Hauptrotorwelle 1 Main shaft 063 Stift 1 5x8 1 Pin 1 5x8 064 Schraube TPF 1 7x4 4 Screw TPF 1 7x4 065 Hauptzahnradbefestigung 1 Main gear fixing set 066 Hauptz...

Страница 63: ...05 10 63...

Страница 64: ...Vue eclat e Verbrandingstekening Explosionszeichnung Exploded view 05 10 64 Exploded View Honey Bee CPX mit Rumpfaufbau with fuselage avec fuselage met romp...

Страница 65: ...lybar 023 Rotorbremse 1 Disc brake No Bezeichnung Description ST Pcs 024 Verschiebeblock 1 Slide block 025 Rotorkopf 1 Main rotor head 026 Paddelstangenbefestigung 1 Flybar mounting set 027 Anlenkgest...

Страница 66: ...motor wire 058 Rahmen links 1 Left framework 059 Kreuzschlitzschraube ST1 7x6 13 Philips head screw ST1 7x6 060 Servo 3 Servo 061 Kreuzschlitzschraube 1 7x6 2 Philips head screw 1 7x6 062 Kreuzschlitz...

Страница 67: ...05 10 67...

Страница 68: ...000200 Kugellager 3x6x3 Bearing 3x6x3 002369 H henleitwerk Horizontal fin 002366 Stellring Hauptrotorwelle Main shaft retaining collar 002380 Rotorblattverbinder Horizontal shaft 002381 Schraubenset S...

Страница 69: ...Paddelstange Fly bar 000512 Steckernetzger t Switching adapter 000988 6 Kanal Sender CCPM Transmitter 6CH CCPM 001367 6Kanal Empf nger 2 4 GHz 6 CH receiver 2 4 GHz 002385 Landekufen Skid strut 000282...

Страница 70: ...5 10 St Screw set M2x2 5 10 pcs 002610 Kreuzschlitzschraube M2x7 10 St Cruciform slotted screw M2x7 10 pcs 002620 Kugelkopfschraube 4x1 8 10 St Ball end screw 4x1 8 10 pcs 002609 Kreuzschlitzschraube...

Страница 71: ...onal Round Head ScrewM2x16 10pcs 002600 Rotorblatthalter Alu Main blade clip set alum 002599 Mittelnabe Alu Center hub set alum 002597 Anlenkung Paddel Alu Flybar yoke alum 002598 Taumelscheibe Alu Sw...

Страница 72: ...print We reserve the right to change the technical or physical specifications Copyright 2010 Information l gal Cette notice d utilisation est une publication de la societ ESKYHOBBY 28 Building North Y...

Страница 73: ...usend Teile f r Sie bereit Bestellung per Telefon 0180 531 21 11 Bestellung per Telefax 0180 531 21 10 Bestellung per Mail sales conrad de Bestellung per Internet www conrad de ersatzteilservice Wir f...

Отзывы: