


D-Show Profile Guide
104
Scrolling in the Patchbay
To scroll through the channel list (vertically):
1
Move the cursor over a channel name at the left of the
Patching Grid.
2
Press the Up or Down Arrow keys on the keyboard.
To scroll through the hardware I/O list (horizontally):
1
Move the cursor over a hardware I/O channel at the top of
the Patching Grid.
2
Press the Left or Right Arrow keys on the keyboard.
To scroll the Patching Grid, do one of the following:
■
Click the up/down or left/right Patching Grid scroll arrows
to move square by square.
■
Click the up or down Patching Grid double arrows to move
screen by screen.
■
Right-click in the Patching Grid and drag in any direction.
Routing Channels in the Patchbay
To route channels in the Patchbay:
1
Go to a patchbay page by clicking the appropriate I/O tab,
Channel Type tab, and Hardware tab.
2
Place the cursor over the Patching Grid. The cursor changes
to a crosshair, and lines extend above and to the left of the
current cursor location to identify the column and row in
which it is located.
3
Click in the row for the channel and in the column for the
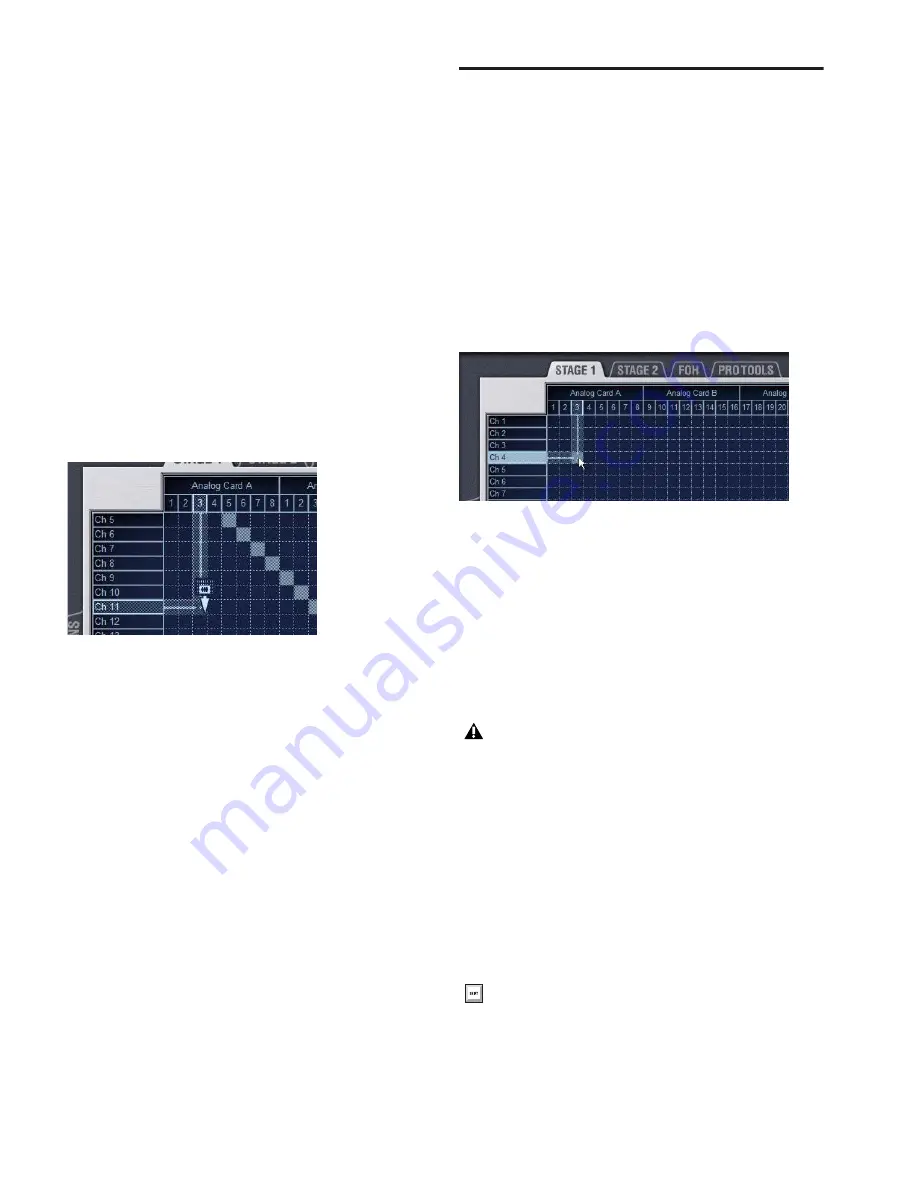
hardware I/O source. For example, to route Stage Rack analog
input 4 to D-Show Input Channel 4, click in row 4, column 4
as shown below.
4
Click and drag vertically, horizontally, or at an angle to as-
sign multiple patch points in a single action.
5
Repeat as needed.
Patchbay Click and Drag
You can quickly select a range of crosspoints in the Patchbay
grid in one operation with a left-click and drag of the cursor.
You can click and drag horizontally, vertically, and at 45 de-
gree angles in any direction.
To use click and drag in the Patchbay grid:
1
Left-click on the crosspoint defining the start of the range.
2
Continue to hold the left-click button, then drag horizon-
tally (to populate a row), vertically (to populate a column), or
horizontally and vertically (a 45 degree angle).
3
Release the left-click button when the destination cross-
point is reached. All crosspoints along the path are filled in.
The destination crosspoint sets the targeted channel. If the
new assignments steal any previous assignments, a warning
dialog will ask you to confirm or cancel the reassignment.
Scrolling the Patching Grid by right-clicking and dragging
Routing a hardware input to an Input Channel
You cannot undo changes to the Patchbay grid.
To suppress the reassignment warning dialog, hold Default
(on the control surface) or Alt (on the computer keyboard)
while clicking in the patch grid. For more information, see
“Warning when Stealing Inputs or Outputs in the Patch-
bay” on page 106.
Содержание D-Show Profile
Страница 10: ...D Show Profile Guide x ...
Страница 11: ...Part I Overview and Installation ...
Страница 12: ......
Страница 16: ...D Show Profile Guide 6 ...
Страница 32: ...D Show Profile Guide 22 ...
Страница 33: ...Part II System Description ...
Страница 34: ......
Страница 50: ...D Show Profile Guide 40 ...
Страница 58: ...D Show Profile Guide 48 ...
Страница 67: ...Part III Signal Routing ...
Страница 68: ......
Страница 94: ...D Show Profile Guide 84 ...
Страница 102: ...D Show Profile Guide 92 ...
Страница 110: ...D Show Profile Guide 100 ...
Страница 134: ...D Show Profile Guide 124 ...
Страница 135: ...Part IV Processing ...
Страница 136: ......
Страница 144: ...D Show Profile Guide 134 ...
Страница 171: ...Part V Shows ...
Страница 172: ......
Страница 180: ...D Show Profile Guide 170 ...
Страница 204: ...D Show Profile Guide 194 ...
Страница 227: ...Part VI Specifications ...
Страница 228: ......
Страница 236: ...D Show Profile Guide 226 D Show Output Signal Flow Diagram Version 1 3 07 07 05 ...
Страница 245: ...Part VII Reference ...
Страница 246: ......
Страница 258: ...D Show Profile Guide 248 ...
Страница 269: ......


