


85
The Qube 2 Administrator can also determine the connection mode
between the Qube 2 and the ISP. There are three possible
connection-mode settings; these settings determine how the Qube 2 uses
the modem to connect to your ISP.
•
“Not Used” means the Qube 2 does not connect at all.
•
“Dial-on-demand” means the Qube 2 connects only when there is
traffic that is destined for an external network.
•
“Always Connected” means the Qube 2 is connected at all times.
The setting you choose depends on your phone line and access charges.
•
If you have a dedicated phone line for Internet access, then you can
choose “Always Connected.”
•
If the phone line you use for Internet access is also used for voice or
fax communication, or if your Internet access is charged by the
minute, then choose “Dial-on-demand.” The modem accesses the
Internet only when a user requires Internet access.
Note:
If you choose Dial-on-demand, your first attempt to
access the Internet may time out before your modem can
establish a connection to your ISP. If this happens, wait for a
short period, then try again.
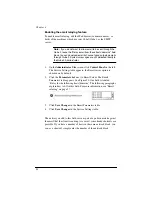
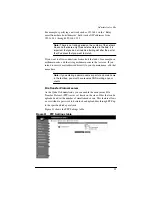
Figure 28 shows the Modem Dial-out Settings table.
Figure 28 Modem Dial-out Settings table
Содержание Cobalt Qube 2
Страница 1: ...Cobalt QubeTM 2 User Manual...
Страница 6: ...vi...
Страница 20: ...Chapter 1 6 Figure 3 Administrator Site screen Figure 4 Public Site screen...
Страница 26: ...Chapter 1 12...
Страница 45: ...Setting up the Qube 2 31 Figure 15 shows the online registration page Figure 15 Online registration page...
Страница 46: ...Chapter 2 32 Figure 16 shows the Public Site screen on the Qube 2 Figure 16 Public site on the Qube 2...
Страница 68: ...Chapter 3 54...
Страница 70: ...Chapter 4 56 Figure 17 Administrator Site screen...
Страница 72: ...Chapter 4 58 Figure 18 shows the Administrator Settings table Figure 18 Administrator Settings table...
Страница 76: ...Chapter 4 62 Figure 19 shows the User Defaults table Figure 19 User Defaults table...
Страница 78: ...Chapter 4 64 Figure 20 shows the Add New User table Figure 20 Add New User table...
Страница 81: ...Administrator Site 67 Figure 21 shows the Email Settings table for a user Figure 21 Email Settings table...
Страница 87: ...Administrator Site 73 Figure 24 shows the Add New Group table Figure 24 Add New Group table...
Страница 184: ...Appendix B 170...
Страница 206: ...Appendix E 192...
Страница 218: ...Appendix F 204...


