


94
Enabling the email relaying feature
To enable email relaying, add the IP addresses (or domain names, or
both) of the machines which use your Cobalt Qube 2 as the SMTP
server.
Note:
If you do not want to allow email to be sent through the
Qube 2, leave the “Relay email from these hosts/domains” field
blank. You can download email but cannot send outgoing emails
through Qube 2. Systems messages are still delivered locally to
the Qube 2 Administrator.
1.
On the
Administrator Site
screen, click
Control Panel
on the left.
The Service Settings table appears; the Email server option is
checked on by default.
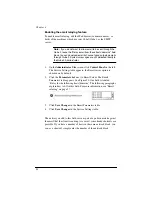
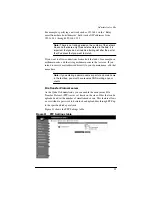
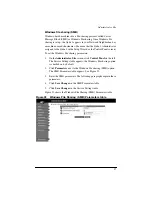
2.
Click the
Parameters
link next to Email Server. The Email
Parameters table appears. See Figure 30. One field is labeled
“Relay for the following hosts/domains”. The following paragraphs
explain how to fill in this field. For more information, see “Email
relaying” on page 37.
3.
Click
Save Changes
in the Email Parameters table.
4.
Click
Save Changes
in the Service Settings table.
The entries you add to this field serve as part of a pattern match against
the email that the client is sending. As a result, some handy shortcuts are
possible. If you have a number of hosts in the same network block, you
can, as a shortcut, simply enter the number of the network block.
Содержание Cobalt Qube 2
Страница 1: ...Cobalt QubeTM 2 User Manual...
Страница 6: ...vi...
Страница 20: ...Chapter 1 6 Figure 3 Administrator Site screen Figure 4 Public Site screen...
Страница 26: ...Chapter 1 12...
Страница 45: ...Setting up the Qube 2 31 Figure 15 shows the online registration page Figure 15 Online registration page...
Страница 46: ...Chapter 2 32 Figure 16 shows the Public Site screen on the Qube 2 Figure 16 Public site on the Qube 2...
Страница 68: ...Chapter 3 54...
Страница 70: ...Chapter 4 56 Figure 17 Administrator Site screen...
Страница 72: ...Chapter 4 58 Figure 18 shows the Administrator Settings table Figure 18 Administrator Settings table...
Страница 76: ...Chapter 4 62 Figure 19 shows the User Defaults table Figure 19 User Defaults table...
Страница 78: ...Chapter 4 64 Figure 20 shows the Add New User table Figure 20 Add New User table...
Страница 81: ...Administrator Site 67 Figure 21 shows the Email Settings table for a user Figure 21 Email Settings table...
Страница 87: ...Administrator Site 73 Figure 24 shows the Add New Group table Figure 24 Add New Group table...
Страница 184: ...Appendix B 170...
Страница 206: ...Appendix E 192...
Страница 218: ...Appendix F 204...


