


89
Managing the settings for the services
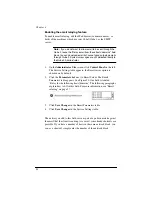
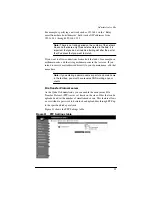
To manage the settings for the Qube 2 services:
1.
On the Administrator Site screen, click
Control Panel
on the left.
The Service Settings table appears. See Figure 29.
2.
To turn on any of the services listed in the Service Settings table
(except Web server and Discussion Group, which are always on),
click the check box next to that service. The services are described
in the sections that follow.
3.
Click
Save Changes
.
Note:
Instructions for users on how to use the Qube 2 services
are given in Chapter 3.
Web server
This service is always on. It allows users to access Web content.
Discussion group
This service is always on. It allows users to access discussions groups.
Discussion groups are online discussions or message boards which are
open to group members. Sample uses include policy discussions,
brainstorming, and planning.
Email server
The Qube 2 supports email for entire domains (for example,
www.mydomain.com). By default, each registered user has an email
account created on the Qube 2.
The Qube 2 supports multiple client and server email protocols but does
not implement virtual email users. This means that for the entire
Qube 2, each user must have a unique user name, even if the users are
on different virtual sites. For more information, see “Email relaying” on
page 37.
Содержание Cobalt Qube 2
Страница 1: ...Cobalt QubeTM 2 User Manual...
Страница 6: ...vi...
Страница 20: ...Chapter 1 6 Figure 3 Administrator Site screen Figure 4 Public Site screen...
Страница 26: ...Chapter 1 12...
Страница 45: ...Setting up the Qube 2 31 Figure 15 shows the online registration page Figure 15 Online registration page...
Страница 46: ...Chapter 2 32 Figure 16 shows the Public Site screen on the Qube 2 Figure 16 Public site on the Qube 2...
Страница 68: ...Chapter 3 54...
Страница 70: ...Chapter 4 56 Figure 17 Administrator Site screen...
Страница 72: ...Chapter 4 58 Figure 18 shows the Administrator Settings table Figure 18 Administrator Settings table...
Страница 76: ...Chapter 4 62 Figure 19 shows the User Defaults table Figure 19 User Defaults table...
Страница 78: ...Chapter 4 64 Figure 20 shows the Add New User table Figure 20 Add New User table...
Страница 81: ...Administrator Site 67 Figure 21 shows the Email Settings table for a user Figure 21 Email Settings table...
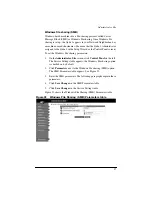
Страница 87: ...Administrator Site 73 Figure 24 shows the Add New Group table Figure 24 Add New Group table...
Страница 184: ...Appendix B 170...
Страница 206: ...Appendix E 192...
Страница 218: ...Appendix F 204...


