31
Onboard Charger Repairs
BATTERY CHARGER: FOR ERIC CHARG-
ING SYSTEM
1
4
5
3
6
2
7
2793
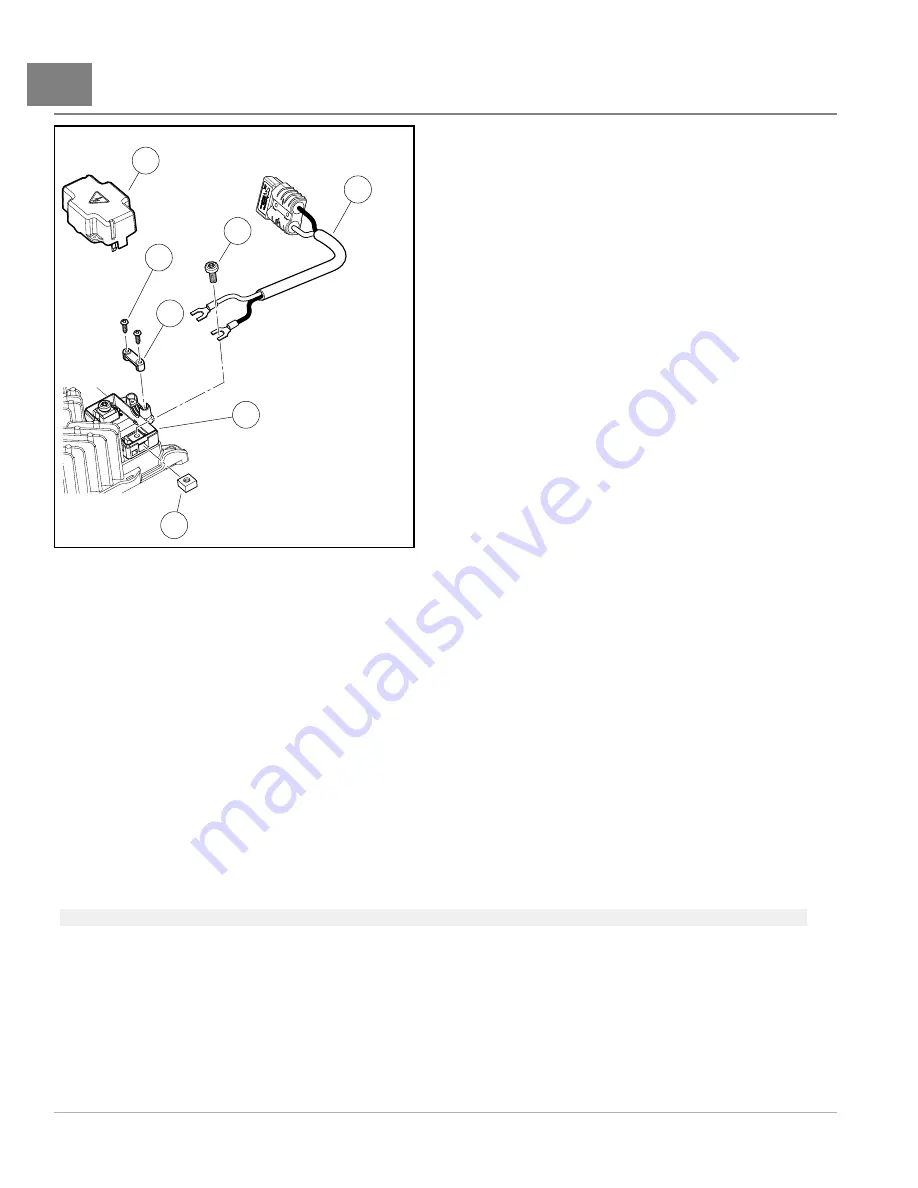
Figure 31-13
Terminal Block Cover, DC Cord and Strain
Relief – Onboard Charger
DC CORD AND STRAIN RELIEF REMOVAL
1.
Disconnect AC cord from AC outlet.
2.
Disconnect DC cord (1) at connector mounted under seat
.
3.
Remove terminal block cover.
See Terminal Block Cover Removal on page 31-23.
4.
Remove two torx screws (4) securing strain relief (5) to terminal block (3)
.
5.
Remove torx screw (6) securing each DC cord wire to terminal block (3).
DC CORD AND STRAIN RELIEF INSTALLATION
1.
Attach DC cord red wire to positive terminal (+) and black wire to negative terminal (–) with torx screws (6)
See following NOTE.
Tighten screws (6) to 39.8 in·lb (4.5 N·m).
NOTE:
The positive symbol (+) and negative symbol (–) are molded into the terminal block for easy identification.
2.
With DC cord (1) seated properly in the terminal block (3), place strain relief (5) over cord and secure with two
torx screws (4). Tighten screws (4) to 7.5 in·lb (0.85 N·m).
3.
Install terminal block cover.
See Terminal Block Cover Installation on page 31-23.
DC CHARGING HARNESS REMOVAL
1.
If connected, disconnect AC cord from AC outlet.
Page 31-24
2014 Precedent
®
Golf Car Maintenance and Service Manual
Содержание Precedent 2014
Страница 2: ......
Страница 4: ......
Страница 24: ......
Страница 28: ......
Страница 38: ......
Страница 66: ......
Страница 104: ......
Страница 108: ...8 Tires WHEELS AND TIRES 680 Figure 8 2 Inflate Tire Page 8 4 2014 Precedent Golf Car Maintenance and Service Manual ...
Страница 116: ......
Страница 152: ......
Страница 234: ......
Страница 252: ......
Страница 264: ......
Страница 298: ......
Страница 332: ......
Страница 394: ......
Страница 412: ......
Страница 438: ......
Страница 444: ......
Страница 508: ......
Страница 534: ......
Страница 543: ......
Страница 544: ......
Страница 545: ......
Страница 547: ......
Страница 548: ......


