6.0 Operation
31
6.13.5 Editing an Existing Job
6.13.5.1 Editing the Job Name
The job name can be edited (or added if an existing job does not have a name) in the job mode
screen. To edit the name, move the cursor down to the desired job number by pressing the down
arrow key. Then press the right arrow key to move the cursor to the desired character position and
edit the character by pressing the up or down arrow keys to toggle between characters of the
alphabet. Numbers can be entered directly by using the number keys. Pressing CLEAR clears the
current character. When finished, you may either go to the current job by pressing ENTER, or go to a
different job, or exit job mode.
6.13.5.2 Editing Send Values
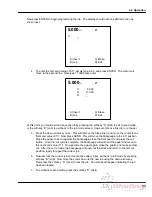
To edit send values of an existing job, start by opening the desired job from the job mode screen. A
job is opened by one of two methods: pointing at the desired job with the cursor and pressing
ENTER, or by entering the job number with the keypad and pressing ENTER. Once a job has been
opened, the current job number will be displayed in the upper right corner. Note: If the job is locked,
it cannot be edited.
Send values can now be edited by moving the cursor up or down to the desired send value and then
typing over the existing value.
When finished editing the job, you may exit the current job by pressing soft-key “B” (Job) to go back
to the job mode screen or soft-key “D” (Exit) to exit to send mode. Or you may use the job for cutting
since it is already open.
6.13.5.3 Inserting Send Values
To insert a send value, press the soft-key “A” (Insert). This moves all send values down and provides
a blank line after the current send value. If more than 35 send values are needed (99 on s/n 001276
and up), the job can be linked (see Channel Linking under the Creating a New Job section on page
30).
6.13.5.4 Erasing Send Values
To erase a send value, press the soft-key “C” (Erase). This will remove the cut value currently being
pointed to by the cursor. To backspace over the current send value without removing the line, press
the left arrow key.
6.13.6 Running a Programmed Job
To use an existing job for cutting, you must first open it by using one of two methods: move the
cursor to the desired job with the arrow keys and press ENTER, or enter the job number with the
keypad and press ENTER. Once a job has been opened, the current job number will be displayed in
the upper right corner. Now press SEND to move the backgauge to the first programmed position (or
send value). Close the front guard and make a cut. Once the cut is made, the backgauge will
automatically push out the paper (if “push-out” is enabled) and move to the next programmed
position. After the last cut in the job is made, the backgauge will move to the first cut position of the
current job. Pressing SEND at any time during the job will send the backgauge to its next
programmed position without making a cut. A plus “+” sign will be displayed at the bottom of the
screen if more cuts remain in the current job.
Содержание Titan 265
Страница 60: ...9 0 Parts List Sequence of Operations 59 9 2 Main Assembly Side View 44000 Sht 2 Rev J...
Страница 61: ...9 0 Parts List Sequence of Operations 60 9 3 Main Assembly Rear View 44000 Sht 3 Rev E...
Страница 62: ...9 0 Parts List Sequence of Operations 61 9 4 Main Assembly Table View 44000 Sht 4 Rev E...
Страница 63: ...9 0 Parts List Sequence of Operations 62 9 5 Main Assembly Parts List 44000 Sht 5 Rev S...
Страница 64: ...9 0 Parts List Sequence of Operations 63 Main Assembly Parts List continued 44000 Sht 6 Rev N...
Страница 65: ...9 0 Parts List Sequence of Operations 64 9 6 Main Assembly Cut Buttons 44000 Sht 7 Rev H...
Страница 66: ...9 0 Parts List Sequence of Operations 65 9 7 Main Assembly Front Shield 44000 Sht 7 Rev H...
Страница 67: ...9 0 Parts List Sequence of Operations 66 9 8 Electrical Panel Assembly EE 2879 Rev H...
Страница 68: ...9 0 Parts List Sequence of Operations 67 Electrical Panel Assembly continued EE 2879 Rev H...
Страница 69: ...9 0 Parts List Sequence of Operations 68 Electrical Panel Assembly continued EE 2879 Rev H...
Страница 71: ...9 0 Parts List Sequence of Operations 70 9 10 Hydraulic Power Unit Assembly H 507 Rev E...
Страница 72: ...9 0 Parts List Sequence of Operations 71 Hydraulic Power Unit Assembly continued H 507 Rev E...
Страница 73: ...9 0 Parts List Sequence of Operations 72 9 11 Manifold Assembly H 516 Sheet 1 Rev C...
Страница 74: ...9 0 Parts List Sequence of Operations 73 9 12 Hydraulic Schematic H 516 Sheet 2 Rev B...
Страница 75: ...9 0 Parts List Sequence of Operations 74 9 13 Manifold Sub Plate Assembly H 517...
Страница 76: ...9 0 Parts List Sequence of Operations 75 9 14 Sequence Check Valve Assembly H 551 Rev A...
Страница 77: ...9 0 Parts List Sequence of Operations 76 9 15 Basic Machine Schematic E 2853 Rev C...
Страница 78: ...9 0 Parts List Sequence of Operations 77 Basic Machine Schematic continued E 2853 Rev C...
Страница 80: ...9 0 Parts List Sequence of Operations 79 9 17 Cut Button Assembly EE 2851 1...
Страница 81: ...9 0 Parts List Sequence of Operations 80 9 18 Control Console Assembly EE 2773 1 Rev C...
Страница 82: ...9 0 Parts List Sequence of Operations 81 9 19 Control P C Assembly EE 2807 1...
Страница 83: ...9 0 Parts List Sequence of Operations 82 9 20 Power Panel Label S 1781 54 Rev C...
Страница 85: ...9 0 Parts List Sequence of Operations 84 9 22 Knife Latch Assembly 47568 Rev C...
Страница 86: ...9 0 Parts List Sequence of Operations 85 9 23 Line Light Assembly EE 2779 Rev B...
Страница 88: ...10 0 Safety Systems Test 87 NOTES...


