6.0 Operation
30
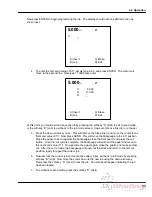
6.13.4.1 Entering Send Values
Now enter send values by using any of the following methods: 1) Type in the desired value and press
ENTER, 2) Press ENTER at a blank line - this will enter the current position of the backgauge as a
send value, or 3) Use the “Cut and Record” feature as described below.
When finished entering send values you may exit the current job by pressing soft-key “B” (Job) to go
back to the job mode screen or soft-key “D” (Exit) to exit to send mode. Or you may use the current
job for cutting by pressing the down arrow at the last line and following the instructions in the
“Running a Job” section (pg. 23).
6.13.4.2 Cut and Record
To use this feature, send the backgauge to a desired position using the backgauge glide control or by
using SEND, then make a cut. The current backgauge position will automatically be entered into the
job as a send value. This can be very convenient for setting up a program when the actual cut
positions are not known.
6.13.4.3 Channel Linking
If more than 35 cut values are needed (99 channels on s/n 001276 and up), 2 channels can be linked
together into one job providing up to 70 (198 on s/n 001276 and up) cut values. This is done
automatically when a job is at 35 cuts (99 on s/n 001276 and up) and an attempt is made to add
another value. At this point, a screen is displayed asking: do you want to link to the next channel?
Use the up or down arrow key to select yes or no. If no is selected, the last cut will be discarded and
the new value will be inserted. If yes is selected, the last cut will be pushed into the first value of the
next channel, although it will be displayed as value 36 of the current channel (or 100 on s/n 001276
and up). If the next channel is locked, linking will not be allowed. NOTE: If the next channel is not
locked, but contains data, the old data WILL BE LOST. After 2 jobs have been linked, the linked job
will be displayed as “^^^^^^^^” and will be locked.
To unlink a job, use the up or down arrow key to point to the linked job name and press soft-key “C”
(Erase).
When finished entering send values you may exit the current job by pressing soft-key “B” (Job) to go
back to the job mode screen or soft-key “D” (Exit) to exit to send mode. Or you may use the current
job for cutting by pressing the down arrow at the last line and following the instructions in the Running
a Programmed Job section on page 31.
5.000
in
#1
1>
_
A) Insert
C) Erase
B) Job
D) Exit
Содержание Titan 265
Страница 60: ...9 0 Parts List Sequence of Operations 59 9 2 Main Assembly Side View 44000 Sht 2 Rev J...
Страница 61: ...9 0 Parts List Sequence of Operations 60 9 3 Main Assembly Rear View 44000 Sht 3 Rev E...
Страница 62: ...9 0 Parts List Sequence of Operations 61 9 4 Main Assembly Table View 44000 Sht 4 Rev E...
Страница 63: ...9 0 Parts List Sequence of Operations 62 9 5 Main Assembly Parts List 44000 Sht 5 Rev S...
Страница 64: ...9 0 Parts List Sequence of Operations 63 Main Assembly Parts List continued 44000 Sht 6 Rev N...
Страница 65: ...9 0 Parts List Sequence of Operations 64 9 6 Main Assembly Cut Buttons 44000 Sht 7 Rev H...
Страница 66: ...9 0 Parts List Sequence of Operations 65 9 7 Main Assembly Front Shield 44000 Sht 7 Rev H...
Страница 67: ...9 0 Parts List Sequence of Operations 66 9 8 Electrical Panel Assembly EE 2879 Rev H...
Страница 68: ...9 0 Parts List Sequence of Operations 67 Electrical Panel Assembly continued EE 2879 Rev H...
Страница 69: ...9 0 Parts List Sequence of Operations 68 Electrical Panel Assembly continued EE 2879 Rev H...
Страница 71: ...9 0 Parts List Sequence of Operations 70 9 10 Hydraulic Power Unit Assembly H 507 Rev E...
Страница 72: ...9 0 Parts List Sequence of Operations 71 Hydraulic Power Unit Assembly continued H 507 Rev E...
Страница 73: ...9 0 Parts List Sequence of Operations 72 9 11 Manifold Assembly H 516 Sheet 1 Rev C...
Страница 74: ...9 0 Parts List Sequence of Operations 73 9 12 Hydraulic Schematic H 516 Sheet 2 Rev B...
Страница 75: ...9 0 Parts List Sequence of Operations 74 9 13 Manifold Sub Plate Assembly H 517...
Страница 76: ...9 0 Parts List Sequence of Operations 75 9 14 Sequence Check Valve Assembly H 551 Rev A...
Страница 77: ...9 0 Parts List Sequence of Operations 76 9 15 Basic Machine Schematic E 2853 Rev C...
Страница 78: ...9 0 Parts List Sequence of Operations 77 Basic Machine Schematic continued E 2853 Rev C...
Страница 80: ...9 0 Parts List Sequence of Operations 79 9 17 Cut Button Assembly EE 2851 1...
Страница 81: ...9 0 Parts List Sequence of Operations 80 9 18 Control Console Assembly EE 2773 1 Rev C...
Страница 82: ...9 0 Parts List Sequence of Operations 81 9 19 Control P C Assembly EE 2807 1...
Страница 83: ...9 0 Parts List Sequence of Operations 82 9 20 Power Panel Label S 1781 54 Rev C...
Страница 85: ...9 0 Parts List Sequence of Operations 84 9 22 Knife Latch Assembly 47568 Rev C...
Страница 86: ...9 0 Parts List Sequence of Operations 85 9 23 Line Light Assembly EE 2779 Rev B...
Страница 88: ...10 0 Safety Systems Test 87 NOTES...


