


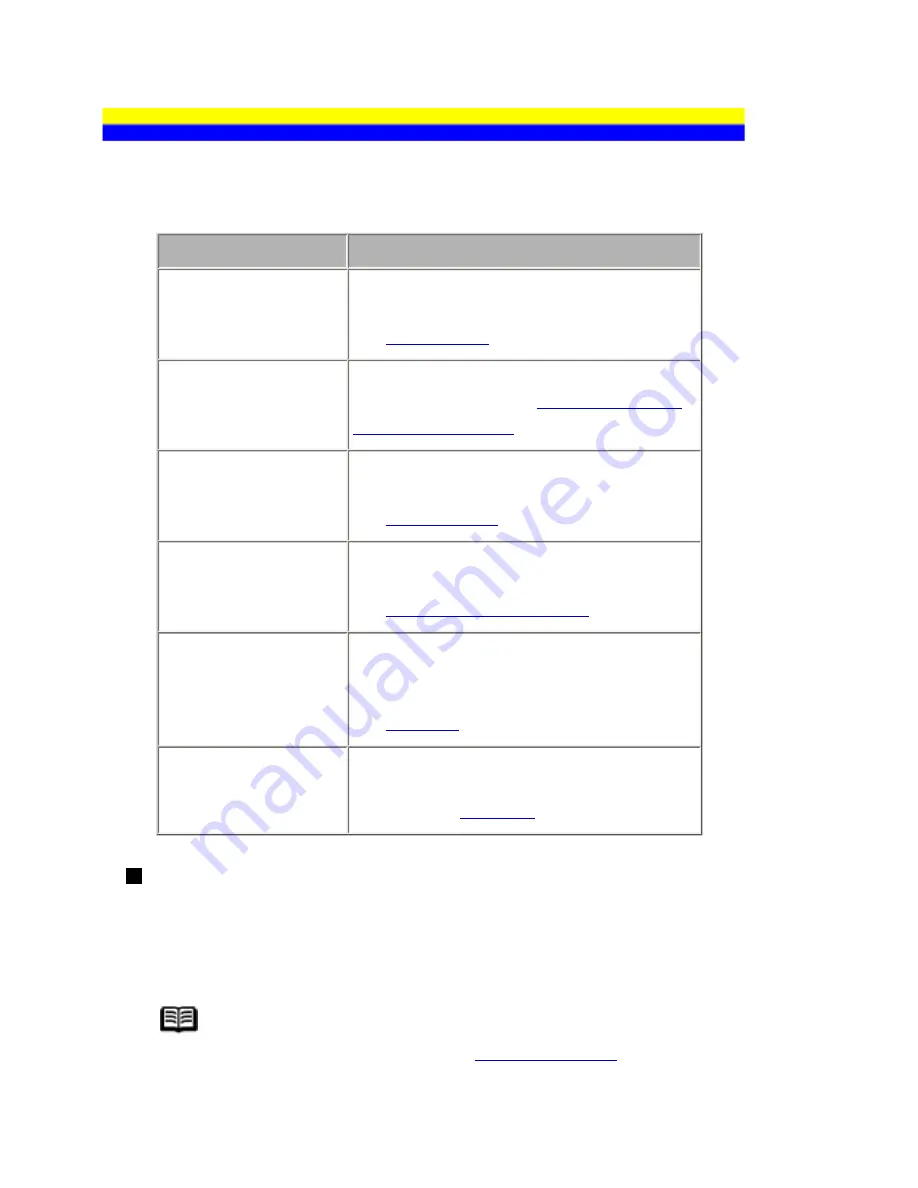
Summary of Reports and Lists
The table below shows the reports and lists that can be printed from the machine. Refer to the pages
indicated for more details.
Report Or List
Description
Activity report
Shows recent fax transactions performed by
your machine.
See
Activity Report
.
Coded speed dial list
Lists the numbers and names registered for
coded speed dialing. See
Printing a List of the
Registered Destination
.
User's data list
Lists the current settings of the machine and
the registered sender information.
See
User's Data List
.
Memory list
Lists the documents currently stored in the
machine's memory.
See
Document Stored in Memory
.
TX (Transmission)
report
Confirms whether a transmission was
completed successfully. If enabled, prints after
each fax transmission.
See
TX Report
.
RX (Reception) report
Confirms whether a reception was completed
successfully. If enabled, prints after each fax
reception. See
RX Report
.
Activity Report
Prints the history of sent and received faxes. The machine is factory-set to print an Activity
report after every 20 transactions. You can also disable automatic printing of this report, or print
it manually.
Note
For details on the Activity report setting, see
ACTIVITY REPORT
.
103
Содержание PIXM MX300 Series
Страница 21: ...21 ...
Страница 32: ...32 ...
Страница 35: ...in the machine 35 ...
Страница 43: ...43 ...
Страница 98: ...98 ...
Страница 102: ...Note If you are unsure of the transaction number print the memory list See Printing a List of Documents in Memory 102 ...
Страница 114: ... 5 Repeat the procedure until you finish inputting the pattern number for column R 114 ...
Страница 119: ...Note If it is difficult to pick the best pattern pick the setting that produces the least noticeable white streaks 119 ...
Страница 121: ... 5 Repeat the procedure until you finish inputting the pattern number for column R then click Send 121 ...
Страница 132: ...132 ...
Страница 157: ... 8 Press the OK button The desired language is displayed on the LCD 9 Press the Stop Reset button 157 ...
Страница 160: ...160 ...
Страница 211: ...Recommended printing area 211 ...
Страница 220: ...220 ...
Страница 222: ...222 ...


