Chapter 1
1-61
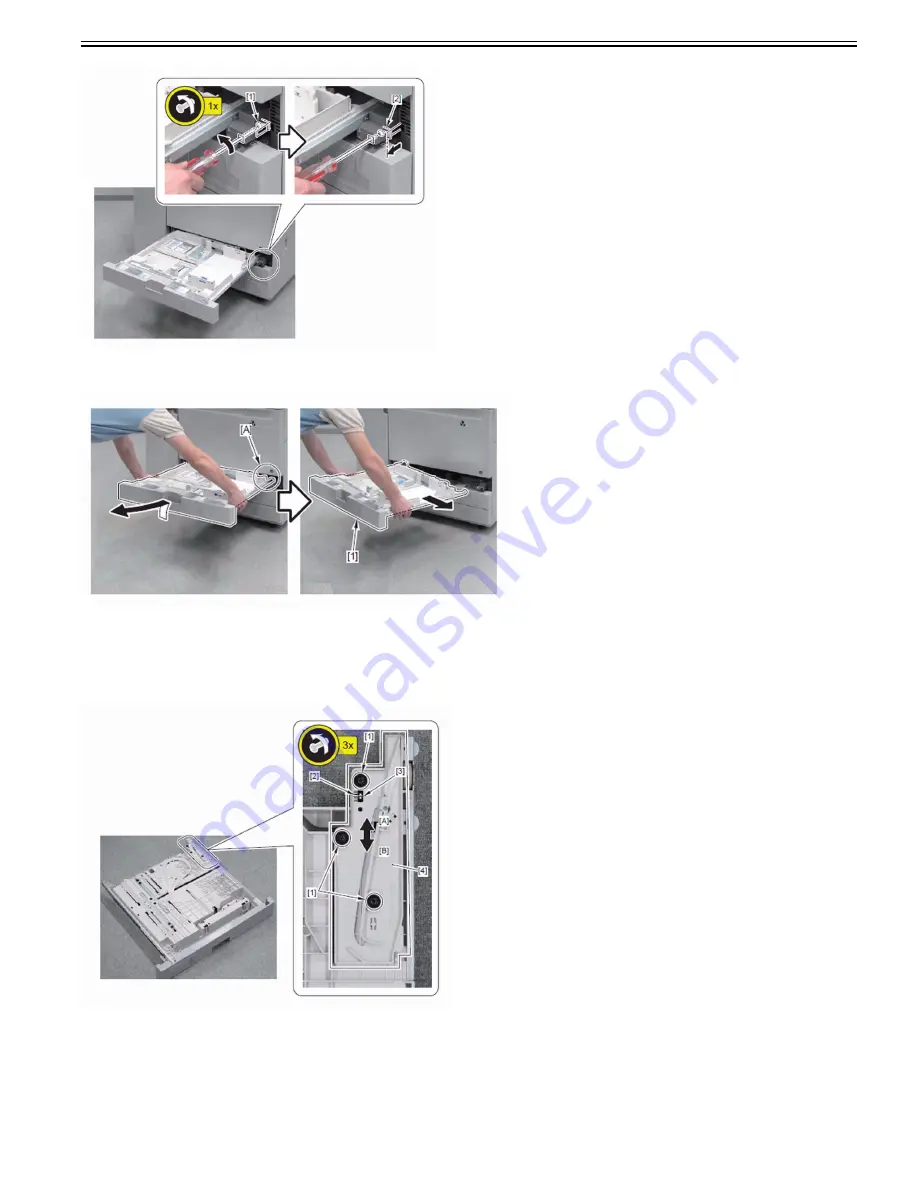
B-2) Pull out the right side of the cassette [A] with the front side lifted with hands, and detach the cassette [1] by moving it to the right.
F-1-3
B-3) Loosen the 3 adjustment screws [1] at the rear side of the cassette. Using the scale [2] and the boss line [3] as reference, move the position of the pull-in guide
[4] for 1 division of the scale.
- In the case of a semi-closed cassette: Move the pull-in guide [4] for 1 division of the scale upward (toward the rear side [A] of the host machine) so that the amount
the cassette if pulled in is reduced.
- In the case of latch not locking: Move the pull-in guide [4] for 1 division of the scale down ward (toward the front side [B] of the host machine) so that the amount
the cassette is pulled in is increased.
B-4) Perform the work in the step B-2) and B-1) in reverse order to reinstall the cassette.
B-5) Check that the symptom does not occur.
In case the symptom does not improve, readjust the adjusting position in the step B-3) until the symptom no longer occurs.
B-6) Check if the gap between the cover at the rear side is within 2 to 4mm.
If the gap is other than the range of 2 to 4mm, perform the work in the work A) to adjust the cassette front cover.
Содержание imagePRESS C800 Series
Страница 1: ...Dec 2 2014 Troubleshooting Guide imagePRESS C800 Series...
Страница 2: ......
Страница 6: ......
Страница 8: ......
Страница 9: ...Chapter 1 Correcting Faulty Images...
Страница 10: ......
Страница 14: ......
Страница 71: ...Chapter 1 1 57 3 Hold the staple case by its left and right sides and lower the bracket on the staple case...
Страница 101: ...Chapter 1 1 87 1 Feeding Direction 2 Print Side Down b If you are using No 10 COM10 ISO C5 DL Monarch or Yougatanaga 3...
Страница 110: ...Chapter 1 1 96 Feeding Direction b If you are using No 10 COM10 Monarch DL ISO C5 or Yougatanaga 3...
Страница 112: ...Chapter 1 1 98 Feeding Direction b If you are using No 10 COM10 Monarch DL ISO C5 or Yougatanaga 3...
Страница 114: ...Chapter 1 1 100 7 2 Select the envelope type press OK...
Страница 165: ...Chapter 1 1 151 3 Pull the Tray all the way out...
Страница 167: ...Chapter 1 1 153 5 Remove the Waste Toner Container...
Страница 172: ...Chapter 1 1 158 2 Pull out the staple cartridge holding it by the green tab...
Страница 173: ...Chapter 1 1 159 3 Replace the staple case Remove the old staple case 1 Insert a new staple case 2...
Страница 180: ...Chapter 1 1 166 5 Push in the new staple case until it clicks to insert it...
Страница 181: ...Chapter 1 1 167 6 Close the Cover for the saddle stitch staple cartridge...
Страница 194: ...Chapter 1 1 180 4 Clean the surface A of the Fixing Inlet Guide with lint free paper 1 moistened with alcohol...
Страница 199: ...Chapter 1 1 185 b 1 Take out the Waste Toner Container 1...
Страница 201: ...Chapter 1 1 187 b 2 Install the Waste Toner Joint 1 to the Waste Toner Container 2...
Страница 202: ...Chapter 1 1 188 b 3 Put the Waste Toner Bag 1 on the Waste Toner Joint and fix it with the Waste Toner Band 2...
Страница 206: ...Chapter 1 1 192 b 9 Remove the Prism 1 1 Screw 2 1 Hook 3...
Страница 207: ...Chapter 1 1 193 b 10 Clean the toner adhered to the 2 A parts on the prism...
Страница 208: ...Chapter 1 1 194 b 11 Clean the toner adhered to the A part of the Waste Toner Container...
Страница 210: ...Chapter 1 1 196 2 Pull out the punch waste tray...
Страница 212: ...Chapter 1 1 198 3 Discard the punch waste into a receptacle Make sure that the punch waste tray is completely emptied...
Страница 216: ...Chapter 1 1 202 2 Below the stapler unit is the staple waste tray Pull out the staple waste tray...
Страница 217: ...Chapter 1 1 203 3 Discard the staple waste...
Страница 239: ...Chapter 1 1 225 3 Press Memory Media 4 Select the target memory media...
Страница 240: ...Chapter 1 1 226 5 Select the storage destination folder and then press Scan 6 Specify the desired scan settings...
Страница 250: ...Chapter 1 1 236 Select Share files and folders using SMB Windows Select the account to be used...
Страница 255: ...Dec 2 2014...
Страница 256: ......


