Chapter 1
1-112
Hardware Specifications and Software Specifications of the Network Environmentfor are as follows.
Field Remedy
Hardware Specifications
Software Specifications
1.1.7.1.30 Location of Power Switch and how to check Breaker
0031-5620
[ Manual-related ]
Description
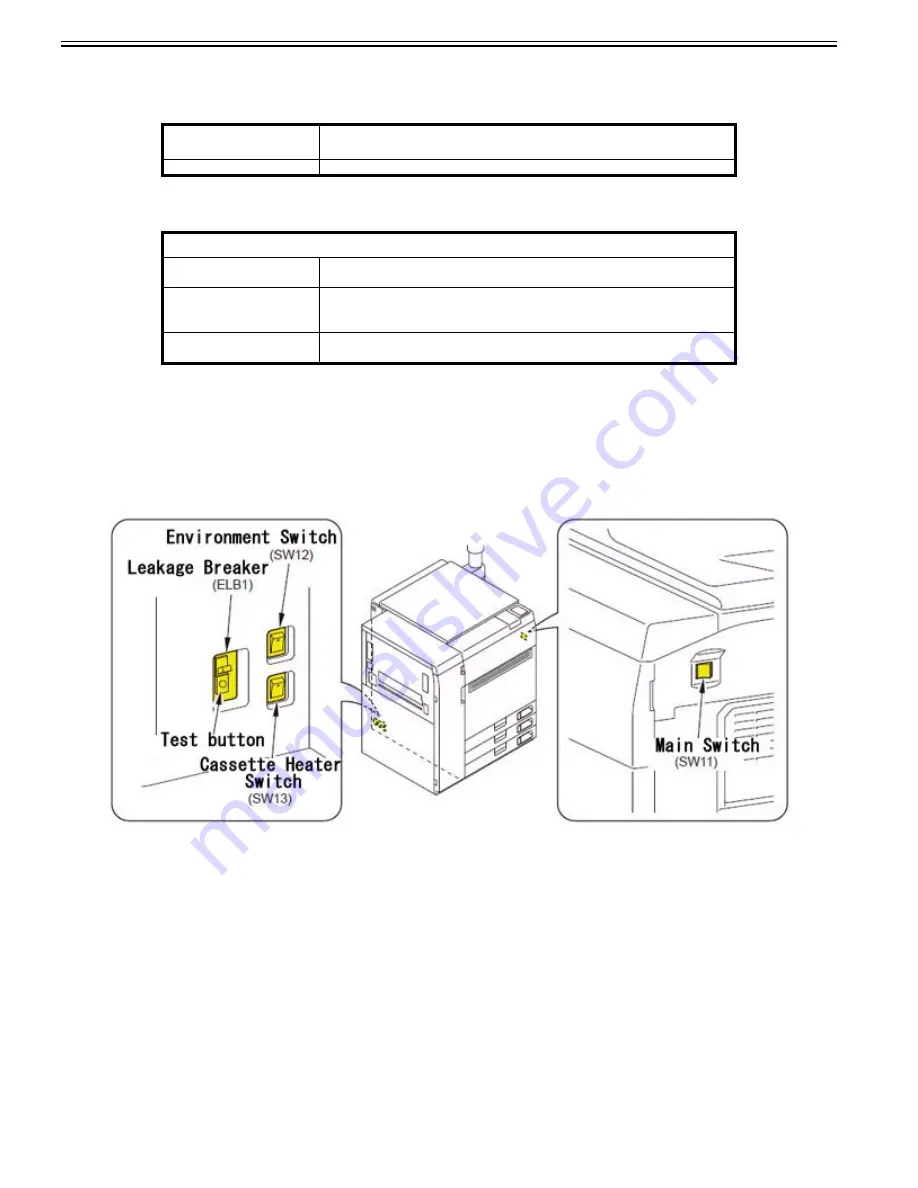
Refer to information below for the location of Power Switch and how to check the Breaker.
Field Remedy
a) Location and name of Power Switch
The Environment Heater Switch is the switch that supplies or shuts power to the Drum Heater, Cassette Heater and Reader Heater.
[Caution]
- Do not turn off the Main Power Switch while the progress bar is displayed at power-on due to the machine accessing the HDD.
- Turn off the Main Power Switch to turn off the power (The conventional shutdown sequence process is not needed).
- After turning off the Main Power Switch, do not turn on the Main Power Switch again until the screen turns blank.
- Do not turn off the Main Power Switch when executing a download.
b) How to check the Breaker
1) Turn off the Main Power Switch and check that the LED on the Control Panel is turned off.
2) Press the test button on the Breaker which is located at the rear of machine with a ballpoint pen or other pointed object.
3) Check that the Breaker Switch leans toward off (O side).
4) Set the Breaker Switch to on (I side).
5) Turn the Main Power Switch ON.
1.1.7.1.31 Number of registered mail box
0031-5625
[ Manual-related ]
Description
Please explain the number of registered mail box.
[Reference] The mail box is a data storage location in the machine that stores and handles files for printing in a format exclusively supported by this machine.
It enables users to store files that are scanned with this machine, or data sent from a personal computer via the printer driver.
You can print the stored document whenever necessary using the desired settings. Also, you can convert the file format of documents to another format, such as
Item
Specifications
Network Interface
10Base-T/100Base-TX/1000Base-T (RJ-45)
Protocol Supported
TCP/IP
Frame type : Ethernet II
Print applications: LPD/Raw/IPP/IPPS/FTP/WSD/SMB
IPX/SPX
Frame type: Ethernet II/Ethernet 802.2/Ethernet 802.3/Ethernet SNAP/Auto Detect
Print applications: Bindery PServer/NDS PServer/RPrinter/Nprinter
AppleTalk
Frame type: Ethernet SNAP
Print applications: PAP (Printer Access Protocol)
Содержание imagePRESS C800 Series
Страница 1: ...Dec 2 2014 Troubleshooting Guide imagePRESS C800 Series...
Страница 2: ......
Страница 6: ......
Страница 8: ......
Страница 9: ...Chapter 1 Correcting Faulty Images...
Страница 10: ......
Страница 14: ......
Страница 71: ...Chapter 1 1 57 3 Hold the staple case by its left and right sides and lower the bracket on the staple case...
Страница 101: ...Chapter 1 1 87 1 Feeding Direction 2 Print Side Down b If you are using No 10 COM10 ISO C5 DL Monarch or Yougatanaga 3...
Страница 110: ...Chapter 1 1 96 Feeding Direction b If you are using No 10 COM10 Monarch DL ISO C5 or Yougatanaga 3...
Страница 112: ...Chapter 1 1 98 Feeding Direction b If you are using No 10 COM10 Monarch DL ISO C5 or Yougatanaga 3...
Страница 114: ...Chapter 1 1 100 7 2 Select the envelope type press OK...
Страница 165: ...Chapter 1 1 151 3 Pull the Tray all the way out...
Страница 167: ...Chapter 1 1 153 5 Remove the Waste Toner Container...
Страница 172: ...Chapter 1 1 158 2 Pull out the staple cartridge holding it by the green tab...
Страница 173: ...Chapter 1 1 159 3 Replace the staple case Remove the old staple case 1 Insert a new staple case 2...
Страница 180: ...Chapter 1 1 166 5 Push in the new staple case until it clicks to insert it...
Страница 181: ...Chapter 1 1 167 6 Close the Cover for the saddle stitch staple cartridge...
Страница 194: ...Chapter 1 1 180 4 Clean the surface A of the Fixing Inlet Guide with lint free paper 1 moistened with alcohol...
Страница 199: ...Chapter 1 1 185 b 1 Take out the Waste Toner Container 1...
Страница 201: ...Chapter 1 1 187 b 2 Install the Waste Toner Joint 1 to the Waste Toner Container 2...
Страница 202: ...Chapter 1 1 188 b 3 Put the Waste Toner Bag 1 on the Waste Toner Joint and fix it with the Waste Toner Band 2...
Страница 206: ...Chapter 1 1 192 b 9 Remove the Prism 1 1 Screw 2 1 Hook 3...
Страница 207: ...Chapter 1 1 193 b 10 Clean the toner adhered to the 2 A parts on the prism...
Страница 208: ...Chapter 1 1 194 b 11 Clean the toner adhered to the A part of the Waste Toner Container...
Страница 210: ...Chapter 1 1 196 2 Pull out the punch waste tray...
Страница 212: ...Chapter 1 1 198 3 Discard the punch waste into a receptacle Make sure that the punch waste tray is completely emptied...
Страница 216: ...Chapter 1 1 202 2 Below the stapler unit is the staple waste tray Pull out the staple waste tray...
Страница 217: ...Chapter 1 1 203 3 Discard the staple waste...
Страница 239: ...Chapter 1 1 225 3 Press Memory Media 4 Select the target memory media...
Страница 240: ...Chapter 1 1 226 5 Select the storage destination folder and then press Scan 6 Specify the desired scan settings...
Страница 250: ...Chapter 1 1 236 Select Share files and folders using SMB Windows Select the account to be used...
Страница 255: ...Dec 2 2014...
Страница 256: ......


