Chapter 1
1-21
above mentioned symptom.
The symptom is more likely to be generated under a high humidity environment as the force of electrostatic attraction between paper and toner is weakened.
The area at 81mm from the leading edge of a sheet touches the pre-registration roller, the area at 258mm touches the vertical path roller 1 of the cassette 1 and the
area at 354mm touches the vertical path roller 2 of the cassette 2.
Service work
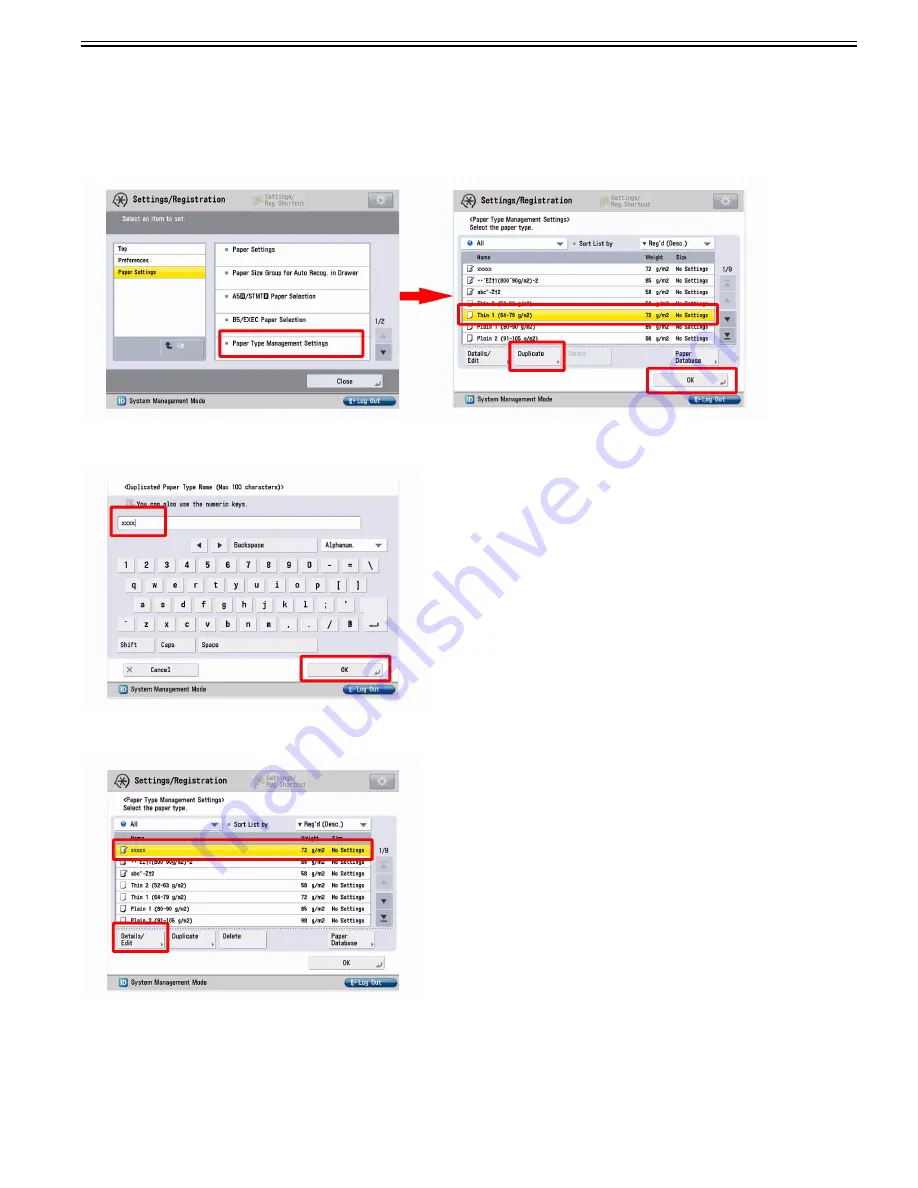
1) Have the customer log in from System Management Mode in user mode.
2) Go to Preferences > Paper Settings > Paper Type Management Settings, select an appropriate paper type from among the list, press "Duplicate" button and then
"OK" button.
3) Enter any name as the duplicated paper type and press "OK" button.
4) Select the paper type duplicated in the step 3) and press "Details/Edit".
5) Select "Adj. Secondary Transfer Volt." and press "Change".
[Note] In case adjust secondary transfer voltage will not be displayed on the control panel, change the setting value of Service Mode > Mode List > COPIER >
Option > DSPLY-SW > IMGC-ADJ to "1" and perform a power-cycle of main power (off/on). The value is "0" by default.
Содержание imagePRESS C800 Series
Страница 1: ...Dec 2 2014 Troubleshooting Guide imagePRESS C800 Series...
Страница 2: ......
Страница 6: ......
Страница 8: ......
Страница 9: ...Chapter 1 Correcting Faulty Images...
Страница 10: ......
Страница 14: ......
Страница 71: ...Chapter 1 1 57 3 Hold the staple case by its left and right sides and lower the bracket on the staple case...
Страница 101: ...Chapter 1 1 87 1 Feeding Direction 2 Print Side Down b If you are using No 10 COM10 ISO C5 DL Monarch or Yougatanaga 3...
Страница 110: ...Chapter 1 1 96 Feeding Direction b If you are using No 10 COM10 Monarch DL ISO C5 or Yougatanaga 3...
Страница 112: ...Chapter 1 1 98 Feeding Direction b If you are using No 10 COM10 Monarch DL ISO C5 or Yougatanaga 3...
Страница 114: ...Chapter 1 1 100 7 2 Select the envelope type press OK...
Страница 165: ...Chapter 1 1 151 3 Pull the Tray all the way out...
Страница 167: ...Chapter 1 1 153 5 Remove the Waste Toner Container...
Страница 172: ...Chapter 1 1 158 2 Pull out the staple cartridge holding it by the green tab...
Страница 173: ...Chapter 1 1 159 3 Replace the staple case Remove the old staple case 1 Insert a new staple case 2...
Страница 180: ...Chapter 1 1 166 5 Push in the new staple case until it clicks to insert it...
Страница 181: ...Chapter 1 1 167 6 Close the Cover for the saddle stitch staple cartridge...
Страница 194: ...Chapter 1 1 180 4 Clean the surface A of the Fixing Inlet Guide with lint free paper 1 moistened with alcohol...
Страница 199: ...Chapter 1 1 185 b 1 Take out the Waste Toner Container 1...
Страница 201: ...Chapter 1 1 187 b 2 Install the Waste Toner Joint 1 to the Waste Toner Container 2...
Страница 202: ...Chapter 1 1 188 b 3 Put the Waste Toner Bag 1 on the Waste Toner Joint and fix it with the Waste Toner Band 2...
Страница 206: ...Chapter 1 1 192 b 9 Remove the Prism 1 1 Screw 2 1 Hook 3...
Страница 207: ...Chapter 1 1 193 b 10 Clean the toner adhered to the 2 A parts on the prism...
Страница 208: ...Chapter 1 1 194 b 11 Clean the toner adhered to the A part of the Waste Toner Container...
Страница 210: ...Chapter 1 1 196 2 Pull out the punch waste tray...
Страница 212: ...Chapter 1 1 198 3 Discard the punch waste into a receptacle Make sure that the punch waste tray is completely emptied...
Страница 216: ...Chapter 1 1 202 2 Below the stapler unit is the staple waste tray Pull out the staple waste tray...
Страница 217: ...Chapter 1 1 203 3 Discard the staple waste...
Страница 239: ...Chapter 1 1 225 3 Press Memory Media 4 Select the target memory media...
Страница 240: ...Chapter 1 1 226 5 Select the storage destination folder and then press Scan 6 Specify the desired scan settings...
Страница 250: ...Chapter 1 1 236 Select Share files and folders using SMB Windows Select the account to be used...
Страница 255: ...Dec 2 2014...
Страница 256: ......


