Canon imageCLASS MF269dw Скачать руководство пользователя страница 93

Setting a Shared Folder as a Save Location

2KUS-01S

The feature of scanning to shared folders is also called "Scan to SMB" because the feature uses Server Message Block

(SMB), a Windows-specific technology. SMB is a protocol for sharing resources, such as files and printers, with more

than one device in a network (  Configuring SMB(P. 61)  ). To configure the machine for saving your scanned

documents into a shared folder in the network via SMB, specify the location of the shared folder from a computer in

advance. This section describes how to specify the save location by using the Send Function Setting Tool.

You can also use the Remote UI to specify the location of the shared folder as save destination by registering
the folder to the Address Book. Registering Destinations in the Address Book from Remote UI. 
Registering Destinations from Remote UI(P. 346) 

1

Start the Send Function Setting Tool.
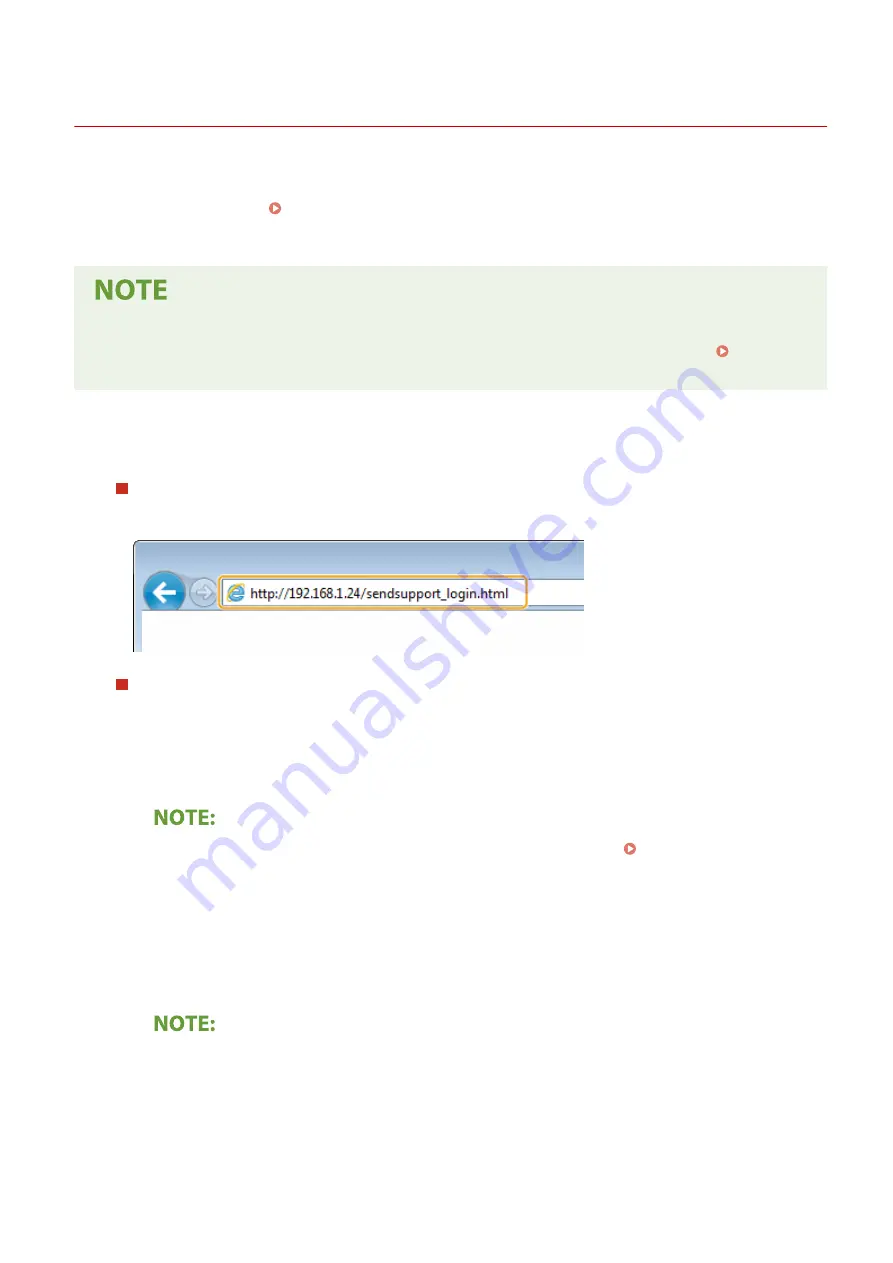
Using a Web browser

Enter "http://<the IP address of the machine>/sendsupport_login.html" in the address field of a Web browser,

and press the [ENTER] key.

Using the CD-ROM/DVD-ROM

1

Insert the provided CD-ROM/DVD-ROM into the drive on the computer.

Select a language and click [OK] if you are prompted to do so.

2

Click [Start Software Programs].

If the [Software Programs/Manuals Setup] screen is not displayed, see  Displaying the [Software
Programs/Manuals Setup] Screen(P. 558)  
.

If [AutoPlay] is displayed, click [Run MInst.exe].

3

Click [Start] for [Send Function Setting Tool].

4

Click [Next].

If you want to view "Send Setting Guide," click [How to Set].

If the screen that cancels the Windows firewall is displayed, click [Yes].

5

Select the machine from [Device List] and click [Next].

Setting Up

86

Содержание imageCLASS MF269dw

Страница 1: ...MF269dw MF267dw MF264dw User s Guide USRMA 3285 00 2018 07 en Copyright CANON INC 2018 ...

Страница 2: ... with a Computer 41 Configuring Printing Protocols and WSD Functions 42 Configuring Printer Ports 45 Setting Up Print Server 49 Configuring the Machine for Your Network Environment 52 Configuring Ethernet Settings 53 Changing the Maximum Transmission Unit 55 Setting a Wait Time for Connecting to a Network 56 Configuring DNS 57 Configuring SMB 61 Monitoring and Controlling the Machine with SNMP 63 ...

Страница 3: ...oading Envelopes 141 Loading Preprinted Paper 143 Specifying Paper Size and Type 145 Specifying Paper Size and Type in the Drawer 146 Specifying Paper Size and Type in the Multi Purpose Tray 147 Registering a Custom Paper Size 148 Limiting the Paper Sizes Displayed 150 Customizing the Display 151 Customizing the Home Screen 152 Changing the Default Settings for Functions 154 Setting Sounds 155 Ent...

Страница 4: ...iving Methods 211 Saving Received Documents into the Machine Memory Reception 212 Forwarding the Received Documents Automatically 214 Checking Status and Log for Sent and Received Documents 216 Sending Faxes from Your Computer PC Fax 218 Sending PC Faxes 219 Printing 222 Printing from a Computer 223 Canceling Prints 225 Checking the Printing Status and Log 227 Scanning 230 Basic Operations for Sca...

Страница 5: ...94 Configuring the Network Security Settings 296 Restricting Communication by Using Firewalls 298 Specifying IP Addresses for Firewall Settings 299 Specifying MAC Addresses for Firewall Settings 302 Changing Port Numbers 304 Setting a Proxy 305 Configuring the Key and Certificate for TLS 307 Generating the Key and Certificate for Network Communication 309 Generating a Key and Certificate Signing R...

Страница 6: ... Maintenance 415 System Management Settings 421 Maintenance 431 Regular Cleaning 433 Cleaning the Exterior 434 Cleaning the Platen Glass 435 Cleaning the Feeder 436 Cleaning the Fixing Assembly 440 Cleaning the Machine Interior 441 Replacing the Toner Cartridge 444 Replacing the Drum Cartridge 448 Checking the Remaining Amount of Consumables 452 Relocating the Machine 453 Viewing the Counter Value...

Страница 7: ...pendix 521 Third Party Software 522 Feature Highlights 523 Going Green and Saving Money 524 Improving Efficiency 526 Going Digital 528 So Much More 530 Specifications 532 Main Unit 533 Feeder 536 Available Paper 538 Fax Function 541 Scan Function 542 Printer Functions 543 Management Functions 545 System Environment 546 Network Environment 548 Manuals and Their Contents 549 Using User s Guide 550 S...

Страница 8: ...Setting IP Addresses 31 Setting IPv4 Address 32 Setting IPv6 Addresses 35 Viewing Network Settings 38 Configuring Settings for Communication with a Computer 41 Configuring Printing Protocols and WSD Functions 42 Configuring Printer Ports 45 Setting Up Print Server 49 Configuring the Machine for Your Network Environment 52 Configuring Ethernet Settings 53 Changing the Maximum Transmission Unit 55 S...

Страница 9: ...o Use the Machine as a Scanner 77 Procedure for Setting to Send E Mail 78 Configuring Basic E Mail Settings 79 Configuring E Mail Communication Settings 82 Procedure for Setting a Shared Folder as a Save Location 85 Setting a Shared Folder as a Save Location 86 Setting Up 2 ...

Страница 10: ...equired Before Use P 5 The functions installed on the machine vary depending on the model you purchased Before using the machine see Main Functions P 4 and check the available functions Configuring Initial Settings of the Machine Setup Guide You can easily configure the initial settings required to use the machine such as date time and network settings by following the on screen guidance Setting U...

Страница 11: ...d scanning Feeder 1 sided scanning Feeder 1 sided scanning Handset Optional Optional For the available driver types see the CD ROM DVD ROM supplied with the machine or see the Canon website http www canon com In the User s Guide when operations differ depending on screens distinctions are highlighted with the different descriptions Touch Panel Model and 5 Lines LCD Model When operations are the sa...

Страница 12: ...also check Preventing Unauthorized Access P 7 Step 1 Setting Up Using the Setup Guide P 9 Step 2 Setting Up the Network Environment P 14 Configure the network settings that are not covered in the Setup Guide If you do not need to use the Setup Guide configure the network settings from here Step 3 Installing Drivers P 69 Step 4 Configuring Initial Settings for Fax Functions P 70 Step 5 Configuring ...

Страница 13: ...Setting from the Remote UI When the network environment settings are complete you can efficiently set the machine from a computer using Remote UI Starting Remote UI P 334 Setting Up 6 ...

Страница 14: ...vice participating in a computer network A global IP address is used for the communication connecting to the Internet and a private IP address is used for the communication within a local area network such as a LAN in the company If a global IP address is assigned your printer multifunction machine is open to the public and can be accessed via the Internet Thus the risk of information leakage due ...

Страница 15: ...e Network Security Settings P 296 and on the procedures to specify see Configuring the Key and Certificate for TLS P 307 Setting PIN to Manage Information Stored in the Machine If a malicious third party attempts to gain unauthorized access to a printer multifunction machine setting PIN to information stored in the machine will reduce the risk of information leakage Canon printers multifunction ma...

Страница 16: ...the primary time standard by which the world regulates clocks and time The correct UTC time zone setting is required for Internet communications 2 Enter the date and time and press Apply Touch Panel Model Tap or to move the cursor and enter the date and time using the numeric keys Tap or to switch between AM or PM 5 Lines LCD Model Use or to move the cursor and enter the date and time using the nu...

Страница 17: ...ess LAN settings Read the displayed message and press Close 2 Select OK 3 Select the setting method For more information about the wireless LAN settings see Connecting to a Wireless LAN P 18 4 Read the message that is displayed and press Close When the Setup Guide is complete the screen below appears Touch Panel Model 5 Lines LCD Model Setting Up 10 ...

Страница 18: ...ttings are also changed accordingly 1 Display the Menu screen Home Screen P 111 Touch Panel Model Select Menu in the Home screen 5 Lines LCD Model Press 2 Select Timer Settings Date Time Settings Time Zone 3 Select the time zone What is UTC Coordinated Universal Time UTC is the primary time standard by which the world regulates clocks and time Time differences exist depending on the country or are...

Страница 19: ...or PM 4 Press Apply Set Time Zone before setting the current date and time If the Time Zone setting is changed later the current date and time are also changed accordingly The display format of the date and time can be changed respectively Date Format P 380 Time Format P 381 Setting the Daylight Saving Time If daylight saving time is enabled specify the dates from which and to which daylight savin...

Страница 20: ...ct On proceed to step 4 4 Set the month and day for the start date and then select Apply To set the day specify what day of which week 5 Set the month and day for the end date and then select Apply To set the day specify what day of which week Setting Up 13 ...

Страница 21: ...evices or contact your manufacturer Before You Start Follow these steps to connect the machine to a network Check your computer settings Make sure that the computer is correctly connected to the network For more information see the instruction manuals for the devices you are using or contact the device manufacturers Make sure that the network settings have been completed on the computer If the net...

Страница 22: ... to the setting you selected in step 2 Connecting to a Wired LAN P 17 Connecting to a Wireless LAN P 18 Set the IP address as necessary At the time of purchase the machine is set to automatically acquire an IP address Change this setting if you want to use a specific IP address Setting IP Addresses P 31 LINKS Configuring Settings for Communication with a Computer P 41 Configuring the Machine for Y...

Страница 23: ...reinstall them For more information see the manuals for the relevant drivers on the online manual website 1 Display the Menu screen Home Screen P 111 Touch Panel Model Select Menu in the Home screen 5 Lines LCD Model Press 2 Select Network Settings If the screen for entering a PIN appears enter the correct PIN Setting the System Manager PIN P 292 3 Select Select Wired Wireless LAN 4 Select Wired L...

Страница 24: ...to the router 1 Connect a LAN cable Connect the machine to a router by using a LAN cable Push the connector in until it clicks into place 2 Wait for several minutes The IP address is set automatically You can set the IP address manually Setting IP Addresses P 31 LINKS Setting Up the Network Environment P 14 Setting Up 17 ...

Страница 25: ...ted to an unsecured network your personal information might be leaked to a third party because radio waves used in wireless communication can go anywhere nearby even beyond walls Wireless LAN security The wireless LAN function of this machine supports WEP WPA PSK and WPA2 PSK For the wireless security compatibility of your wireless router see the instruction manuals for your networking devices or ...

Страница 26: ...mation Regardless of the method make sure that you have the required setup information including the SSID and network key Checking the SSID and Network Key P 30 Selecting a Wireless Router Select this setup option if you need to manually set up the connection but want to complete the setup as easily as possible Setting Up Connection by Selecting a Wireless Router P 24 Manually Entering the Setup I...

Страница 27: ...ter the correct PIN Setting the System Manager PIN P 292 3 Select Wireless LAN Settings If the Do you want to enable the wireless LAN Enable the wireless LAN message is displayed select Yes If the Direct Connection will be terminated Is it OK message is displayed select Yes 4 Read the message that is displayed and select OK 5 Select WPS Push Button Mode 6 Select Yes 7 Press and hold the WPS button...

Страница 28: ...t the IP address manually Setting IP Addresses P 31 On the touch panel model while the machine is connected to the wireless LAN the Wi Fi icon is displayed in the Home screen Home Screen P 111 Reducing power consumption You can set the machine to enter Power Save Mode based on signals emitted from the wireless router Power Save Mode P 363 If the IP address of the machine has changed In a DHCP envi...

Страница 29: ...n see the instruction manuals for your networking device From the Operation Panel 2 Display the Menu screen Home Screen P 111 Touch Panel Model Select Menu in the Home screen 5 Lines LCD Model Press 3 Select Network Settings If the screen for entering a PIN appears enter the correct PIN Setting the System Manager PIN P 292 4 Select Wireless LAN Settings If the Do you want to enable the wireless LA...

Страница 30: ...n the machine connects to the device with the strongest signal Signal strength is measured using RSSI Received Signal Strength Indication You can set the IP address manually Setting IP Addresses P 31 On the touch panel model while the machine is connected to the wireless LAN the Wi Fi icon is displayed in the Home screen Home Screen P 111 Reducing power consumption You can set the machine to enter...

Страница 31: ...2 encryption you need to set up the connection using Enter Manually Setting Up Connection by Specifying Detailed Settings P 27 1 Display the Menu screen Home Screen P 111 Touch Panel Model Select Menu in the Home screen 5 Lines LCD Model Press 2 Select Network Settings If the screen for entering a PIN appears enter the correct PIN Setting the System Manager PIN P 292 3 Select Wireless LAN Settings...

Страница 32: ...urn to step 5 10 Wait until message Connected is displayed Wait several minutes until the IP address and other items are set automatically Signal strength When more than one wireless router is available for connection the machine connects to the device with the strongest signal Signal strength is measured using RSSI Received Signal Strength Indication You can set the IP address manually Setting IP...

Страница 33: ... In a DHCP environment the IP address of the machine may be changed automatically If this happens the connection is maintained as long as the machine and the computer belong to the same subnet LINKS Connecting to a Wireless LAN P 18 Setting Up 26 ...

Страница 34: ...n 5 Lines LCD Model Press 2 Select Network Settings If the screen for entering a PIN appears enter the correct PIN Setting the System Manager PIN P 292 3 Select Wireless LAN Settings If the Do you want to enable the wireless LAN Enable the wireless LAN message is displayed select Yes If the Direct Connection will be terminated Is it OK message is displayed select Yes 4 Read the message that is dis...

Страница 35: ...lly changes the setting to Shared Key and retries the connection 3 Select the WEP key you want to edit Select Edit WEP Key WEP key 1 to 4 Up to four WEP keys can be registered 4 Enter the network key that you have written down Enter the network key and select Apply 5 Select the desired WEP key Select Select WEP Key select the WEP key you have edited Using WPA PSK or WPA2 PSK 1 Select WPA WPA2 PSK ...

Страница 36: ...rength is measured using RSSI Received Signal Strength Indication You can set the IP address manually Setting IP Addresses P 31 On the touch panel model while the machine is connected to the wireless LAN the Wi Fi icon is displayed in the Home screen Home Screen P 111 Reducing power consumption You can set the machine to enter Power Save Mode based on signals emitted from the wireless router Power...

Страница 37: ...ude access point name and network name Network Key A keyword or password used for encrypting data or authenticating a network Some other terms used for network key include encryption key WEP key WPA WPA2 passphrase and preshared key PSK Wireless Security Protocols Authentication Encryption When manually setting up a wireless connection by specifying detailed settings you need to specify security s...

Страница 38: ... network IP address Two versions of IP addresses are available IPv4 and IPv6 Configure these settings depending on the network environment To use IPv6 addresses you need to properly configure the IPv4 address settings Setting IPv4 Address P 32 Setting IPv6 Addresses P 35 Setting Up 31 ...

Страница 39: ...n P 111 Touch Panel Model Select Menu in the Home screen 5 Lines LCD Model Press 2 Select Network Settings If the screen for entering a PIN appears enter the correct PIN Setting the System Manager PIN P 292 3 Select TCP IP Settings IPv4 Settings IP Address Settings 4 Configure IP address settings Auto Acquire Select to automatically assign an IP address via DHCP protocol When On is displayed autom...

Страница 40: ...subnet mask and gateway address or default gateway Enter these values in each screen and select Apply On how to enter text see Entering Text P 123 Checking whether the settings are correct Make sure that the Remote UI screen can be displayed with your computer Starting Remote UI P 334 If a computer is not available you can check the connection by using the operation panel Testing the Network Conne...

Страница 41: ...er the correct PIN Setting the System Manager PIN P 292 3 Select TCP IP Settings IPv4 Settings PING Command 4 Enter the IPv4 address of another device on the network and select Apply If a proper connection has been established Received response from host is displayed LINKS Setting IPv6 Addresses P 35 Viewing Network Settings P 38 Setting Up 34 ...

Страница 42: ...ion of the machine is enabled Manual address An address that is entered manually When using this address specify the prefix length and default router address Stateless address An address that is generated automatically using the MAC address of the machine and the network prefix that is advertised by the router Stateful address An address obtained from a DHCP server using DHCPv6 For more informatio...

Страница 43: ...s 1 cannot be entered Prefix Length Enter a number that indicates how many bits are available for the network address Default Router Address Specify the IPv6 address of the default router as necessary Addresses that start with ff or multicast address and the loopback address 1 cannot be entered Use DHCPv6 Select the check box when using a stateful address When not using DHCPv6 clear the check box ...

Страница 44: ...en you have changed the IP address after installing the printer driver You need to add a new port Configuring Printer Ports P 45 LINKS Setting IPv4 Address P 32 Viewing Network Settings P 38 Setting Up 37 ...

Страница 45: ...be solved by setting a certain interval before the machine starts communicating Setting a Wait Time for Connecting to a Network P 56 You can print a list of the current network settings User Data List P 458 Viewing IPv4 Settings Network Information IPv4 Select the setting to view Check the settings Viewing IPv6 Settings Network Information IPv6 Select the setting to view Check the settings Viewing...

Страница 46: ...l Select Menu in the Home screen 5 Lines LCD Model Press 2 Select Network Settings If the screen for entering a PIN appears enter the correct PIN Setting the System Manager PIN P 292 3 Select Wireless LAN Settings If the Do you want to enable the wireless LAN Enable the wireless LAN message is displayed select Yes If the Direct Connection will be terminated Is it OK message is displayed select Yes...

Страница 47: ... the setting to view Viewing from the Status Monitor screen Wireless LAN Status and Latest Error Information can be viewed from Network Information Network Connection Method Conn Info Connection Information Select the setting to view LINKS Connecting to a Wireless LAN P 18 Setting IPv4 Address P 32 Setting IPv6 Addresses P 35 Configuring DNS P 57 Setting Up 40 ...

Страница 48: ...ers on the online manual website Configuring Printing Protocols and WSD Functions P 42 Configuring Printer Ports P 45 Setting Up Print Server P 49 Protocols explained here are rules for delivering document data between a computer and the machine and can be selected according to intended purposes or the network environment Ports are gateways for passing data between network devices If a communicati...

Страница 49: ... 334 2 Click Settings Registration on the Portal page Remote UI Screen P 335 3 Click Network Settings TCP IP Settings 4 Configure printing protocols Configuring LPD or RAW 1 Click Edit in LPD Print Settings or RAW Print Settings 2 Configure the settings as necessary Use LPD Printing Select the check box to print via LPD When not using LPD printing clear the check box Use RAW Printing Select the ch...

Страница 50: ...ation Scanning and Saving to a Computer P 233 Use Multicast Discovery Select the check box to set the machine to reply to multicast discovery messages If the check box is cleared the machine stays in sleep mode even when multicast discovery messages are flowing on the network 3 Click OK Selecting settings from the operation panel LPD RAW and WSD settings can also be accessed from the Menu screen L...

Страница 51: ...LINKS Configuring Printer Ports P 45 Setting Up 44 ...

Страница 52: ...and configure the required settings Adding a port If you have changed the IP address of the machine or you have selected an incorrect port while installing drivers from the Windows printer folder add a new port There are two types of port MFNP Port and Standard TCP IP Port Select the port type according to your environment MFNP Port only for IPv4 environment This is a port that allows the IP addre...

Страница 53: ...t Auto Detect and select the machine when it is detected and then click Next If the machine is not detected Click Refresh If the problem persists select IP address or MAC address enter the IP address or MAC address of the machine Viewing Network Settings P 38 and then click Next 4 Click Add Finish 5 Click Close Adding a standard TCP IP port 1 Click Add Port 2 Select Standard TCP IP Port in Availab...

Страница 54: ...has been changed on the machine side Configuring Printing Protocols and WSD Functions P 42 or the port number has been changed Changing Port Numbers P 304 the corresponding settings on the computer must also be configured This operation is not needed for WSD ports MFNP port 1 Click Configure Port 2 Under Protocol Type select RAW or LPR and change the Port Number 3 Click OK Standard TCP IP port 1 C...

Страница 55: ... If you selected Raw change the Port Number If you selected LPR enter lp in Queue Name 3 Click OK 4 Click Close LINKS Setting Up Print Server P 49 Setting Up 48 ...

Страница 56: ...m and the bit architecture 32 bit or 64 bit of the print server and client computers When implementing a print server in a domain environment consult your Network Administrator 1 Open the printer folder Displaying the Printer Folder P 556 2 Right click the printer driver icon for this machine and click Printer properties or Properties 3 Click the Sharing tab select Share this printer and enter the...

Страница 57: ...der that contains the drivers and then click OK If the print server runs a 32 bit operating system select intdrv UFRII x64 Driver folders on the provided CD ROM DVD ROM If the print server runs a 64 bit operating system select intdrv UFRII 32bit Driver folders on the provided CD ROM DVD ROM 4 Follow the on screen instructions to install additional drivers 5 Click OK Installing the Drivers on a Com...

Страница 58: ...Printing from a Computer P 223 Setting Up 51 ...

Страница 59: ...ons as possible and it is equipped with a variety of technologies Consult your Network Administrator and set a configuration to suit your network environment Configuring Ethernet Settings P 53 Changing the Maximum Transmission Unit P 55 Setting a Wait Time for Connecting to a Network P 56 Configuring DNS P 57 Configuring SMB P 61 Monitoring and Controlling the Machine with SNMP P 63 Configuring SN...

Страница 60: ...D Model Press 2 Select Network Settings If the screen for entering a PIN appears enter the correct PIN Setting the System Manager PIN P 292 3 Select Ethernet Driver Settings Auto Detect 4 Select whether to configure Ethernet settings automatically or manually If auto detection is enabled the machine detects and automatically sets the Ethernet communication mode and the type that can be used Config...

Страница 61: ...working device using half duplex Full Duplex Simultaneously sends and receives communication data Use this setting for most environments 3 Ethernet Type select the Ethernet type 4 Select Apply LINKS Changing the Maximum Transmission Unit P 55 Setting a Wait Time for Connecting to a Network P 56 Setting Up 54 ...

Страница 62: ...e settings of the machine as necessary For more information contact your Network Administrator 1 Display the Menu screen Home Screen P 111 Touch Panel Model Select Menu in the Home screen 5 Lines LCD Model Press 2 Select Network Settings If the screen for entering a PIN appears enter the correct PIN Setting the System Manager PIN P 292 3 Select TCP IP Settings MTU Size 4 Select the MTU LINKS Confi...

Страница 63: ...vices are connected or if you add a new device If this type of problem occurs set a wait time for connecting to the network 1 Display the Menu screen Home Screen P 111 Touch Panel Model Select Menu in the Home screen 5 Lines LCD Model Press 2 Select Network Settings If the screen for entering a PIN appears enter the correct PIN Setting the System Manager PIN P 292 3 Select Waiting Time for Connect...

Страница 64: ...For more information about the basic operations to be performed when setting the machine from the Remote UI see Setting Up Menu Options from Remote UI P 343 1 Start the Remote UI and log in to System Manager Mode Starting Remote UI P 334 2 Click Settings Registration on the Portal page Remote UI Screen P 335 3 Click Network Settings TCP IP Settings 4 Configure DNS settings Configuring IPv4 DNS 1 C...

Страница 65: ...icast DNS is a protocol for associating a host name with an IP address without using DNS Select the check box to enable mDNS and enter the mDNS name in the mDNS Name text box DHCP Option Settings Acquire Host Name Select the check box to enable Option 12 to obtain the host name from the DHCP server DNS Dynamic Update Select the check box to enable Option 81 to dynamically update the DNS records th...

Страница 66: ...amically update the DNS records whenever the machine s IP address is changed To specify the type s of addresses you want to register to the DNS server select the check box for Register Manual Address Register Stateful Address or Register Stateless Address To specify the interval between updates enter the time in hours in the DNS Dynamic Update Interval text box mDNS Settings Use mDNS Adopted by Bo...

Страница 67: ...LINKS Setting IPv4 Address P 32 Setting IPv6 Addresses P 35 Viewing Network Settings P 38 Setting Up 60 ...

Страница 68: ...the computer name as the NetBIOS name Workgroup Name Workgroup name is a name for grouping multiple computers so that basic network functions such as file sharing become available in a Windows network Specify the workgroup name to identify the group that the machine belongs to For more information about the basic operations to be performed when setting the machine from the Remote UI see Setting Up...

Страница 69: ...Enter alphanumeric characters for the NetBIOS name of the machine Workgroup Name Enter alphanumeric characters for the name of the workgroup that the machine belongs to 6 Click OK Setting Up 62 ...

Страница 70: ... and use SNMPv3 SNMPv3 With SNMPv3 you can implement network device management that is protected by robust security features Note that TLS must be enabled for the Remote UI before configuring SNMPv3 Configuring the Key and Certificate for TLS P 307 The machine does not support the trap notification feature of SNMP To change the port number of SNMP see Changing Port Numbers P 304 SNMP management so...

Страница 71: ... of the community MIB Access Permission For each community select Read Write or Read Only for the access privileges to MIB objects Read Write Permits both viewing and changing the values of MIB objects Read Only Permits only viewing the values of MIB objects Use Dedicated Community Dedicated Community is a preset community intended exclusively for Administrators using Canon software Select the che...

Страница 72: ...tion of authentication and encryption settings Authentication Algorithm Click the Authentication On Encryption On or Authentication On Encryption Off for Security Settings for the algorithm that corresponds to your environment Encryption Algorithm Click the Authentication On Encryption On for Security Settings for the algorithm that corresponds to your environment Set Change Password To set or cha...

Страница 73: ...le such as obtaining machine information via the printer driver Using the operation panel You can also specify SNMPv1 settings and enable disable SNMPv3 settings from the Menu screen SNMP Settings P 369 Enabling Both SNMPv1 and SNMPv3 If both versions of SNMP are enabled it is recommended that MIB access permission in SNMPv1 be set to Read Only MIB access permission can be set independently in SNM...

Страница 74: ...when setting the machine from the Remote UI see Setting Up Menu Options from Remote UI P 343 1 Start the Remote UI and log in to System Manager Mode Starting Remote UI P 334 2 Click Settings Registration on the Portal page Remote UI Screen P 335 3 Select Network Settings TCP IP Settings 4 Click Edit in SNTP Settings 5 Select the Use SNTP check box and specify the required settings Use SNTP Select ...

Страница 75: ...with the registered server by clicking Settings Registration Network Settings TCP IP Settings Check NTP Server in SNTP Settings If a proper connection has been established the result is displayed as shown below Note that this operation does not adjust the system clock Setting Up 68 ...

Страница 76: ... machine or environmental conditions some functions may not be available Some of the drivers are not supported depending on the OS For more information about the supported status of the latest OS see the Canon website 2 Proceed with the installation For more information about the installation procedure see the manuals for the drivers and software you are going to use Installation of drivers is imp...

Страница 77: ...tended use and then follow the on screen instructions to configure the settings For more information about a particular step click on the link to go to the corresponding section Step 1 Deciding Which Fax Receive Mode to Use P 71 Step 2 Registering the Fax Number and Unit Name P 72 Step 3 Selecting the Receive Mode P 73 Step 4 Connecting the Telephone Line P 74 Setting Up 70 ...

Страница 78: ...h fax and telephone Use answering machine Answering Machine Connect your answering machine Callers can record a message if they call while you are away from the telephone The machine automatically receives incoming faxes Use standard telephone or optional handset Fax Tel Auto Switch Connect your telephone or handset The machine automatically receives incoming faxes and the telephone rings for inco...

Страница 79: ...een P 111 2 Select Fax Settings Fax Setup Guide 3 Select Set Up Now 4 Select Next 5 Enter the fax number and select Apply 6 Select Next 7 Enter the unit name such as a user name or company name and select Apply On how to enter text see Entering Text P 123 When the unit name has been registered the RX mode setting screen is displayed Continue to Selecting the Receive Mode P 73 LINKS Receiving Faxes...

Страница 80: ...eceive modes other than those described below depending on your country or region Receiving Faxes P 203 To set the receive mode to Auto Select No To set the receive mode to Answering Machine Select Yes Yes To set the receive mode to Fax Tel Auto Switch Select Yes No Yes To set the receive mode to Manual Select Yes No No 3 Select Apply When the RX mode has been set the telephone line connection met...

Страница 81: ... the machine Connect the included telephone cable to the telephone line jack on the machine and the telephone line jack on the wall If you are using a telephone answering machine or an optional handset connect it to the external telephone jack If you are connecting an external telephone with fax functions set up the telephone to receive faxes manually 3 Select Next after the telephone line has bee...

Страница 82: ...t sure of the type of phone line you are using contact your local telephone company Select Line Type may not be available depending on the country where you are using the machine Menu Fax Settings Basic Settings Select Line Type Select the type of telephone line LINKS Basic Operations for Sending Faxes P 195 Receiving Faxes P 203 Setting Up 75 ...

Страница 83: ...he machine will assist you with the required setup Set the necessary configuration depending on your purpose and network environment Saving to a Computer Preparing to Use the Machine as a Scanner P 77 Scanning to E mail Procedure for Setting to Send E Mail P 78 Scanning to Shared Folders Procedure for Setting a Shared Folder as a Save Location P 85 LINKS System Environment P 546 Scan Function P 54...

Страница 84: ...when connecting this machine to a computer via a wireless or wired LAN you need to register this machine in MF Network Scanner Selector using the following procedure This procedure is not required if the machine and your computer are connected via USB The scan function is not available if the machine and your computer are connected in an IPv6 environment Use IPv4 or a USB connection 1 Click in the...

Страница 85: ...s required and the user name and password for authentication For more information about the e mail server settings contact your Internet service provider or Network Administrator Make sure that the computer meets the system requirements for the Send Function Setting Tool sending e mail System requirements for the Send Function Setting Tool System Environment P 546 Also make sure that Use HTTP and ...

Страница 86: ... Send Function Setting Tool Using a Web browser Enter http the IP address of the machine sendsupport_login html in the address field of a Web browser and press the ENTER key Using the CD ROM DVD ROM 1 Insert the provided CD ROM DVD ROM into the drive on the computer Select a language and click OK if you are prompted to do so 2 Click Start Software Programs If the Software Programs Manuals Setup sc...

Страница 87: ...K 2 Click Start If the login screen is displayed enter the appropriate PIN in the corresponding text boxes and then click Logon 3 Click Send to E mail Settings If the screen prompting you to enter the Address Book PIN is displayed enter the PIN for the Address Book and click OK Restricting Use of the Address Book P 324 4 Specify the required settings Registration One touch Speed Dial Number Settin...

Страница 88: ...ding e mails To prevent e mail transmissions by unauthorized users the machine supports SMTP authentication SMTP AUTH and POP before SMTP For more information about the required authentication method contact your Internet service provider or Network Administrator POP before SMTP authentication can only be configured by using the Remote UI Configuring E Mail Communication Settings P 82 5 Click Next...

Страница 89: ... Settings Registration on the Portal page Remote UI Screen P 335 3 Select Network Settings E Mail Settings 4 Click Edit 5 Specify the required settings SMTP Server Enter alphanumeric characters as the SMTP server name or IP address for sending e mail E Mail Address Enter alphanumeric characters for the e mail address that you want to use for the machine POP Server Enter alphanumeric characters as ...

Страница 90: ...g the authentication process Configuring SMTP authentication If you configure SMTP authentication SMTP AUTH user identification by user name and password is performed at the time of sending e mail Use SMTP Authentication SMTP AUTH To enable authentication on the SMTP server select the check box and enter alphanumeric characters in the User Name text box Set Change Password To specify or change the...

Страница 91: ... POP3 server using TLS Select the Verify Certificate and Add CN to Verification Items check boxes as required 6 Click OK Depending on the network you are using you may need to change the SMTP or POP3 port setting Changing Port Numbers P 304 For more information contact your Internet service provider or Network Administrator LINKS Procedure for Setting to Send E Mail P 78 Configuring Basic E Mail S...

Страница 92: ...g the Computer Name P 560 Path to and the name of the shared folder If access restrictions are set to the folder the user name and password information is also needed For instructions on how to create a new shared folder see Send Setting Guide included with the provided CD ROM DVD ROM Make sure that the computer meets the system requirements for the Send Function Setting Tool System requirements f...

Страница 93: ...to the Address Book Registering Destinations in the Address Book from Remote UI Registering Destinations from Remote UI P 346 1 Start the Send Function Setting Tool Using a Web browser Enter http the IP address of the machine sendsupport_login html in the address field of a Web browser and press the ENTER key Using the CD ROM DVD ROM 1 Insert the provided CD ROM DVD ROM into the drive on the compu...

Страница 94: ...Click Start If the login screen is displayed enter the appropriate PIN in the corresponding text boxes and then click Logon 3 Click Store to Shared Folder Settings If the screen prompting you to enter the Address Book PIN is displayed enter the PIN for the Address Book and click OK Restricting Use of the Address Book P 324 4 Specify the required settings Registration One touch Speed Dial Number Se...

Страница 95: ... on Store Destination Computer Enter the name of or path to the shared folder For example if the shared folder is a subfolder named share and is contained in the Public folder in drive C path C users public share enter users public share Status of Settings for Shared Folder Access Restriction to Shared Folder Click the Not Set or Set radio button to match the access restrictions set to the shared ...

Страница 96: ...ext 123 Placing Originals 128 Loading Paper 132 Loading Paper in the Drawer 134 Loading Paper in the Multi Purpose Tray 138 Loading Envelopes 141 Loading Preprinted Paper 143 Specifying Paper Size and Type 145 Specifying Paper Size and Type in the Drawer 146 Specifying Paper Size and Type in the Multi Purpose Tray 147 Registering a Custom Paper Size 148 Limiting the Paper Sizes Displayed 150 Custo...

Страница 97: ...stinations 161 Registering Destinations in the Address Book 163 Registering Destinations for One Touch Dial 165 Registering Multiple Destinations as a Group 167 Editing the Registered Destinations in the Address Book 169 Basic Operations 90 ...

Страница 98: ...he operation panel and how to view the display Parts and Their Functions P 94 Turning ON the Machine This section describes how to turn the machine ON and OFF Turning ON the Machine P 107 Using the Operation Panel This section describes how to use the display for tasks such as selecting items and adjusting settings Also it describes how to enter characters and numbers Using the Operation Panel P 1...

Страница 99: ... or create shortcut buttons in order to make it easier to use screens shown in the display Customizing the Display P 151 Entering Quiet Mode This section describes how to place the machine in quiet mode to reduce operation sound Entering Quiet Mode P 157 Entering Sleep Mode This section describes how to set the sleep mode Entering Sleep Mode P 159 Basic Operations 92 ...

Страница 100: ... Registering Destinations This section describes how to register destinations for sending faxes or scanned documents Registering Destinations P 161 Basic Operations 93 ...

Страница 101: ...parts of the machine used for such basic operations as loading paper and replacing the toner cartridges etc this section also describes the keys on the operation panel and display Read this section for tips on how to use the machine properly Front Side P 95 Back Side P 97 Interior P 98 Feeder P 99 Multi Purpose Tray P 100 Drawer P 101 Operation Panel P 102 Basic Operations 94 ...

Страница 102: ... the operation panel Operation Panel P 102 Basic Screens P 110 Output tray Printed paper is output to the output tray Lift handles Hold the lift handles when carrying the machine Relocating the Machine P 453 Power switch Turns the power ON or OFF To restart the machine turn OFF the machine wait for at least 10 seconds and turn it back ON Paper stopper Open the paper stopper when you want to preven...

Страница 103: ...nning books originals of heavy or thin paper and other originals that cannot be scanned using the feeder place them on the platen glass Placing Originals P 128 Ventilation slots Air inside the machine is vented out to cool down the inside of the machine Note that placing objects in front of the ventilation slots prevents ventilation Basic Operations 96 ...

Страница 104: ...ble when connecting the machine and a computer LAN port Connect a LAN cable when connecting the machine to a wired LAN router etc Connecting to a Wired LAN P 17 Power socket Connect the power cord External telephone jack Connect your telephone answering machine or an optional handset Connecting the Telephone Line P 74 Telephone line jack Connect a telephone cable when connecting the machine to a t...

Страница 105: ... the Machine P 515 Toner cover Open this cover to replace the toner cartridge etc or clear paper jams Replacing the Toner Cartridge P 444 Replacing the Drum Cartridge P 448 Paper Jams inside the Machine P 515 Paper exit guide Open this guide to clear paper jams Paper Jams inside the Machine P 515 LINKS Replacing the Toner Cartridge P 444 Replacing the Drum Cartridge P 448 Basic Operations 98 ...

Страница 106: ...aded in the feeder originals can be scanned continuously Placing Originals P 128 Original output tray Scanned originals are output here Original scanning area Originals loaded in the feeder are automatically fed to the original scanning area to be scanned Do not place any objects in the original output area Doing so may cause damage to the originals Regularly clean the feeder and platen glass in o...

Страница 107: ...wer the multi purpose tray when loading paper Paper guides Adjust the paper guides to exactly the width of the loaded paper to ensure that paper is fed straight into the machine LINKS Loading Paper in the Multi Purpose Tray P 138 Basic Operations 100 ...

Страница 108: ...wer 2KUS 023 Paper guides Adjust the paper guides to exactly the size of the loaded paper to ensure that paper is fed straight into the machine LINKS Loading Paper in the Drawer P 134 Basic Operations 101 ...

Страница 109: ...me key Press to display the Home screen which provides access to the setting menu and functions such as copy and scan Home Screen P 111 Customizing the Home Screen P 152 Display You can view the progress of the machine and error statuses The display is also a touch panel so you can specify settings by touching the screen directly Basic Operations 102 ...

Страница 110: ... any errors occurred Status Monitor Screen P 115 Numeric keys 0 9 keys Press to enter numbers and text Entering Text P 123 Stop key Press to cancel printing and other operations Energy Saver key Press to put the machine into sleep mode The key lights up green when the machine is in sleep mode Press the key again to exit sleep mode Entering Sleep Mode P 159 Quiet Mode key Press to put the machine i...

Страница 111: ...ngs for the machine such as Timer Settings or Preferences Setting Menu List P 360 COPY SCAN key Press to switch the mode to copy or scan ID Card Copy key Press to enter a mode for copying the front and back sides of a driver s license or other ID card onto the same side of a page at actual size Making ID Card Copies P 189 Basic Operations 104 ...

Страница 112: ...elect the item immediately below the currently selected item When changing setting values press to decrease a value Clear key Press to delete the entered numbers and text Back key Press to return to the previous screen If you press this key when specifying settings for example the settings are not applied and the display returns to the previous screen key Press to apply settings or specified detai...

Страница 113: ...e copy mode for copying multiple document pages reduced on a single sheet Using Paper Save Copy P 187 Quiet Mode key Press to put the machine into quiet mode While in quiet mode this key is lit in green Press the key again to exit quiet mode Entering Quiet Mode P 157 Error indicator Blinks or lights up when an error such as a paper jam occurs Processing Data indicator Blinks while operations such ...

Страница 114: ...rt screen appears Operation Panel P 102 A blank sheet of paper may be output when you turn ON the power for the first time after purchasing the machine This is not a malfunction On the touch panel model you can select the screen that is displayed first after the machine is turned ON Default Screen after Startup Restoration P 376 LINKS Turning OFF the Machine P 108 Basic Operations 107 ...

Страница 115: ...me for the machine to completely shut down Do not unplug the power cord until the display turns off To restart the machine wait for at least 10 seconds after the machine is turned OFF Even when the power is turned OFF the machine continues to consume a small amount of power To reduce power consumption to zero unplug the power plug from the AC power outlet Basic Operations 108 ...

Страница 116: ...functions This section describes basic usage of the display and keys Basic Screens P 110 Basic Operation P 118 Entering Text P 123 If you want to invert the light and dark parts of the display Invert Screen Colors P 376 If you want to adjust the contrast of the display Contrast P 376 LINKS Operation Panel P 102 Basic Operations 109 ...

Страница 117: ...essages and the machine s operation status The screen is also a touch panel so you can perform operations by touching the screen directly Home Screen P 111 Status Monitor Screen P 115 Message Display P 117 For the Touch Panel Model You can customize the Home screen by rearranging frequently used buttons for easier access to the respective functions Customizing the Home Screen P 152 Basic Operation...

Страница 118: ...ange page Use this to view another page in the Home screen Wi Fi icon Displayed when the machine is connected to a wireless LAN Copy Use this button to start copying Copying P 171 Fax Use this button to send a fax from the machine Faxing P 193 Scan Scans an original and converts it into an electronic file You can save scanned files on your computer or send them via e mail Scanning P 230 Addr Book ...

Страница 119: ...ply select this button to start a scan Scanning Using the Shortcut Key P 235 ID Card Cpy Use this function to copy the front and back sides of a driver s license or other card onto the same side of one sheet of paper Making ID Card Copies P 189 Passprt Cpy Use this function to copy passports for several individuals laid out on a single sheet of paper Making Passport Copy P 190 Direct Conn Use this...

Страница 120: ...s Paper Setting to select the paper to copy or print on the Paper Settings screen is displayed Select the paper on the screen Also for example you can press this key to change the paper settings when you load a paper size that is different from the previously loaded paper size Note that the paper setting must be correctly specified so that the paper is fed properly Selecting Paper Tray Use to sele...

Страница 121: ...Setting Menu List P 360 LINKS Customizing the Home Screen P 152 Basic Operations 114 ...

Страница 122: ... 492 Device Information Displays the status of the machine such as the paper size or the amount of toner remaining in the toner cartridges Paper Information Displays whether paper is loaded in each paper source Cartridge Level Displays the amount of toner remaining in the toner cartridges Other internal parts may reach the end of their lifetime before the toner runs out Check Counter Displays the ...

Страница 123: ...ob RX Job and Fax Forwarding Errors statuses only on a touch panel model The Copy Print Job screen is shown below as an example Network Information Displays the network settings such as the IP address of the machine and status such as the condition of wireless LAN communications Viewing Network Settings P 38 Basic Operations 116 ...

Страница 124: ...92 When You have notifications or Tap the i icon is displayed Touch Panel Model Tap to view the notification When an Error Occurs In some cases when an error occurs instructions on how to respond to the error are displayed Follow the on screen instructions to solve the problem The screen displayed when a paper jam occurs is shown below as an example Touch Panel Model 5 Lines LCD Model Basic Operat...

Страница 125: ...nted objects fingernails ballpoint pen pencil etc Operating with wet soiled hands Operating the display while an object is placed on it Before using the touch panel display peel off the protective film from the display Tap Touch the screen lightly and quickly Use for selecting or finalizing items Long Touch Keep finger held on the screen When text cannot be completely displayed on one line appears...

Страница 126: ...el the selection To return to the previous screen Press to return to the previous screen Scrolling the Screen The scroll bar appears on the screen when there is still information that is undisplayed If the scroll bar is displayed tap or to scroll the screen The screen changes page by page and the page number is displayed in the scroll bar Basic Operations 119 ...

Страница 127: ...etting on the scale You can change a variety of display related settings such as the display language Display Settings P 376 You can change the screen that is automatically displayed when the machine remains idle for a specified length of time Function After Auto Reset P 382 You can change various settings about the operability such as screen brightness Display Settings P 376 Basic Operation of 5 ...

Страница 128: ...lue Use to enter values If an icon such as below is displayed at the upper left of the screen you can enter values directly using the numeric keys Entering Text P 123 Values in displayed below the entry box are the enterable value range Using Proceeding to next screen Returning to previous screen Press to proceed to the next screen Press to return to the previous screen You can also proceed to the...

Страница 129: ...lues Entering Text P 123 You can change a variety of display related settings such as the scrolling speed or display language Display Settings P 376 To change the screen that is automatically displayed when the machine remains idle for a specified length of time Function After Auto Reset P 382 You can change various settings about the operability such as screen brightness Display Settings P 376 Ba...

Страница 130: ... Character Tap A a 12 to switch the type of character that is entered The currently selected type of character is indicated by the A a or 12 displayed above and to the right of the text input field You can also press to switch the type of character Types of Character That Can Be Entered Enter character with the numeric keys and the display Character that can be entered is listed below Key A a 12 _...

Страница 131: ...n 1 1 Press A a 12 or press repeatedly until A is selected 2 Press repeatedly until the letter C is selected 3 Press A a 12 or press repeatedly until a is selected 4 Press repeatedly until the letter a is selected 5 Press repeatedly until the letter n is selected 6 Press repeatedly until the letter o is selected 7 Press repeatedly until the letter n is selected 8 Press repeatedly until the symbol ...

Страница 132: ...ext on the 5 Lines LCD Model Use the numeric keys to enter text and values Switching the Type of Character Press to switch the type of character that is entered The currently selected type of character is indicated by the A a or 12 of Entry Mode You can also select Entry Mode and press to switch the type of character Types of Character That Can Be Entered Character that can be entered using the nu...

Страница 133: ...ect the symbol to enter and press Deleting Text One character is deleted each time is pressed Press and hold to delete all of the entered text Moving the Cursor Entering a Space Press to move the cursor To enter a space move the cursor to the end of the text and press Example of Entering Text and Numbers Example Canon 1 1 Press repeatedly until A is selected 2 Press repeatedly until the letter C i...

Страница 134: ...til the letter n is selected 6 Press repeatedly until the letter o is selected 7 Press repeatedly until the letter n is selected 8 Press repeatedly until the symbol is selected 9 Press repeatedly until 12 is selected 10 Press 11 Select Apply and press Basic Operations 127 ...

Страница 135: ...er jams Do not place the following types of originals in the feeder as this may cause paper jams Wrinkled or creased paper Carbon paper Curled or rolled paper Coated paper Torn paper Onion skin or thin paper Stapled or clipped originals Paper printed by a thermal transfer printer Transparencies To scan originals more accurately Originals placed in the feeder are scanned while being fed into the ma...

Страница 136: ...t corner of the platen glass To scan transparent originals for example tracing paper or transparencies cover them with plain white paper 3 Gently close the feeder The machine is ready to scan the original When scanning is complete Remove the original from the platen glass Placing Originals in the Feeder 1 Open the original supply tray Basic Operations 129 ...

Страница 137: ...ack in small batches and align the edges by lightly tapping the stack on a flat surface a few times 4 Place the original s face up in the feeder Make sure that the original stack does not exceed the load limit line Do not load originals of various sizes at the same time If originals are loaded so that they exceed the load limit line scanning may stop or a paper jam may occur Basic Operations 130 ...

Страница 138: ...hine is ready to scan the original Align the slide guides securely against the edges of the original Slide guides that are too loose or too tight can cause misfeeds or paper jam While originals are being scanned Do not add or remove originals When scanning is complete Remove the scanned originals from beneath the feeder to prevent paper jams Basic Operations 131 ...

Страница 139: ... and Type P 145 Precautions for Paper Do not use the following types of paper A paper jam or printing error may occur Wrinkled or creased paper Curled or rolled paper Torn paper Damp paper Very thin paper Thin coarse paper Paper printed by a thermal transfer printer Back side of paper printed by a thermal transfer printer Highly textured paper Glossy paper Notes on use of paper Only use paper that...

Страница 140: ... evaporate most likely to occur at low room temperatures Storing the Paper Printed with the Machine When handling storing the paper printed with the machine take the following precautions How to Store the Printed Paper Store on a flat surface Do not store together with articles made of PVC polyvinyl chloride such as clear folders Toner may melt resulting in the paper s sticking to PVC articles Tak...

Страница 141: ...ti Purpose Tray P 138 When loading A5 size paper When setting the paper size make sure the current paper orientation When loading paper in landscape orientation you must configure this setting in the printer driver For more information refer to the printer driver Help Landscape orientation Portrait orientation 1 Open the front cover 2 Spread the paper guides apart Slide the paper guides outward Ba...

Страница 142: ... the paper with Notify to Check Paper Settings set to On a confirmation screen is displayed Notify to Check Paper Settings P 377 Keep the paper stack within the load limit guides Make sure that the paper stack does not exceed the load limit guides Loading too much paper may cause paper jams When loading envelopes or preprinted paper see Loading Envelopes P 141 or Loading Preprinted Paper P 143 4 A...

Страница 143: ... of the output tray Continue to Specifying Paper Size and Type in the Drawer P 146 When changing the paper size or type The factory default settings for paper size and type are A4 and Plain respectively If you load a different size or type of paper into the machine make sure to change the settings If you do not change the settings the machine cannot print properly Printing on the Back Side of Prin...

Страница 144: ... with the side to print face up previously printed side face down When using the multi purpose tray load one sheet of paper each time you print You can use only the paper printed with this machine You cannot print on the side that has previously been printed on If you are using A5 size paper the reverse side may not be printed correctly LINKS Available Paper P 538 Basic Operations 137 ...

Страница 145: ...one sheet of paper at a time Only one sheet of paper can be loaded each time you print When loading A5 size paper When setting the paper size make sure the current paper orientation When loading paper in landscape orientation you must configure this setting in the printer driver For more information refer to the printer driver Help Landscape orientation Portrait orientation 1 Open the front cover ...

Страница 146: ...the paper with the print side face up When loading envelopes or paper with a logo see Loading Envelopes P 141 or Loading Preprinted Paper P 143 5 Align the paper guides against the edges of the paper Align the paper guides securely against the edges of the paper Paper guides that are too loose or too tight can cause misfeeds or paper jams Basic Operations 139 ...

Страница 147: ...ny curls on the printed paper and insert it into the drawer Loading Paper in the Drawer P 134 or multi purpose tray with the side to print face up previously printed side face down You can use only the paper printed with this machine You cannot print on the side that has previously been printed on If you are using A5 size paper the reverse side may not be printed correctly LINKS Available Paper P ...

Страница 148: ...you want as well as procedures that you need to complete before loading envelopes For a description of the general procedure for loading envelopes in the drawer see Loading Paper in the Drawer P 134 or Loading Paper in the Multi Purpose Tray P 138 Before Loading Envelopes Follow the procedure below to prepare the envelopes before loading 1 Close the flap of each envelope 2 Flatten them to release ...

Страница 149: ...velopes Load the envelopes so that the edge with the flap is toward the left side as shown in the illustration Loading Envelopes in the Multi Purpose Tray Load the envelopes Monarch No 10 COM10 DL or C5 in portrait orientation with the short edge toward the machine with the non glued side front side face up You cannot print on the reverse side of envelopes Load the envelopes so that the edge with ...

Страница 150: ...ted paper with the proper facing and orientation For a description of the general procedure for loading paper in the drawer see Loading Paper in the Drawer P 134 or Loading Paper in the Multi Purpose Tray P 138 Making Printouts on Paper with Logos Load the paper with the logo side the side to print the document face up Printing on Paper with Logos in Portrait Orientation Printing on Paper with Log...

Страница 151: ...of the paper to load each time you perform 1 sided and 2 sided printing However if Switch Paper Feed Method is set to Speed Priority the facing that you use for loading preprinted paper for 2 sided printing logo side face down can also be used for 1 sided printing This setting is especially useful if you frequently perform both 1 sided and 2 sided printing Switch Paper Feed Method P 385 Basic Oper...

Страница 152: ...tings when you load the paper that is different from the previously loaded paper Specifying Paper Size and Type in the Drawer P 146 Specifying Paper Size and Type in the Multi Purpose Tray P 147 Registering a Custom Paper Size P 148 Limiting the Paper Sizes Displayed P 150 If the setting does not match the size and type of loaded paper a paper jam or printing error may occur Basic Operations 145 ...

Страница 153: ...l Select Paper Set in the Home screen 5 Lines LCD Model Press Paper Setting 2 Select Drawer 1 3 Select the paper size If the loaded paper size is not displayed select Other Sizes 4 Select the paper type LINKS Loading Paper in the Drawer P 134 Limiting the Paper Sizes Displayed P 150 Available Paper P 538 Basic Operations 146 ...

Страница 154: ...l Select Paper Set in the Home screen 5 Lines LCD Model Press Paper Setting 2 Select MP Tray 3 Select the paper size If the loaded paper size is not displayed select Other Sizes 4 Select the paper type LINKS Loading Paper in the Multi Purpose Tray P 138 Limiting the Paper Sizes Displayed P 150 Available Paper P 538 Basic Operations 147 ...

Страница 155: ... Paper Set in the Home screen 5 Lines LCD Model Press Paper Setting 2 Select MP Tray or Drawer 1 Custom 3 Specify the length of the X side and Y side Execute the following steps in sequence X enter the length of the X side using Apply Y enter the length of the Y side Apply Apply Touch Panel Model 5 Lines LCD Model 4 Select Apply 5 Select the paper type Basic Operations 148 ...

Страница 156: ...LINKS Loading Paper in the Drawer P 134 Loading Paper in the Multi Purpose Tray P 138 Basic Operations 149 ...

Страница 157: ... 2 Select Select Frequently Used Paper Sizes 3 Select Multi Purpose Tray or Drawer 1 4 Clear the check boxes for paper sizes you do not want displayed Ensure that only the check boxes for frequently used paper sizes are selected Paper sizes that are not selected can be viewed by selecting the Other Sizes in the paper size setting selection screen 5 Select Apply LINKS Specifying Paper Size and Type...

Страница 158: ... 2KUS 031 In order to make the Home screen easier to use you can customize it Customizing the Home Screen You can rearrange buttons that are displayed in the Home screen Customizing the Home Screen P 152 Basic Operations 151 ...

Страница 159: ...92 2 Select Set Display Order 3 Select the button to move 4 Select Previous or Next to move the button and select Apply The button moves as many times as you tapped A long touch on Previous or Next moves the selected button continuously 5 Repeat steps 3 and 4 to move all buttons you want to move 6 Select End Inserting a Blank 1 Select Home Set in the Home screen Home Screen P 111 If a screen appea...

Страница 160: ...button where you want to insert a blank and select Insert To delete an inserted blank select the blank select Delete and proceed to step 5 4 Select Apply 5 Select End LINKS Basic Operation P 118 Basic Operations 153 ...

Страница 161: ...r information about changeable setting items see Fax Settings P 389 Menu Fax Settings TX Function Settings Change Default Settings Select the setting Change the default value of the selected item Apply E Mail For information about changeable setting items see E Mail Settings P 400 Menu Scan Settings E Mail Settings Change Default Settings Select the setting Change the default value of the selected...

Страница 162: ...iving is complete Scanning Done Tone Sound produced when fax original scanning is complete Entry Tone Confirmation sound each time a key on the operation panel or button on the display is pressed Select On produce a tone or Off not produce a tone Invalid Entry Tone Sound produced when an invalid key operation is performed such as when you enter a number outside the valid setting range Warning Tone...

Страница 163: ... To mute the sound move the cursor all the way to the left End sound only for error Select When Error select On and select Apply Basic Operations 156 ...

Страница 164: ...nctions becomes slower On the touch panel model the volume of notifications such as Entry Tone and Job Done Tone is not lower To adjust volume or mute sounds see Setting Sounds P 155 When the machine cannot enter quiet mode The machine is in Special Printing Mode A particular paper size or paper type is specified Specifying a time for the machine to enter quiet mode You can specify a time for the ...

Страница 165: ... a time for entering quiet mode To set select On then specify the time End Time Specify a time for exiting quiet mode To set select On then specify the time Exiting Quiet Mode Press to exit quiet mode Basic Operations 158 ...

Страница 166: ... condensation When a paper jam occurs When the receiver of the external telephone or the optional handset is off the hook When the machine is set such that the fax incoming ring will not sound When the menu screen is displayed When an error message is displayed on the screen There are some exceptions The machine sometimes enters sleep mode when an error message is displayed When the machine is wai...

Страница 167: ...Apply Exiting Sleep Mode You can press or any other key on the operation panel to exit the sleep mode On the touch panel model you can also tap the display to exit sleep mode If an external telephone or the optional handset is connected the machine exits sleep mode when you take the receiver off the hook Basic Operations 160 ...

Страница 168: ...ou can select multiple destinations that have already been registered and register them together as a group You can send faxes or e mails to multiple destinations at the same time Groups can also be registered in One Touch Dial Registering Multiple Destinations as a Group P 167 Index The registered destinations are classified into indexes depending on the initial character or the type of address C...

Страница 169: ...ion P 86 Registering Destinations from Remote UI P 346 You can save the Address Book as a file on your computer although you cannot use the computer to edit the Address Book You can also import a saved Address Book from the computer to the machine Saving Loading Address Book from Remote UI P 350 You can print a list of destinations registered in the Address Book Address Book List Touch Panel Model...

Страница 170: ... select Apply Restricting Use of the Address Book P 324 3 Select Coded Dial Select the type of address to register According to the address being registered select Fax or E Mail 4 Select Name Registering Name is optional If you register Name the destination can be searched alphabetically 5 Enter the name and select Apply On how to enter text see Entering Text P 123 6 Select Fax Number or E Mail Ad...

Страница 171: ...ngs for destinations Menu Fax Settings However settings made from Addr Book are enabled for the detailed settings of destinations registered in the Address Book 8 Select Apply A three digit number is automatically set to destinations The number can be edited after it has been registered You can make a group of destinations already registered in the Address Book and register it as one destination F...

Страница 172: ...dress Book and select Apply Restricting Use of the Address Book P 324 3 Select One Touch Select the type of address to register According to the address being registered select Fax or E Mail 4 Select the number to register You can change this number to another number later 5 Select Name Registering Name is optional If you register Name the destination can be searched alphabetically 6 Enter the nam...

Страница 173: ...r telephone connection you can adjust the transmission start speed downward Long Distance Specify International 1 to International 3 according to the transmission conditions when registering overseas fax numbers You can make detailed settings for destinations Menu Fax Settings However settings made from Addr Book are enabled for the detailed settings of destinations registered in the Address Book ...

Страница 174: ... Addr Book in the Home screen Home Screen P 111 2 Select Regist Dest If a screen appears prompting you to enter a PIN enter the PIN for the Address Book and select Apply Restricting Use of the Address Book P 324 3 Select Coded Dial Group Groups can also be registered in One Touch Dial Select One Touch to register the group as a One Touch Dial number 4 Select Name Registering Name is optional If yo...

Страница 175: ...tinations that you want to register and then select Apply To view information about the destination Select the target destination To remove a destination from the group Select the destination that you want to remove from the group and select Remove Yes 11 Select Apply Basic Operations 168 ...

Страница 176: ...ons You can also delete destinations or groups 1 Select Addr Book in the Home screen Home Screen P 111 2 Select Details Edit 3 Select the index containing the destination you want to edit Index P 161 4 Select the destination and select Edit To delete the destination select Delete Yes If a screen appears prompting you to enter a PIN enter the PIN for the Address Book and select Apply Restricting Us...

Страница 177: ...nd Adjusting Copy Quality 180 Selecting the Type of Original for Copying 181 Adjusting Sharpness for Copying Sharpness 182 Useful Copy Functions 184 Copying Multiple Documents onto One Sheet N on 1 185 Using Paper Save Copy 187 Collating Copies by Page 188 Making ID Card Copies 189 Making Passport Copy 190 Copying 170 ...

Страница 178: ...ng Copies P 177 Checking the Copying Status and Log P 179 Enhancing Quality Enhancing and Adjusting Copy Quality P 180 Selecting the Type of Original for Copying P 181 Adjusting Sharpness for Copying Sharpness P 182 Using Useful Copy Functions Useful Copy Functions P 184 Copying Multiple Documents onto One Sheet N on 1 P 185 Using Paper Save Copy P 187 Collating Copies by Page P 188 Copying 171 ...

Страница 179: ...Making ID Card Copies P 189 Making Passport Copy P 190 Copying 172 ...

Страница 180: ... LCD Model Press COPY SCAN 3 Enter the number of copies using the numeric keys If you have entered an incorrect value use to clear it 4 Specify the copy settings as necessary Adjusting Density 2 Sided Copying Enlarging or Reducing Adjusting Density Adjust the density of the scan if the text or images in an original are excessively light or dark You can also automatically set an optimal density for...

Страница 181: ...ginal on both sides of the paper or on two sheets of paper 2 Sided may not be available with some sizes and types of paper Available Paper P 538 2 Sided is not available when using Paper Save Paper Save Copy ID Card Cpy ID Card Copy or Passprt Cpy Passport Copy 2 Sided Select the type of 2 sided copying Types of 2 sided copying The illustration below shows the types of 2 sided copying 1 2 Sided 2 ...

Страница 182: ...takes priority Copy Ratio Select the copy ratio Custom Ratio You can set any copy ratio from 25 to 400 in 1 increments Preset copy ratio Select a copy ratio For information about other copy settings see Enhancing and Adjusting Copy Quality P 180 or Useful Copy Functions P 184 5 Press Copying starts If you want to cancel select Cancel Yes Canceling Copies P 177 When placing originals in the feeder ...

Страница 183: ...tire original 3 Select Start Copy Start Copying When the Size Settings Mismatch or The memory is full Scanning will be canceled Do you want to print The memory is full Scanning will be canceled Print message is shown in the display Countermeasures for Each Message P 492 When copying originals with text or images that extend to the edges of the page The edges of the original might not be copied For...

Страница 184: ...us Select Cancel on the Screen That is Displayed While Copying Press to Cancel If the Screen Displays a List of Documents When is Pressed Originals have been scanned and are waiting to be printed Select a copy document to be canceled and select Yes Check the copy job status before canceling Copy Print Job Job Status Select the copy document in the Copy Print Job Status screen Cancel Yes Copying 17...

Страница 185: ...LINKS Basic Copy Operations P 173 Copying 178 ...

Страница 186: ...f your original to be copied but printing of the document has not started yet you may want to see the waiting list of the documents waiting to be printed When you cannot find your printouts that you thought had been copied you may want to see whether an error has occurred 1 Press 2 Select Copy Print Job 3 Select Job Status and select the document whose status you want to check Displays detailed in...

Страница 187: ...J You can improve the copy quality by specifying more detailed settings such as adjusting the brightness erasing unnecessary shadows etc Selecting the Type of Original for Copying P 181 Adjusting Sharpness for Copying Sharpness P 182 Copying 180 ...

Страница 188: ...ext Suitable when copying originals that only contain text Text Photo High Speed Suitable when copying originals that contain both text and photos Priority is given to speed over image quality Text Photo Suitable when copying originals that contain both text and photos Photo Suitable when copying originals that contain printed photos such as magazines or pamphlets If Text Photo High Speed Text Pho...

Страница 189: ...t and lines or decrease the sharpness to improve the appearance of magazine photos Touch Panel Model Copy Sharpness Adjust the sharpness Apply 5 Lines LCD Model COPY SCAN Sharpness Adjust the sharpness Example If you want to sharpen text and lines written in pencil Example If you want to improve the appearance of magazine photos Copying 182 ...

Страница 190: ...LINKS Basic Copy Operations P 173 Copying 183 ...

Страница 191: ...ts into complete sets in sequential page order Also there is a function to copy both sides of a card etc onto one page Copying Multiple Documents onto One Sheet N on 1 P 185 Using Paper Save Copy P 187 Collating Copies by Page P 188 Making ID Card Copies P 189 Making Passport Copy P 190 Copying 184 ...

Страница 192: ... Paper Save ID Card Cpy ID Card Copy or Passprt Cpy Passport Copy When you copy multiple originals onto one page margins may be created in the copied image Using the Paper Save enables you to combine 2 sided copying and N on 1 Using Paper Save Copy P 187 Touch Panel Model Copy N on 1 Select 2 on 1 or 4 on 1 Select the original size on the Scan Size screen 5 Lines LCD Model COPY SCAN N on 1 Select ...

Страница 193: ... Select Layout Specify how to arrange the originals on the page LINKS Basic Copy Operations P 173 Using Paper Save Copy P 187 Copying 186 ...

Страница 194: ... copy ratio is displayed on the screen You can increase or further reduce the copy ratio before pressing but the edges of the document might not be copied if you increase it Paper Save is not available when using 2 Sided N on 1 ID Card Cpy ID Card Copy or Passprt Cpy Passport Copy When you copy multiple documents onto one page margins may be created in the copied image Paper Save Select the paper ...

Страница 195: ... Collate On Off The copies are grouped by page and not collated For example if you are making three copies of a five page original the printouts will be arranged in the following page order 1 1 1 2 2 2 3 3 3 4 4 4 5 5 5 On The copies are grouped into complete sets in sequential page order For example if you are making three copies of a five page original the printouts will be arranged in the follo...

Страница 196: ...a driver s license or ID card ID Card Cpy ID Card Copy is not available when using Paper Save Paper Save Copy 2 Sided N on 1 Copy Ratio or Passprt Cpy Passport Copy Touch Panel Model Place the card on the platen glass ID Card Cpy Turn the card over 5 Lines LCD Model Place the card on the platen glass ID Card Copy Turn the card over LINKS Basic Copy Operations P 173 Copying 189 ...

Страница 197: ...f the original might not be copied Scan size is fixed at 130 mm x 180 mm The order of layout cannot be set Passprt Cpy Passport Copy is not available when using Paper Save Paper Save Copy N on 1 or ID Card Cpy ID Card Copy The 2 sided copying setting cannot be changed Touch Panel Model Place one of the passports on the platen glass Passprt Cpy Specify the layout Place the next passport Repeat unti...

Страница 198: ...LINKS Basic Copy Operations P 173 Copying 191 ...

Страница 199: ...ings for Sending Recall Settings 207 Sending a Fax after a Phone Call Manual Sending 209 Various Receiving Methods 211 Saving Received Documents into the Machine Memory Reception 212 Forwarding the Received Documents Automatically 214 Checking Status and Log for Sent and Received Documents 216 Sending Faxes from Your Computer PC Fax 218 Sending PC Faxes 219 Faxing 192 ...

Страница 200: ...s for Fax Functions P 70 You need to register destinations in the Address Book before using this feature Registering Destinations P 161 Using Basic Operations Basic Operations for Sending Faxes P 195 Canceling Sending Faxes P 202 Receiving Faxes P 203 Checking Status and Log for Sent and Received Documents P 216 Using Useful Functions When Sending Useful Functions When Sending P 206 Recalling Prev...

Страница 201: ...nto the Machine Memory Reception P 212 Forwarding All the Received Documents Forwarding the Received Documents Automatically P 214 Sending Faxes Directly from Your Computer Sending Faxes from Your Computer PC Fax P 218 Faxing 194 ...

Страница 202: ...can cause transmission errors Always reset the settings before sending 4 Specify the destination Specifying from Address Book Specifying from Coded Dial Numbers Specifying from One Touch Entering Destinations Directly Specifying from Address Book The Address Book enables you to specify a destination by selecting from a list of registered destinations or by searching by name for destinations with r...

Страница 203: ... the Address Book beforehand Registering Destinations P 161 1 Select Destination Specify from Coded Dial 2 Enter a three digit number If you have entered an incorrect value use to clear it If a confirmation screen appears When One Touch Coded Dial TX Confirmation is set to On a screen is displayed that shows the destination and the name for the number For Group Dial the group name and the number o...

Страница 204: ...onfirmation is set to On a screen is displayed that shows the destination and destination name registered to the one touch button For Group Dial the group name and the number of destinations are shown Check the contents and if everything is correct select OK To specify a different destination select Cancel and then select the one touch buttons again If you select any of One Touch 1 to One Touch 4 ...

Страница 205: ...ination To send a fax to multiple destinations at a time sequential broadcast repeat the appropriate steps to enter all destinations You can also recall previously used destinations Recalling Previously Used Settings for Sending Recall Settings P 207 To delete destinations If you specified multiple destinations you can delete destinations as necessary 1 Select Destination Confirm Edit 2 Select a d...

Страница 206: ...t and lines or decrease the sharpness to improve the appearance of magazine photos Adjusting Sharpness P 199 Selecting Resolution Resolution Select the resolution Adjusting Density Density Adjust the density Apply Adjusting Sharpness Sharpness Adjust the sharpness Apply Example If you want to sharpen text and lines written in pencil Example If you want to improve the appearance of magazine photos ...

Страница 207: ...glass or when the machine is set to Manual Sending 2 Sided Original Select Book Type or Calendar Type Book Type Select for originals whose images on the front and back sides face the same direction Calendar Type Select for originals whose images on the front and back sides face in opposite directions 4 Press Scanning of the original starts If you want to cancel select Cancel Yes Canceling Sending ...

Страница 208: ...2 Place the next original on the platen glass and press Repeat this step until you finish scanning all of the pages 3 Select Start TX The faxes are sent If you always want to send faxes with the same settings Changing the Default Settings for Functions P 154 If you want to sound an alarm when the handset is off the hook Off Hook Alarm P 389 LINKS Canceling Sending Faxes P 202 Useful Functions When...

Страница 209: ...l on the screen during fax transmission Press to cancel If the screen displays a list of documents when is pressed Originals have been scanned and are waiting to be processed Select the document to cancel and select Yes Check the transmission status before canceling TX Job Job Status Select the document Cancel Yes LINKS Basic Operations for Sending Faxes P 195 Checking Status and Log for Sent and ...

Страница 210: ... it up by following the procedure in Setting Up the Machine to Receive Faxes P 204 Auto Dedicated to receiving faxes The machine receives faxes automatically Even if someone makes a call to you you cannot talk to the caller Fax Tel Auto Switch When the call is a fax The machine receives the fax automatically When the call is a telephone call An incoming call rings Pick up the handset to answer the...

Страница 211: ...e distinguishes between fax and telephone calls This mode is only available for certain countries and requires a subscription to a network switch service You need to connect your telephone or the optional handset to the machine beforehand Depending on the type of telephone connected to it the machine may not be able to send or receive faxes properly If you are connecting an external telephone with...

Страница 212: ...e Footer P 398 If you want to continue printing even when the amount remaining in the toner cartridge is low Continue Print When Near Cart Life End P 398 Using a Telephone to Receive Faxes Remote Reception When you pick up the telephone and get a fax signal you do not need to go to the machine to receive the fax Just enter a specific ID number with the telephone and you can start receiving the fax...

Страница 213: ... forward a fax again to a previously specified destination how to send a fax after a phone call and how to save a copy of a fax document Recalling Previously Used Settings for Sending Recall Settings P 207 Sending a Fax after a Phone Call Manual Sending P 209 Faxing 206 ...

Страница 214: ...ng New Destinations that Can Be Specified P 326 The destinations in Manual Sending are not available for this feature Sending a Fax after a Phone Call Manual Sending P 209 When you specify a destination using this feature any destinations that you have already specified are deleted 1 Place the original s Placing Originals P 128 2 Select Fax in the Home screen Home Screen P 111 3 Press If the desti...

Страница 215: ...the scanning settings as necessary Basic Operations for Sending Faxes P 195 7 Press Scanning of the original starts If you want to cancel select Cancel Yes Canceling Sending Faxes P 202 When placing originals in the feeder in step 1 When scanning is complete the faxes are sent When placing originals on the platen glass in step 1 When scanning is complete follow the procedure below 1 Select the ori...

Страница 216: ...ls in Manual Sending 2 Select Fax in the Home screen Home Screen P 111 3 Press If the destinations set by the previous user are still selected this can cause transmission errors Always reset the settings before sending 4 Specify the scanning settings as necessary Basic Operations for Sending Faxes P 195 5 Dial the recipient s fax number 6 Ask the recipient to set their fax machine to receive your ...

Страница 217: ...Canceling Sending Faxes P 202 Checking Status and Log for Sent and Received Documents P 216 Faxing 210 ...

Страница 218: ...ved faxes in the machine s memory without printing them You can reduce fax paper waste by checking the detailed information of fax documents and only printing necessary documents Saving Received Documents into the Machine Memory Reception P 212 Faxing 211 ...

Страница 219: ...u Fax Settings RX Function Settings Memory Lock Settings On Specify each setting Apply Report Print Enables you to print RX Result reports every time documents are stored into memory To print reports select On You also need to set RX Result Report to On RX Result Report Touch Panel Model P 457 Memory Lock Time Specify a period of time during the day in which received documents are stored in memory...

Страница 220: ...lete an unnecessary document if any 1 Press 2 Select RX Job 3 Select Job Status and select the document whose status you want to check Displays detailed information about the document To forward the document select Forward and specify the appropriate destination To delete the document select Delete Yes You can preview received documents using the Remote UI Checking the Status and Logs P 337 LINKS ...

Страница 221: ...g Settings Enable Forwarding Settings On Select the forwarding destination from the Address Book Printing Documents to be Forwarded If you want to check the documents to be forwarded for yourself you can set the machine to print the documents whenever they are forwarded or to print only the documents that failed to be forwarded Menu Fax Settings Forwarding Settings Print Images Select On or Only W...

Страница 222: ...formation about the document To print the document select Print Fwd Print Yes To resend the document select Print Fwd Forward and specify the appropriate destination To delete the document select Delete Yes LINKS Receiving Faxes P 203 Checking Status and Log for Sent and Received Documents P 216 Faxing 215 ...

Страница 223: ...k the statuses for sent and received documents 1 Select Job Status and select the document whose status you want to check Displays detailed information about the document If you specified multiple destinations the number of specified destinations is displayed on the screen To check the details of specified multiple destinations select Number of Destinations To check the communication logs for sent...

Страница 224: ...sult column shows a three digit number This number represents an error code Countermeasures for Each Error Code P 505 LINKS Basic Operations for Sending Faxes P 195 Canceling Sending Faxes P 202 Receiving Faxes P 203 Printing Reports and Lists P 456 Faxing 217 ...

Страница 225: ...tion about how to install the fax driver see the manuals for the relevant drivers on the online manual website Sending PC Faxes P 219 Depending on the operating system and the version of the fax driver you are using the fax driver screens in this manual may differ from your screens About the Fax Driver Help Clicking Help on the fax driver screen displays the Help screen On this screen you can see ...

Страница 226: ...for each application For more information see the instruction manual for the application you are using 2 Select the fax driver for this machine and click Print 3 Specify the destination To specify only one destination 1 Click the Enter Destination tab 2 Set the communication mode and fax number or URI To specify multiple destinations at once 1 Click the Select Destination tab 2 Click Add Destinati...

Страница 227: ...ier to specify destinations using the Address Book Selecting Store Sent Fax Information and Image enables you to store the logs for sending documents and check detailed information of a sent document along with its image including destinations and number of pages For more information click Help on the fax driver screen When the Confirm Fax Number or Confirm URI field is active also enter the appro...

Страница 228: ...Printing Printing 222 Printing from a Computer 223 Canceling Prints 225 Checking the Printing Status and Log 227 Printing 221 ...

Страница 229: ...obile Devices Linking mobile devices such as smartphones or tablets to this machine provides a quick and easy way to print photos and web pages The machine also supports Google Cloud Print Linking with Mobile Devices P 265 Using Google Cloud Print P 285 Printing silently If you mind the printing noise you can reduce the noise by specifying the quiet mode Note that If you print in the quiet mode pr...

Страница 230: ...ting Operations P 223 About the Printer Driver Help Clicking Help on the printer driver screen displays the Help screen On this screen you can see the detailed descriptions that are not in the User s Guide Basic Printing Operations This section describes how to print a document on your computer by using the printer driver Paper settings on the machine Normally it is necessary to specify the paper ...

Страница 231: ...4 Click Print or OK Printing starts If you want to cancel printing see Canceling Prints P 225 LINKS Checking the Printing Status and Log P 227 Printing 224 ...

Страница 232: ...t click the printer driver icon for this machine and click See what s printing or double click the icon of the printer driver for this machine 2 Select the document you want to cancel and click Document Cancel 3 Click Yes Printing of the selected document is canceled Several pages may be output after you cancel printing Canceling from the Remote UI You can cancel printing from the Job Status page ...

Страница 233: ... the document you want to cancel and select Yes Check the Print Job Status Before Canceling Copy Print Job Job Status Select the document in the Copy Print Job Status screen Cancel Yes Several pages may be output after you cancel printing LINKS Basic Printing Operations P 223 Checking the Printing Status and Log P 227 Printing 226 ...

Страница 234: ...ur printouts that you thought had been printed you may want to see whether an error has occurred 1 Press 2 Select Copy Print Job 3 Check the print statuses and logs To check the print statuses 1 Select Job Status and select the document whose status you want to check Displays detailed information about the document To check the print logs 1 Select Print Job Log and select the document whose log yo...

Страница 235: ...name or user name may not reflect the actual document or user name When a three digit number is shown in the case of Error This number represents an error code Countermeasures for Each Error Code P 505 LINKS Basic Printing Operations P 223 Canceling Prints P 225 Printing 228 ...

Страница 236: ...r Scanned Originals 248 Scanning Clearly 250 Adjusting Image Quality 251 Adjusting Density 252 Adjusting Sharpness When Scanning Sharpness 253 Useful Scanning Functions 254 Adjusting Balance between File Size and Image Quality 255 Recalling Previously Used Settings for Sending Saving Recall Settings 256 Specifying E Mail Settings 258 Using Your Computer to Scan Remote Scan 260 Scanning Documents f...

Страница 237: ...ine to the installed software Preparing to Use the Machine as a Scanner P 77 Depending on the operating system and the version of the scanner driver or applications you are using the screens in this manual may differ from your screens Using Basic Operations You can scan and save originals to your computer by using the operation panel of the machine You can also send originals as e mail attachments...

Страница 238: ...MF Scan Utility included with the machine or with other applications such as an image processing or word processing application Using Your Computer to Scan Remote Scan P 260 Scanning from Mobile Devices Linking mobile devices such as smartphones or tablets to this machine provides a quick and easy way to scan originals set on this machine Linking with Mobile Devices P 265 Scanning 231 ...

Страница 239: ...dures for scanning originals Scanning Scanning and Saving to a Computer P 233 Scanning Using the Shortcut Key P 235 Sending Data by E Mail Saving Data to a Shared Folder P 238 Operating Jobs Canceling Sending Documents P 246 Checking Status and Log for Scanned Originals P 248 Scanning 232 ...

Страница 240: ...inals P 128 2 Display the Scan screen Home Screen P 111 Touch Panel Model Select Scan in the Home screen 5 Lines LCD Model Press COPY SCAN 3 Select Computer If only a computer connected to the machine via USB is used proceed to step 5 4 Select the destination computer 5 Select the scan type The scan types and settings that are displayed can be confirmed and changed by using MF Scan Utility For mor...

Страница 241: ...ave destination folder is displayed on the computer About the save destination folder By default the scanned data is saved to the My Documents folder A subfolder named with the scanning date is created and the data is saved to that folder You can change the save destination from the MF Scan Utility For more information click Instructions on MF Scan Utility Scan from the machine more easily If you ...

Страница 242: ...ortcut Key Register the computer that scanned images are saved in and the type of scan to the shortcut key 1 Display the Menu screen Home Screen P 111 Touch Panel Model Select Menu in the Home screen 5 Lines LCD Model Press 2 Select Scan Settings 3 Select Shortcut Key Settings Register 4 Select the shortcut key to which you want to register settings 5 Select the type of connection that is used bet...

Страница 243: ...red Settings Menu Scan Settings Shortcut Key Settings Confirm Destination Select shortcut key Using the Shortcut Key 1 Place the original s Placing Originals P 128 2 Select the shortcut key Touch Panel Model Select Scan PC1 or Scan PC2 in the Home screen Home Screen P 111 5 Lines LCD Model Press To check the settings registered in the key see Checking the Registered Settings P 236 Scanning starts ...

Страница 244: ...en glass and press Repeat this step until you finish scanning all of the pages When there is only one page to be scanned proceed to the next step 2 Select Finish Scan Finish Scanning The save destination folder is displayed on the computer About the save destination folder By default the scanned data is saved to the My Documents folder A subfolder named with the scanning date is created and the da...

Страница 245: ...nals P 128 2 Select Scan in the Home screen Home Screen P 111 3 Select E Mail or File 4 Specify the destination If you selected File in step 3 the Address Book screen is displayed You can also specify the destination from coded dial numbers or one touch dial numbers Specifying from Address Book Specifying from Coded Dial Numbers Specifying from One Touch Entering Destinations Directly E Mail Sendi...

Страница 246: ...pecifying from Coded Dial Numbers Three digit numbers coded dial numbers are assigned to addresses in the Address Book You can specify an address simply by entering its coded dial number To use coded dial numbers the destination must be registered in the Address Book beforehand Registering Destinations P 161 Register the shared folder address from a computer Setting a Shared Folder as a Save Locat...

Страница 247: ...s e mail Repeat steps 1 to 2 Specifying from One Touch Specify a destination by selecting from a list registered to the one touch buttons You need to register destinations before using one touch dialing Registering Destinations in the Address Book P 163 1 Select Destination Specify from One Touch 2 Select a destination If a confirmation screen appears When One Touch Coded Dial TX Confirmation is s...

Страница 248: ... Settings for Sending Saving Recall Settings P 256 Saving the data to a shared folder Only one destination can be specified 5 When sending an e mail specify multiple destinations including Cc Bcc destinations as necessary Select Destination and select the method for specifying destinations Cc and Bcc addresses can only be selected using Specify from Address Book Specify from Coded Dial or Specify ...

Страница 249: ...pecify the scanning size of your original Scan Size Select the original size Specifying the Color Mode You can specify whether to scan documents in color or black and white Color Mode Select the color mode Selecting a File Format You can select the file format to which originals are scanned from PDF JPEG TIFF For PDF you can select Compact PDF that reduces the data size File Format Select a file f...

Страница 250: ...but the image quality of some originals or the number of originals that can be scanned at once may be lower Specifying Orientation of Your Original You can specify portrait or landscape orientation Original Orientation Select the original orientation Scanning 2 Sided Originals The machine can automatically scan the front and back sides of originals in the feeder The machine cannot scan both sides ...

Страница 251: ...ng all of the pages When there is only one page to be scanned proceed to the next step 2 Select Start TX The sending saving process starts File name of the sent document The file name of a sent document is automatically assigned based on the following format communication management number four digits _sent date and time_document number three digits file extension name If an E Mail Send Error Occu...

Страница 252: ...in Clear Mail Box 5 Read the message that is displayed and click OK E mail is deleted from the mailbox If you always want to scan with the same settings Changing the Default Settings for Functions P 154 Scanning 245 ...

Страница 253: ...cel on the display or press You can also cancel sending documents after checking the sending status Select Cancel to cancel Press to cancel If the screen displays a list of documents when is pressed Originals have been scanned and are waiting to be processed Select the document to cancel and select Yes Scanning 246 ...

Страница 254: ... the transmission status before canceling TX Job Job Status Select the document Cancel Yes LINKS Basic Operations for Scanning Originals P 232 Checking Status and Log for Scanned Originals P 248 Scanning 247 ...

Страница 255: ...nt to check Displays detailed information about the document If you specified multiple destinations the number of specified destinations is displayed on the screen To check the details of specified multiple destinations select Destination To check the logs for sent documents 1 Select Job Log and select the document whose log you want to check OK is displayed when a document was sent successfully a...

Страница 256: ... number represents an error code Countermeasures for Each Error Code P 505 LINKS Basic Operations for Scanning Originals P 232 Canceling Sending Documents P 246 Printing Reports and Lists P 456 Scanning 249 ...

Страница 257: ...rochures that contain many pictures or reports written in pencil you can adjust density and brightness to achieve clearer image quality Adjusting Image Quality P 251 Adjusting Density P 252 Adjusting Sharpness When Scanning Sharpness P 253 Scanning 250 ...

Страница 258: ...r the scan depending on the original type such as text only originals originals with charts and graphs or magazine photos Scan Specify destinations in E Mail or File Original Type Select the original type LINKS Basic Operations for Scanning Originals P 232 Scanning 251 ...

Страница 259: ...the scan if the text or images in a original are too light or dark Scan Specify destinations in E Mail or File Density Adjust the density Apply LINKS Basic Operations for Scanning Originals P 232 Adjusting Sharpness When Scanning Sharpness P 253 Scanning 252 ...

Страница 260: ...ase the sharpness to improve the appearance of magazine photos Scan Specify destinations in E Mail or File Sharpness Adjust the sharpness Apply Example If you want to sharpen text and lines written in pencil Example If you want to improve the appearance of magazine photos LINKS Basic Operations for Scanning Originals P 232 Adjusting Density P 252 Scanning 253 ...

Страница 261: ...ate secure PDF files to prevent them from being tampered with and that can send data again to previously specified destinations Adjusting Balance between File Size and Image Quality P 255 Recalling Previously Used Settings for Sending Saving Recall Settings P 256 Specifying E Mail Settings P 258 Scanning 254 ...

Страница 262: ...Priority makes the compression ratio higher than normal to create smaller files with lower image quality On the other hand Large Image Quality Priority makes the compression ratio lower than normal larger files with higher image quality Scan Specify destinations in E Mail or File Data Size Specify the setting LINKS Basic Operations for Scanning Originals P 232 Scanning 255 ...

Страница 263: ...ions to On deletes the past destinations and disables this feature Restricting New Destinations that Can Be Specified P 326 When you specify a destination using this feature any destinations that you have already specified are deleted 1 Place the original s Placing Originals P 128 2 Select Scan in the Home screen Home Screen P 111 3 Select E Mail or File 4 Select Destination Recall Set 5 Select th...

Страница 264: ...nding Documents P 246 When placing originals in the feeder in step 1 When scanning is complete the sending saving process starts When placing originals on the platen glass in step 1 When scanning is complete follow the procedure below except if you selected JPEG as a file format 1 If there are additional pages of originals to be scanned place the next original on the platen glass and press Repeat ...

Страница 265: ...y to address and priority for the e mail To specify subject message 1 Select Subject Message 2 Select Subject 3 Enter the subject and select Apply On how to enter text see Entering Text P 123 4 Select Message 5 Enter the message and select Apply 6 Select Apply To specify reply to address Specify the reply to address when you want to notify the recipient of an e mail address different from that of ...

Страница 266: ...ning is complete follow the procedure below except if you selected JPEG as a file format 1 If there are additional pages of originals to be scanned place the next original on the platen glass and press Repeat this step until you finish scanning all of the pages When there is only one page to be scanned proceed to the next step 2 Select Start TX The e mails are sent If you always want to scan with ...

Страница 267: ... application included with the machine that enables you to scan documents or images to a computer You can forward the scanned data to a specified application or attach it to an e mail message For more information click Instructions on MF Scan Utility If you are a macOS user see the manuals for the relevant drivers or software on the online manual website Scanning Using an Application You can scan ...

Страница 268: ...canned or an error message may be displayed depending on the application In such a case place and scan one original at a time When Auto Online for Remote Scan is set to Off you must press Scan COPY SCAN Remote Scanner to bring the machine online Auto Online for Remote Scan P 424 2 From the application select the start scan command The procedure for selecting the start scan command varies depending...

Страница 269: ...LINKS Using ScanGear MF P 263 Scanning 262 ...

Страница 270: ...ormation click Instructions on MF Scan Utility If you are a macOS user see the manuals for the relevant drivers or software on the online manual website Starting from an application To scan from applications such as image processing or word processing software select ScanGear MF as scanner driver Scanning Documents from an Application P 261 Functions of ScanGear MF Previewing the image before scan...

Страница 271: ...onnection 267 Connecting Directly Access Point Mode 268 Utilizing the Machine through Applications 271 Using AirPrint 272 Printing with AirPrint 277 Scanning with AirPrint 280 Faxing with AirPrint 282 If AirPrint Cannot Be Used 284 Using Google Cloud Print 285 Managing the Machine by the Remote Control 287 Linking with Mobile Devices 264 ...

Страница 272: ...hine from mobile devices via remote control to confirm printing status and change the settings of the machine Connecting with Mobile Devices P 266 Connecting Directly Access Point Mode P 268 Utilizing the Machine through Applications P 271 Using AirPrint P 272 Using Google Cloud Print P 285 Managing the Machine by the Remote Control P 287 Depending on your mobile device the machine may not operate...

Страница 273: ...are using Connecting via a Wireless LAN Router Just as connecting a computer to the machine connect a mobile device to the machine via a wireless LAN router Connecting via a Wireless LAN Router LAN Connection P 267 Connecting Directly Directly connect a mobile device to the machine wirelessly without using wireless LAN It is possible to immediately connect to the machine wirelessly even outside of...

Страница 274: ...ee the instruction manuals for your networking devices or contact your manufacturer Connect the machine to a router via the wired or wireless LAN Setting Up the Network Environment P 14 If your mobile devices do not support IPv6 use the IPv4 address Setting IPv4 Address P 32 1 Press 2 Select Network Information 3 Display the IP address of the machine IPv4 Select IPv4 IP Address IPv6 Select IPv6 Li...

Страница 275: ...obile device Configure settings to connect the mobile device to Wi Fi Put the machine into the connection standby status Menu Network Settings Direct Connection Settings set Use Direct Connection to On Specifying the value for time until auto termination You can specify the time to automatically establish a disconnection when the direct connection is enabled Time Until Direct Connection Terminatio...

Страница 276: ...isconnect Yes Connecting Directly 5 Lines LCD Model It may take time until a connection of the machine and the mobile device is established 1 Press and select Direct Connection If a message appears continue by following the instructions on the screen 2 Select Display SSID Network Key 3 Configure the Wi Fi settings from the mobile device using the SSID and network key information that appear on the...

Страница 277: ...th a wireless LAN you need to keep the machine connected to the wireless LAN when using direct connection When the machine is not connected to a wireless LAN or the connection process is not complete yet the direct connection process cannot begin If the connection between the machine and the wireless LAN is lost during communication through direct connection the communication may end When you fini...

Страница 278: ...e You can easily print from the menu of applications that support the Android print subsystem For more information on supported operating systems and detailed settings and procedures see the Canon website http www canon com Printing by Mopria The machine also supports Mopria Using Mopria enables you to print from mobile devices that support Android using common operations and settings even if manu...

Страница 279: ...e machine and installation location that is used for identifying the machine You can also disable the AirPrint function of the machine Use the Remote UI to change these settings For more information about the basic operations to be performed when setting the machine from the Remote UI see Setting Up Menu Options from Remote UI P 343 1 Start the Remote UI and log in to System Manager Mode Starting ...

Страница 280: ...location where the machine is installed Longitude Enter the longitude of the location where the machine is installed 6 Click OK If you select Use AirPrint the following settings are set to on Use HTTP IPP Print Settings mDNS Settings IPv4 Settings mDNS Settings IPv6 Settings Network Link Scan Settings If you change Printer Name that you have once specified you may be unable to print any more from ...

Страница 281: ...eck box OK Changing the TLS Setting You can specify whether to encrypt communications using TLS when performing printing or fax sending with AirPrint The factory default setting is On Log in to the Remote UI in System Manager Mode Starting Remote UI P 334 Settings Registration Network Settings TCP IP Settings Edit in IPP Print Settings Clear or select the Use TLS check box OK Changing the Scan Set...

Страница 282: ...tings 1 Select System Preferences Printers Scanners then add the machine to the Mac you are using If the machine has already been added this operation is not required 2 Select this machine from the list of printers in Printers Scanners 3 Click Options Supplies 4 Click Show Printer Webpage 5 Log in to the Remote UI To change the AirPrint settings it is necessary to log in as an administrator AirPri...

Страница 283: ... used for TLS Configuring the Key and Certificate for TLS P 307 Key and Certificate Settings Enables you to generate and install a key and certificate or request a certificate to be issued Configuring the Key and Certificate for TLS P 307 Consumables Information Enables you to check the information of a paper source and consumables of the machine and the device version Trademarks Apple Bonjour iPa...

Страница 284: ...e an Apple device and the machine are connected to the same LAN An environment where an Apple device and the machine are connected directly An environment where a Mac is connected to the machine via USB For printing it is required to set Use IPP Printing to On Changing the Setting of Functions Available with AirPrint P 274 Printing from an iPad iPhone or iPod touch 1 Make sure that the machine is ...

Страница 285: ...wice tap Print Printing from a Mac 1 Make sure that the machine is turned ON and connected to the Mac For how to make sure of this see Setting Up the Network Environment P 14 2 Add the machine to the Mac from System Preferences Printers Scanners If the machine has already been added this operation is not required 3 Open a document in an application and display the print dialog box How to display t...

Страница 286: ... The available settings and paper sizes differ depending on the application you are using 6 Click Print Printing starts Linking with Mobile Devices 279 ...

Страница 287: ...AirPrint P 274 Before scanning it is required to put the machine into online state When the auto online function Auto Online for Remote Scan is set to Off first put the machine into online state by selecting Scan Remote Scanner then start the procedure for scanning You cannot scan while settings for operations are being made or while the machine is performing any operation whatsoever Scanning from...

Страница 288: ...5 Click Open Scanner The Scanner screen is displayed 6 Configure the scan settings as necessary 7 Click Scan The original is scanned and the image is displayed Linking with Mobile Devices 281 ...

Страница 289: ...rPrint P 274 Faxing from a Mac 1 Make sure that the machine is turned ON and connected to the Mac For how to make sure of this see Setting Up the Network Environment P 14 2 Add the machine to the Mac from System Preferences Printers Scanners If the machine has already been added this operation is not required 3 Open a document in an application and display the print dialog box How to display the p...

Страница 290: ...6 Click Fax Fax sending starts Linking with Mobile Devices 283 ...

Страница 291: ...machine are connected to the same LAN If the machine is turned ON it may take several minutes before the machine is ready for communication Make sure that Bonjour on your Apple device is enabled For printing make sure that the paper is loaded in the machine and that the machine contains a sufficient amount remaining in the toner cartridge and the drum cartridge Displaying the Screen for AirPrint P...

Страница 292: ...n your country or region A Google account is required to use Google Cloud Print If you do not have a Google account create one on the Google website Checking the Settings of the Machine Check the following before configuring cloud printing Make sure that the IPv4 address or IPv6 address is specified for the machine and that the machine is able to communicate with computers on a network Connecting ...

Страница 293: ...Printing can now be performed from applications that support Google Cloud Print such as Google Chrome For information on the latest applications that support Google Cloud Print check the Google Cloud Print home page Configuring Settings on the Operation Panel You can also enable or disable the Cloud Print function from the Menu screen Google Cloud Print Settings P 427 Registering from a Mobile Dev...

Страница 294: ...er to start the Remote UI Prior to operation confirm the IP address set for the machine Viewing Network Settings P 38 If it is unknown ask your network administrator 1 Start the Web browser of the mobile device 2 Enter http the IP address of the machine in the address entry column If you want to use an IPv6 address enclose the IPv6 address with brackets Example http fe80 2e9e fcff fe4e dbce For a ...

Страница 295: ...ficate for Network Communication 315 Configuring IEEE 802 1X Authentication Settings 317 Restricting the Machine s Functions 321 Restricting Access to Address Book and Sending Functions 323 Restricting Use of the Address Book 324 Limiting Available Destinations 326 Restricting the Fax Sending Functions 328 Restricting USB Functions 330 Disabling HTTP Communication 331 Disabling Remote UI 332 Manag...

Страница 296: ...tor should manage important settings such as access privileges and security settings to ensure that the machine is used safely Configuring the Basic Management System Setting Access Privileges P 291 Configuring the Network Security Settings P 296 Preparing for Risks from Negligence or Misuse Restricting the Machine s Functions P 321 Ensuring Effective Management Managing the Machine from a Compute...

Страница 297: ... Managing the System Configuration and Settings Updating the Firmware P 354 Initializing Settings P 357 Managing the Machine 290 ...

Страница 298: ...rict use of the Remote UI in General User Mode and in System Manager Mode without a System Manager PIN set System Manager PIN System Manager PIN is intended exclusively for Administrators having full access privileges If you specify this PIN you need to log in to the machine using this PIN in order to access Network Settings or System Management Settings etc Set the System Manager PIN when you nee...

Страница 299: ...tem Management Settings 3 Select System Manager Information Settings System Manager PIN 4 Specify the System Manager PIN Enter numbers for each item and press Apply When PIN Confirm is displayed enter the PIN once again to confirm You cannot set a PIN that consists only of zeros such as 00 or 0000000 To cancel the System Manager PIN settings clear the information you entered by pressing and press ...

Страница 300: ...ation Administrator comments the installation location of the machine as well as the settings that you can register by using the operation panel The registered information can be viewed on the Device Information page of the Remote UI Checking System Manager Information P 340 If a System Manager PIN is Set If you try to access Network Settings or System Management Settings etc the following screen ...

Страница 301: ...s Registration on the Portal page Remote UI Screen P 335 3 Select Security Settings Remote UI Settings 4 Click Edit 5 Select the Use Remote UI Access PIN check box and set the PIN Use Remote UI Access PIN If you select the check box you must enter a PIN to access the Remote UI Set Change PIN To set or change a PIN select the check box and enter the same number both in the PIN and Confirm text boxe...

Страница 302: ...tings are initialized The Remote UI Access PIN is also initialized After an initialization reset the PIN Initialize Menu P 428 LINKS Setting Access Privileges P 291 Setting the System Manager PIN P 292 Managing the Machine 295 ...

Страница 303: ...ther devices is assigned port numbers that are predetermined according to the type of protocol The port number must be the same for all communication devices therefore changing it to an arbitrary number is important to prevent hacking from outside Changing Port Numbers P 304 Proxy Settings When the client devices are connected to an external network communication is established through the proxy s...

Страница 304: ...n order to prove that the connection is made by an authorized user Authentication information is sent to and checked by a RADIUS server which permits or rejects communication to the network depending on the authentication result If authentication fails a LAN switch or an access point blocks access from the outside of the network The machine can connect to an 802 1X network as a client device Confi...

Страница 305: ...ation devices that are connected to a network To prevent this unauthorized access specify the settings for packet filter a feature that restricts communication to devices with specified IP addresses or MAC addresses Specifying IP Addresses for Firewall Settings P 299 Specifying MAC Addresses for Firewall Settings P 302 Managing the Machine 298 ...

Страница 306: ...UI see Setting Up Menu Options from Remote UI P 343 1 Start the Remote UI and log in to System Manager Mode Starting Remote UI P 334 2 Click Settings Registration on the Portal page Remote UI Screen P 335 3 Select Security Settings IP Address Filter 4 Click Edit to specify a filter type IPv4 Address Inbound Filter Restrict data received by the machine from a computer by specifying an IPv4 address ...

Страница 307: ... to Register Communication is allowed with devices with any other IP addresses Allowed Addresses Allows communication received only with devices having IP addresses entered for Address to Register and restricts communication with devices with any other IP addresses Registered in both Allows communication received only with devices having IP addresses registered in Allowed Addresses and restricts c...

Страница 308: ...10 192 168 0 20 Specifying a range of addresses with a prefix IPv6 only Enter the address followed by a slash and a number indicating the prefix length fe80 1234 64 Deleting an IP address from exceptions Select an IP address and click Delete 3 Click OK Using the operation panel You can also enable or disable IP address filtering from the Menu screen IPv4 Address Filter P 422 IPv6 Address Filter P ...

Страница 309: ...Setting Up Menu Options from Remote UI P 343 1 Start the Remote UI and log in to System Manager Mode Starting Remote UI P 334 2 Click Settings Registration on the Portal page Remote UI Screen P 335 3 Select Security Settings MAC Address Filter 4 Click Edit 5 Specify the settings for packet filtering Specify MAC addresses for exceptions 1 Select the Use Filter check box Select the check box to rest...

Страница 310: ...le to access the machine from the Remote UI in which case you need to set MAC Address Filter to Off MAC Address Filter P 423 Deleting a MAC address from exceptions Select a MAC address and click Delete 3 Click OK Using the operation panel You can also enable or disable MAC address filtering from the Menu screen MAC Address Filter P 423 LINKS Specifying IP Addresses for Firewall Settings P 299 Mana...

Страница 311: ... server see Setting a Proxy P 305 1 Display the Menu screen Home Screen P 111 Touch Panel Model Select Menu in the Home screen 5 Lines LCD Model Press 2 Select Network Settings If the screen for entering a PIN appears enter the correct PIN Setting the System Manager PIN P 292 3 Select TCP IP Settings Port Number Settings 4 Selecting the protocol of which you want to change the port number Learning...

Страница 312: ...at you have the necessary proxy information including the IP address port number and a user name and password for authentication For more information about the basic operations to be performed when setting the machine from the Remote UI see Setting Up Menu Options from Remote UI P 343 1 Start the Remote UI and log in to System Manager Mode Starting Remote UI P 334 2 Click Settings Registration on ...

Страница 313: ... by the proxy server select the check box and enter alphanumeric characters for the user name in the User Name text box Set Change Password To set or change the password for the proxy authentication when it is enabled select the check box and enter alphanumeric characters for the new password in the Password text box 6 Click OK LINKS Using Google Cloud Print P 285 Managing the Machine 306 ...

Страница 314: ...on about the basic operations to be performed when setting the machine from the Remote UI see Setting Up Menu Options from Remote UI P 343 1 Start the Remote UI and log in to System Manager Mode Starting Remote UI P 334 2 Click Settings Registration on the Portal page Remote UI Screen P 335 3 Select Network Settings TCP IP Settings 4 Click Key and Certificate in TLS Settings 5 Click Register Defau...

Страница 315: ...TLS for e mailing If the SMTP server and the POP3 server support TLS you can enable TLS for communication with these servers Configuring E Mail Communication Settings P 82 For more information about the SMTP server and the POP3 server contact your Internet service provider or Network Administrator LINKS Monitoring and Controlling the Machine with SNMP P 63 Generating the Key and Certificate for Ne...

Страница 316: ...ons to be performed when setting the machine from the Remote UI see Setting Up Menu Options from Remote UI P 343 1 Start the Remote UI and log in to System Manager Mode Starting Remote UI P 334 2 Click Settings Registration on the Portal page Remote UI Screen P 335 3 Select Security Settings Key and Certificate Settings 4 Click Generate Key Deleting a registered key and certificate Click Delete on...

Страница 317: ...rt Date YYYY MM DD Enter the validity start date of the certificate in the order of year month day Validity End Date YYYY MM DD Enter the validity end date of the certificate in the order of year month day A date earlier than Validity Start Date YYYY MM DD cannot be set Country Region Click the Select Country Region radio button and select the country region from the drop down list You can also cl...

Страница 318: ...ome time After the key and certificate is generated it is automatically registered to the machine LINKS Configuring the Key and Certificate for TLS P 307 Registering the Key and Certificate for Network Communication P 315 Managing the Machine 311 ...

Страница 319: ... when setting the machine from the Remote UI see Setting Up Menu Options from Remote UI P 343 Generating a Key and CSR 1 Start the Remote UI and log in to System Manager Mode Starting Remote UI P 334 2 Click Settings Registration on the Portal page Remote UI Screen P 335 3 Select Security Settings Key and Certificate Settings 4 Click Generate Key Deleting a registered key and certificate Click Del...

Страница 320: ...rithm Certificate Signing Request CSR Settings Country Region Click the Select Country Region radio button and select the country region from the drop down list You can also click the Enter Internet Country Code radio button and enter a country code such as US for the United States State City Enter alphanumeric characters for the location as necessary Organization Organization Unit Enter alphanume...

Страница 321: ...Start the Remote UI and log in to System Manager Mode Starting Remote UI P 334 2 Click Settings Registration on the Portal page Remote UI Screen P 335 3 Select Security Settings Key and Certificate Settings 4 Click Key Name or Certificate required to register the certificate 5 Click Register Certificate 6 Click Browse specify the file for the certificate signing request and click Register LINKS Co...

Страница 322: ... 3 Select Security Settings Key and Certificate Settings or CA Certificate Settings Click Key and Certificate Settings to install a key and certificate or CA Certificate Settings to install a CA certificate 4 Click Register Key and Certificate or Register CA Certificate Deleting a registered key and certificate or CA certificate Click Delete on the right of the key and certificate or CA certificat...

Страница 323: ...he right of the key and certificate file you want to register 2 Enter the name of the key and password Key Name Enter alphanumeric characters for the name of the key to be registered Password Enter alphanumeric characters for the password of the private key set for the file to be registered 3 Click OK Registering a CA certificate Click Register on the right of the CA certificate file you want to r...

Страница 324: ...cation server authenticate each other by mutually verifying their certificates A key and certificate issued by a certification authority CA is required for the client authentication when authenticating the machine For the server authentication a CA certificate installed via the Remote UI can be used in addition to a CA certificate preinstalled in the machine TTLS This authentication method uses a ...

Страница 325: ...able IEEE 802 1X authentication Login Name Enter alphanumeric characters for a name EAP identity that is used for identifying the user 6 Configure the required settings according to the specified authentication method Setting TLS 1 Select the Use TLS check box and click Key and Certificate You cannot use TLS with TTLS or PEAP 2 Click Register Default Key on the right of the key and certificate you...

Страница 326: ...a user name other than the login name clear the Use Login Name as User Name check box Select the check box if you want to use the login name as the user name 3 Set the user name password User Name Enter alphanumeric characters for the user name Change Password To set or change the password select the check box and enter alphanumeric characters for the new password both in the Password and Confirm ...

Страница 327: ... the operation panel You can also enable or disable IEEE 802 1X authentication from the Menu screen IEEE 802 1X Settings P 371 LINKS Configuring the Key and Certificate for TLS P 307 Managing the Machine 320 ...

Страница 328: ...s Sequential Broadcast Restricting Access to Address Book and Sending Functions P 323 Restricting USB Functions The USB connection allows an easy connection with peripheral devices but it may cause a security risk such as an information leakage You can restrict a USB connection with a computer Restricting USB Functions P 330 Disabling HTTP Communication When not performing operations via the netwo...

Страница 329: ...Managing the Machine 322 ...

Страница 330: ...s Book or by setting a PIN for the Address Book so that unauthorized users cannot add or edit Address Book entries You can also avoid sending documents to unintended recipients if the machine is set to ask you to enter the fax number twice for confirmation Restricting Use of the Address Book P 324 Limiting Available Destinations P 326 Restricting the Fax Sending Functions P 328 Managing the Machin...

Страница 331: ... Manager PIN P 292 3 Select Restrict TX Function Address Book PIN 4 Specify the PIN Enter the number and select Apply The Confirm screen is displayed Enter the PIN once again to confirm You cannot set a PIN that consists only of zeros such as 00 or 0000000 To cancel the PIN setting clear the information you entered by pressing and select Apply with the field blank In addition to setting the Addres...

Страница 332: ...Registering Destinations from Remote UI P 346 Configuring Basic E Mail Settings P 79 Setting a Shared Folder as a Save Location P 86 Managing the Machine 325 ...

Страница 333: ...ok entries Menu System Management Settings Restrict TX Function Restrict New Destinations On This function does not limit the available destinations for PC faxing Restricting Fax Sending from a Computer P 328 Disabling Use of Previously Used Destinations Prohibits the specification of destinations from the transmission records Using this restriction prevents destinations being selected from the tr...

Страница 334: ...al TX Confirmation On LINKS Sending Data by E Mail Saving Data to a Shared Folder P 238 Recalling Previously Used Settings for Sending Saving Recall Settings P 256 Restricting Use of the Address Book P 324 Restricting the Fax Sending Functions P 328 Managing the Machine 327 ...

Страница 335: ...onfirmation screen to prevent the user from misdialing when entering a destination fax number using the numeric keys Menu Fax Settings TX Function Settings Confirm Entered Fax Number On Restricting Fax Sending from a Computer You can prohibit users from PC faxing faxing from a computer Menu Fax Settings TX Function Settings Allow Fax Driver TX Off Restricting Sequential Broadcasts You can prohibit...

Страница 336: ...adcasting Reject Sequential Broadcast Disables sequential broadcasting LINKS Basic Operations for Sending Faxes P 195 Recalling Previously Used Settings for Sending Recall Settings P 207 Sending Faxes from Your Computer PC Fax P 218 Restricting Use of the Address Book P 324 Limiting Available Destinations P 326 Managing the Machine 329 ...

Страница 337: ...ibes how to restrict connection via the USB port of the machine Restricting the USB Connection with a Computer P 330 Restricting the USB Connection with a Computer You can disable the USB port that is used for connecting the machine to a computer If this port is disabled the machine cannot communicate with a computer via USB Menu System Management Settings Use as USB Device Off Restart the machine...

Страница 338: ...malicious third party intrusions via the unused HTTP port Disabling HTTP disables some of the network capabilities such as the Remote UI WSD printing and printing with Google Cloud Print Menu Network Settings TCP IP Settings Use HTTP Off Yes LINKS Configuring Printing Protocols and WSD Functions P 42 Using Google Cloud Print P 285 Changing Port Numbers P 304 Managing the Machine from a Computer Re...

Страница 339: ...the machine is connected to a computer via USB or if you do not need to use the Remote UI you might want to disable the Remote UI to reduce the risk of having your machine controlled remotely over the network by malicious third parties Menu System Management Settings Remote UI Settings Use Remote UI Off LINKS Disabling HTTP Communication P 331 Managing the Machine from a Computer Remote UI P 333 M...

Страница 340: ...his without leaving your desk making system management easier For more information about the system requirements for the Remote UI see System Environment P 546 Functions of the Remote UI Checking the Status and Logs P 337 Setting Up Menu Options from Remote UI P 343 Registering Destinations from Remote UI P 346 Saving Loading Address Book from Remote UI P 350 Basics of the Remote UI Starting Remot...

Страница 341: ...ate for TLS P 307 When certificate settings or TLS settings have no errors continue browsing the Web site 3 Log in to the Remote UI When a System Manager PIN is not set Select System Manager Mode or General User Mode System Manager Mode You can perform all the Remote UI operations and settings General User Mode You can check the status of documents or the machine and you can also change some of th...

Страница 342: ...5 Remote UI Screen When you log in to the Remote UI the following Portal page appears This section describes the items displayed on the Portal page and the basic operations Device Basic Information Displays the current status of the machine and error information If an error has occurred the link to the Error Information page will be displayed Consumables Information Displays information about cons...

Страница 343: ...Status Monitor Cancel page For any of the waiting documents you can check the status history or cancel the processing Settings Registration Displays Settings Registration page When you have logged in to System Manager Mode you can change the settings items and save load the registered data Setting Up Menu Options from Remote UI P 343 Address Book Displays the coded dial numbers and the One Touch D...

Страница 344: ... the file name Checking Current Status of Print Documents The list of the documents currently printing or waiting to be printed is displayed Log in to the Remote UI Starting Remote UI P 334 Status Monitor Cancel Job Status You can delete a document job by clicking Cancel If you logged in to System Manager Mode all the print documents currently printing and waiting to be printed will be listed If y...

Страница 345: ... Enable and set Use Memory Lock to On Click Job Number to display detailed information and preview of a document waiting to be printed Checking History of Documents The history of print sending faxes e mails TX or receiving faxes RX is displayed Log in to the Remote UI Starting Remote UI P 334 Status Monitor Cancel Job Log Checking Error Information When an error occurs this page will be displayed...

Страница 346: ...are displayed You can also click Check Consumables Details in the Portal page main page to display this page Remote UI Screen P 335 Log in to the Remote UI Starting Remote UI P 334 Status Monitor Cancel Consumables Checking Maximum Print Speed The maximum print speed is displayed Log in to the Remote UI Starting Remote UI P 334 Status Monitor Cancel Device Features Managing the Machine 339 ...

Страница 347: ... Settings Registration page Log in to the Remote UI Starting Remote UI P 334 Status Monitor Cancel Device Information Checking Print Total Counter The total number of pages that have been printed by the copy print and fax functions is displayed Log in to the Remote UI Starting Remote UI P 334 Status Monitor Cancel Check Counter Managing the Machine 340 ...

Страница 348: ... cartridge or the drum cartridge Log in to the Remote UI Starting Remote UI P 334 Status Monitor Cancel Cartridge Log Checking Eco Information You can check information such as the number of printouts per month and amount of consumed power Log in to the Remote UI Starting Remote UI P 334 Status Monitor Cancel Eco Information Managing the Machine 341 ...

Страница 349: ...LINKS Remote UI Screen P 335 Managing the Machine 342 ...

Страница 350: ...of the machine using the Remote UI Some settings can only be changed when you have logged in to System Manager Mode Some settings may require operations that differ from the procedure described here 1 Start the Remote UI Starting Remote UI P 334 2 Click Settings Registration on the Portal page Remote UI Screen P 335 3 Click the setting you want to configure in the menu on the left side of the scre...

Страница 351: ...5 Click Edit 6 Specify the required settings 7 Click OK Managing the Machine 344 ...

Страница 352: ... machine as necessary Turn OFF the machine wait for at least 10 seconds and turn it back ON For information about whether you need to restart the machine view the message on the edit screen Managing the Machine 345 ...

Страница 353: ...he enter PIN page is displayed The Address Book is protected by a PIN Enter the PIN and click OK 3 Click Coded Dial You can also register destinations in One Touch In this case click One Touch instead of Coded Dial One Touch Dial P 161 4 Click the text link under Number Type or Name for an item named Not Registered You can edit a registered item by clicking the corresponding text link under Number...

Страница 354: ...es time for transmissions to start such as when there is a poor telephone connection you can adjust the transmission start speed downward Long Distance Specify International 1 to International 3 according to the transmission conditions when registering overseas fax numbers You can also specify ECM TX and Speed from Fax Settings Fax Settings P 389 on the operation panel However settings made from A...

Страница 355: ...ter name or IP address e g for a shared folder swan organization company com share Folder Path Enter the location of the folder to which the data will be sent Use as a separator Specify the level that follows the path specified in Host Name User Name Enter the user name set for the shared folder Set Password To set a password for the shared folder select the check box and enter a Password Ensure t...

Страница 356: ...Saving Loading Address Book from Remote UI P 350 Address Book List Touch Panel Model P 458 Managing the Machine 349 ...

Страница 357: ...the machine Do not operate the machine during the import or export process Before importing or exporting check that no operation such as printing documents is currently proceeding Exporting Address Book Data 1 Start the Remote UI and log in to System Manager Mode Starting Remote UI P 334 2 Click Settings Registration on the Portal page Remote UI Screen P 335 3 Click Import Export Export If the scr...

Страница 358: ...tal page Remote UI Screen P 335 3 Click Import Export Import If the screen prompting you to enter the Address Book PIN is displayed enter the PIN and click OK Restricting Use of the Address Book P 324 4 Specify the Address Book file to be imported and click Start Importing To specify the file to be imported click Browse and select the file 5 Click OK The specified Address Book data will be importe...

Страница 359: ...a a USB cable 1 Select Menu in the Home screen Home Screen P 111 2 Select System Management Settings If the screen for entering a PIN appears enter the correct PIN Setting the System Manager PIN P 292 3 Select Import Export Address Book 4 Place the provided CD ROM DVD ROM in the PC When the screen appears click Exit 5 Start Computer Right click the CD ROM DVD ROM icon and click Open in the pop up ...

Страница 360: ...Managing the Machine 353 ...

Страница 361: ...AN connection Updating via the Internet P 354 Wired LAN connection Updating via the Internet P 354 Updating from a Computer P 355 USB connection Updating from a Computer P 355 If you are in an IPv6 environment you cannot perform firmware update Use USB to re establish connection and perform the update from the computer Checking the firmware version You can check the firmware version from the opera...

Страница 362: ...atest firmware version from the Canon website use User Support Tool utility software to update the firmware from a computer For how to perform firmware update from a computer see the User Support Tool Operation Guide included with the firmware To Put the Machine into a Firmware Update Waiting State Menu System Management Settings Update Firmware Via PC Yes Checking the Firmware Version 1 Display t...

Страница 363: ...3 Select Update Firmware 4 Select Version Information The current firmware version is displayed Managing the Machine 356 ...

Страница 364: ...ng Menu List P 360 Depending on the settings selected you may need to restart the machine after initialization Menu System Management Settings Initialize Menu Select the item you want to initialize Yes Restart the machine if necessary You can restore the settings only for Network Settings Menu Network Settings Initialize Network Settings Yes Restart the machine Initializing Key and Certificate You...

Страница 365: ...ialize Address Book Yes Initializing All Data Settings This enables restoration of all data and machine settings including logs to the factory default values This prevents sensitive data from being leaked when replacing or disposing of the machine When the initialization process finishes the machine automatically restarts Before initializing make sure that there are no documents being processed or...

Страница 366: ...1 Network Settings 362 Output Rprt Output Reports 373 Preferences 374 Timer Settings 380 Common Settings 385 Copy Settings 387 Fax Settings 389 Scan Settings 400 Printer Settings 405 Adjustment Maintenance 415 System Management Settings 421 Setting Menu List 359 ...

Страница 367: ...y configuring settings described in this chapter To start configuration display the Menu screen This section describes what each item in the setting menu can configure You can print the setting menu in list form to check the current settings Printing Lists of Settings P 457 Setting Menu List 360 ...

Страница 368: ... 5 Lines LCD Model make a direct connection between a mobile device and the machine Connecting Directly Access Point Mode P 268 Settings for Direct Connection can be specified from Direct Connection Settings P 363 Setting Menu List 361 ...

Страница 369: ...pecify this setting You can switch using the following Wireless LAN Settings Selecting Wired LAN or Wireless LAN P 16 Wired LAN Wireless LAN Wireless LAN Settings Specify settings for connecting the machine to a wireless LAN You can also view the current settings or specify the setting for saving power consumption SSID Settings Select to configure a wireless connection by specifying information in...

Страница 370: ...itted from the wireless router Off On Menu Network Settings Wireless LAN Settings Read the displayed message OK Power Save Mode Select Off or On Wireless LAN Information Select to view the current wireless LAN settings Viewing Network Settings P 38 MAC Address Wireless LAN Status Latest Error Information Channel SSID Settings Security Settings Power Save Mode Direct Connection Settings Configure s...

Страница 371: ...work key arbitrarily Use Custom SSID Off On SSID 1 20 Characters Use Custom Network Key Off On Network Key 10 Char Menu Network Settings Direct Connection Settings Access Point Mode Settings Use Custom SSID or Use Custom Network Key On Enter the SSID network key Apply IP Address Settings for Direct Conn Specify an IP address for using Direct Connection Menu Network Settings Direct Connection Setti...

Страница 372: ... IP address settings IPv4 Settings Specify settings for using the machine in an IPv4 network IP Address Settings Configure the IP address which is used for identifying devices such as computers and printers on a TCP IP network Setting IPv4 Address P 32 Auto Acquire Select Protocol Off DHCP BOOTP RARP Auto IP Off On Manually Acquire IP Address 0 0 0 0 Subnet Mask 0 0 0 0 Gateway Address 0 0 0 0 Che...

Страница 373: ...ng DNS functions without DNS servers Off On mDNS Name DHCP Option Settings If DHCP is enabled use these settings to select whether to use the DHCP optional functions to acquire the host name and to use the dynamic update function Configuring DNS P 57 Acquire Host Name Off On DNS Dynamic Update Off On Acquire SMTP Server Address Off On Acquire POP Server Address Off On IPv6 Settings Specify setting...

Страница 374: ...uired via DHCPv6 Off On Check Settings Stateful Address Prefix Length DNS Settings Specify settings for Domain Name System DNS which provides a host name for IP address resolutions Configuring DNS P 57 DNS Host Name Domain Name Settings Use IPv4 Host Domain Off Host Name Domain Name On DNS Dynamic Update Settings Off On Register Manual Address Off On Register Stateful Address Off On Register State...

Страница 375: ...cols and WSD Functions P 42 Off On RAW Print Settings Enable or disable RAW a Windows specific printing protocol Configuring Printing Protocols and WSD Functions P 42 Off On WSD Settings Enable or disable automatic browsing and acquiring information for the printer by using the WSD protocol Configuring Printing Protocols and WSD Functions P 42 WSD Print Settings Use WSD Print Off On Use WSD Browsi...

Страница 376: ...overy 1 to 3702 to 65535 HTTP 1 to 80 to 65535 POP3 1 to 110 to 65535 SMTP 1 to 25 to 65535 SNMP 1 to 161 to 65535 MTU Size Select the maximum size of packets the machine receives Changing the Maximum Transmission Unit P 55 1300 1400 1500 SNMP Settings Specify the settings for monitoring and controlling the machine from a computer running SNMP compatible software Monitoring and Controlling the Mac...

Страница 377: ...selected SNMPv3 Settings Enable or disable SNMPv3 Use the Remote UI to specify detailed settings that are applied when SNMPv3 is enabled Off On Menu Network Settings SNMP Settings SNMPv3 Settings Select Off or On Acquire Printer Mngt Info from Host Enable or disable the monitoring of printer management information from a networked computer running SNMP compatible software Off On Menu Network Setti...

Страница 378: ...tings Select the communication mode of Ethernet half duplex full duplex and the Ethernet type 10BASE T 100BASE TX You can also view the MAC address of the machine Auto Detect Select whether to automatically detect or manually select the communication mode and the Ethernet type Configuring Ethernet Settings P 53 Off Communication Mode Half Duplex Full Duplex Ethernet Type 10BASE T 100BASE TX On MAC...

Страница 379: ... Initialize Network Settings Select to return the Network Settings to the factory defaults Initialize Menu P 428 Setting Menu List 372 ...

Страница 380: ... Output Rprt Output Reports 2KUS 07F You can print out and check the settings of machine setting options and other details as reports or lists Printing Reports and Lists P 456 Setting Menu List 373 ...

Страница 381: ...ings 1 Adjust volume at which the machine beeps when a key is pressed on the operation panel or when a paper jam occurs Setting Sounds P 155 Fax Tone Select whether to make a dial tone while a fax is being sent You can also adjust the volume 5 levels Ring Tone Select whether the machine beeps when a fax is received You can also adjust the volume 6 levels TX Done Tone Select whether the machine bee...

Страница 382: ...ered such as when a user is trying to enter a number unavailable for a setting Off On Warning Tone Select whether the machine beeps when problem such as a paper jam or an operation mistake occurs Off On Job Done Tone Select whether the machine beeps when copying or scanning is complete Off On Energy Saver Alert Select whether the machine beeps when the machine enters or wakes from sleep mode Off O...

Страница 383: ...desired screen Home Screen Button Display Settings 1 Change the order in which Home Screen buttons are displayed Customizing the Home Screen P 152 Contrast Adjust the contrast the difference between the light and dark parts of the display to suit the installation location of the machine 5 Levels Menu Preferences Display Settings Contrast Adjust the contrast Apply Invert Screen Colors Select On to ...

Страница 384: ...eferences Display Settings Notify to Check Paper Settings Select Off or On Notify to Clean Original Scanning Area Specify whether to display a message when stains are detected in the original scanning area Off On Menu Preferences Display Settings Notify to Clean Original Scanning Area Select Off or On Message Display Time Specify the interval in seconds at which two different messages are alternat...

Страница 385: ...rsor to the right of the entered character Select Manual to manually move the cursor to the right of the entered character Auto Manual Menu Preferences Display Settings Cursor Movement Type Select Auto or Manual Language 2 Select the display language used for the display reports and lists Arabic Basque Bulgarian Catalan Chinese Simplified Chinese Traditional Croatian Czech Danish Dutch English Est...

Страница 386: ...ote UI Language 2 Select the display language used for the Remote UI screens Chinese Simplified Chinese Traditional Czech Danish Dutch English Finnish French German Hungarian Italian Japanese Korean Norwegian Polish Portuguese Russian Spanish Swedish Turkish Menu Preferences Display Settings Remote UI Language Select a language Setting Menu List 379 ...

Страница 387: ...gion Quiet Mode Time You can reduce the operation sound of the machine when you want it to run more quietly quiet mode Set a time for the machine to enter quiet mode automatically You can also set the machine to always run in quiet mode Entering Quiet Mode P 157 Start Time Off On Start time setting to enter quiet mode End Time Off On Stop time setting to exit quiet mode Date Time Settings Specify ...

Страница 388: ...so changed accordingly The current date and time cannot be changed for 1 hour after daylight saving time is in effect Time Zone Select the time zone The default setting may vary depending on the setting selected at initial power on If the time zone setting is changed the values set in Current Date Time Settings are also changed accordingly Setting the Date Time P 11 UTC 12 00 International Date Li...

Страница 389: ...ch the Auto Reset is performed The Auto Reset is not performed in the following cases The setting menu is displayed The machine is processing data such as when printing documents An error message is displayed and the Alarm indicator is blinking However Auto Reset is performed when the error does not prevent the user from continuing to use a function 0 Auto Reset is disabled 1 to 2 to 9 min Menu Ti...

Страница 390: ...bled 1 to 5 to 60 min Menu Timer Settings Auto Offline Time Set the time period Apply Auto Shutdown Time Set a timer to automatically shut down the machine after a specified period of idle time has elapsed since the machine entered the sleep mode 0 Auto Shutdown is disabled 1 to 4 to 8 hr Menu Timer Settings Auto Shutdown Time Set the Auto Shutdown time Apply Before setting Auto Shutdown Time When...

Страница 391: ...et Auto Shutdown Time to 0 Off in advance If any settings of the Timer Settings are changed from the Remote UI while the machine is in the sleep mode the timer for the Auto Shutdown Time setting is reset to the beginning The machine automatically shuts down after a specified period of idle time has elapsed since the timer was reset Setting Menu List 384 ...

Страница 392: ...ay as for 2 sided printing Loading Preprinted Paper P 143 Multi Purpose Tray Speed Priority Print Side Priority Drawer 1 Speed Priority Print Side Priority Menu Common Settings Switch Paper Feed Method Select the paper source Select Speed Priority or Print Side Priority Paper Sources Select the paper source that you want to change the setting for Speed Priority When using paper that has been prepr...

Страница 393: ... printing Available Paper P 538 Speed Priority is applied to the paper source instead In this case you need to load the paper in the same way as when Speed Priority is selected Loading Preprinted Paper P 143 1 sided printing speed may be slower when Print Side Priority is selected Setting Menu List 386 ...

Страница 394: ... the model you are using Change Default Settings You can change the default settings about copy The selected settings are used as the default settings of the copy function Changing the Default Settings for Functions P 154 Number of Copies 1 to 999 Density 9 Levels Auto Density Original Type Text Text Photo High Speed Text Photo Photo 2 Sided Off 1 2 Sided 2 2 Sided 2 1 Sided Original Finishing Typ...

Страница 395: ...evels Correct Density Specify the initial copy density You can also change the copy density temporarily Basic Copy Operations P 173 9 Levels Menu Copy Settings Correct Density Adjust the density Apply Initialize Default Settings Select to restore the default copy settings Menu Copy Settings Initialize Default Settings Yes Setting Menu List 388 ...

Страница 396: ... Unit Telephone Number Register the fax number for the machine Registering the Fax Number and Unit Name P 72 Select Line Type 1 Select the telephone line type used for fax transmission Connecting the Telephone Line P 74 Pulse Tone Public Line Connection When the fax receive mode is Fax Tel Auto Switch an external telephone may not ring or a call may not be dialable In this instance specify Adapter...

Страница 397: ...gs TX Start Speed Select a communication start speed RX Start Speed Adjust the communication start speed in descending order from 33600 bps This adjustment should be made when it takes a long time to start receiving a fax due to a poor telephone line connection 33600 bps 14400 bps 9600 bps 7200 bps 4800 bps 2400 bps Menu Fax Settings Basic Settings Communication Management Settings RX Start Speed ...

Страница 398: ...Auto Adjust VoIP Comm Speed Specify whether to reduce communication errors on a poor quality line that experiences much packet loss Off On Menu Fax Settings Basic Settings Auto Adjust VoIP Comm Speed Select Off or On Setting Auto Adjust VoIP Comm Speed to On causes the initial transmitting speed when sending or receiving a fax to be slower TX Function Settings Specify settings for sending faxes Ch...

Страница 399: ...em To reduce errors on received faxes see ECM RX P 395 Off On ECM must be enabled on both the machine and the other fax device because error checks are performed on both the sending and receiving devices Even when ECM is enabled errors may occur due to telephone line conditions It may take a longer time than usual to process data when ECM is enabled because the error checks and corrections are per...

Страница 400: ...1 Specify settings for Auto Redial a function that automatically redials the fax number after several minutes if the first attempt fails because the line is busy You can specify how many times the machine redials and the interval between redials Off On Number of Times to Redial 1 to 2 to 10 times Redial Interval 2 to 99 min Redial When Error Occurs Off On Menu Fax Settings TX Function Settings Aut...

Страница 401: ...de Image Area to print the information inside the image area or Outside Image Area to print the information outside the image area Mark Number as Adds the FAX or TEL mark in front of the fax number registered for the machine Registering the Fax Number and Unit Name P 72 Select TEL to indicate that the notified number is a telephone number Check Dial Tone Before Sending 1 Select whether to check th...

Страница 402: ...Fax Settings TX Function Settings Initialize Default Settings Yes RX Function Settings Specify settings for receiving faxes ECM RX Enable or disable error correction mode ECM ECM checks for fax data errors and corrects them To reduce errors on sent faxes see ECM TX P 392 Off On ECM must be enabled on both the machine and the other fax device because error check is performed on both the sending and...

Страница 403: ...rating a telephone that is connected to the machine Remote Reception When a fax is sent to the machine you can receive it just by picking up the handset of the telephone and entering a specific ID number by using the telephone This feature can save you the trouble of going all the way to the machine For instructions on how to use Remote Reception see Using a Telephone to Receive Faxes Remote Recep...

Страница 404: ...emory Lock Start Time Memory Lock End Time Menu Fax Settings RX Function Settings Memory Lock Settings On Specify settings Apply RX Print Settings Specify settings for printing received faxes Print on Both Sides Specify settings for printing received faxes on both sides of paper Off On Menu Fax Settings RX Print Settings Print on Both Sides On Reduce RX Size Specify settings for reducing the image...

Страница 405: ...age both vertically and horizontally Select Vertical Only to reduce only vertically RX Page Footer Select whether to print information including date and time of reception and page numbers on the bottom of received faxes Off On Menu Fax Settings RX Print Settings RX Page Footer On Continue Print When Near Cart Life End If receiving faxes when the amount remaining in a toner cartridge is nearly emp...

Страница 406: ... Documents Automatically P 214 Off On Print Images Select whether to print forwarded fax documents You can set the machine to print forwarded documents only when an error occurs Printing Documents to be Forwarded P 214 Off On Only When Error Occurs Store Images in Memory Select whether to store fax documents in memory when they are not successfully forwarded You can resend or print the documents l...

Страница 407: ...he model you are using E Mail Settings Change the default settings used for scanning originals to send as e mails Change Default Settings You can change the default settings used for scanning originals to send as e mails The selected settings are used as the default settings when scanning originals Changing the Default Settings for Functions P 154 Scan Size A4 A5R Color Mode Color Black White File...

Страница 408: ...the default e mail transmission settings Menu Scan Settings E Mail Settings Initialize Default Settings Yes File Settings Change the default settings used when originals are saved to a shared folder Change Default Settings You can change the default settings used when originals are saved to a shared folder The selected settings are used as the default settings when scanning Changing the Default Se...

Страница 409: ... Default Settings You can change and register the settings used when documents are saved to a shared folder Menu Scan Settings File Settings Initialize Default Settings Yes Register Unit Name E Mail Register the sender name for e mails The registered name is displayed in e mails along with the e mail address If the sender name is not registered only the e mail address is displayed Menu Scan Settin...

Страница 410: ...mma Value Select the gamma value Shortcut Key Settings Register scan settings for the Scan PC1 and Scan PC2 buttons or key The settings include the computer that scanned images are saved in the type of scan color or black and white and the file format PDF or JPEG Registering these settings enables you to scan documents into a specified computer just by pressing a button You can view the registered...

Страница 411: ... 1 Custom 2 Confirm Destination Scan PC1 Scan PC2 5 Lines LCD Model Register Scan PC Off USB Connection Color Scan B W Scan Custom 1 Custom 2 Network Connection Color Scan B W Scan Custom 1 Custom 2 Confirm Destination Scan PC Setting Menu List 404 ...

Страница 412: ...t from the operation panel The specification from the operation panel becomes effective in some specific cases such as when printing from UNIX or other operating system that does not support printer drivers Action When Paper Size Mismatch Set whether printing goes ahead if a paper size other than the size loaded in the drawer is selected You can also set the machine not to go ahead with printing a...

Страница 413: ...Speed Priority you cannot select Error Diffusion Copies Set the number of copies to print 1 to 999 Menu Printer Settings Copies Set the number of copies to print Apply 2 Sided Printing Select whether to make 2 sided printouts Off On Menu Printer Settings 2 Sided Printing Select Off or On Default Paper Use this item to specify the paper size Available Paper P 538 Setting Menu List 406 ...

Страница 414: ...led when Toner Save is enabled Menu Printer Settings Print Quality Density Adjust the density Apply Toner Save You can save toner consumption when printing from a mobile device Select On when you want to check the layout or other appearance characteristics before proceeding to final printing of a large job Off On Menu Printer Settings Print Quality Toner Save Select Off or On Resolution Specify th...

Страница 415: ...ity Fine Adjustment Specify the density Layout Specify the page layout settings such as binding position Binding Location If you are binding the printouts with a binding tool such as a stapler use this item to specify whether to bind on the long or short edge Long Edge Short Edge Menu Printer Settings Layout Binding Location Select Long Edge or Short Edge Long Edge Specify this to bind on the long...

Страница 416: ...aper Save Select whether to save paper by not outputting blank pages in documents By selecting On the machine will not output blank pages To output all your document data when printing including any blank pages that you have inserted in your document select Off Off On Menu Printer Settings PCL Paper Save Select Off or On Orientation Select Portrait vertical orientation or Landscape horizontal orie...

Страница 417: ... point Menu Printer Settings PCL Point Size Specify the point size Apply Pitch Set the font pitch or cpi characters per inch adjustable in 0 01 increments You can specify this setting only when a fixed pitch scalable font or a bitmap font is selected in Font Number 0 44 to 10 00 to 99 99 cpi Menu Printer Settings PCL Pitch Specify the pitch value Apply Form Lines Set the number of lines printed on...

Страница 418: ... MSPUBL PC775 PC8 PC850 PC852 PC8DN PC8TK PC1004 PIFONT PSMATH PSTEXT ROMAN8 VNINTL VNMATH VNUS WIN30 WINBALT WINL1 WINL2 WINL5 Menu Printer Settings PCL Character Code Select the character code Custom Paper Select whether to set a custom paper size Select On to set the dimensions of the paper in X dimension and Y dimension Off On Menu Printer Settings PCL Custom Paper Select Off or On Unit of Mea...

Страница 419: ...imension long edge of the custom paper 127 to 355 mm Menu Printer Settings PCL Y dimension Specify the dimension Apply Append CR to LF Select whether to append a carriage return CR when the machine receives a line feed code LF If Yes is selected the print position moves to the beginning of the next line when the machine receives an LF code If No is selected the print position moves to the next lin...

Страница 420: ... or On Halftones You can select the printing method to reproduce halftones the intermediate range between the lighter and darker areas of an image for optimal image quality For each document you can make settings by type of image Text Color Tone Gradation Resolution Graphics Color Tone Gradation Resolution Image Color Tone Gradation Resolution Menu Printer Settings PCL Halftones Select the type of...

Страница 421: ... suitable for printing image data such as photo image data Gradation Produces a print with smooth gradation or smooth edges It is suitable for printing figures or graphs containing gradation areas Resolution Produces a fine print with clear edges of text It is suitable for printing characters and fine lines Feed A5 Horizontally Enable or disable horizontal feeding when printing A5 size Off On Menu...

Страница 422: ...yed depending on the model you are using Displ Timing for Cartridge Prep Notif Set the display timing for the message notifying you that the amount remaining in the toner cartridge or the drum cartridge is low Toner Cartridge Drum Cartridge Menu Adjustment Maintenance Displ Timing for Cartridge Prep Notif Select Toner Cartridge or Drum Cartridge Enter the cartridge level Apply Toner Save Select wh...

Страница 423: ...ting this to On may affect the print quality for some types of paper especially for lightweight paper or in some printing environments especially in high humidity environments When you set this to On Special Printing Mode Q Special Printing Mode R and Special Printing Mode T are set to Off automatically Special Printing Mode D Set this item when the printed paper turns out grayish or printing is f...

Страница 424: ...Off Mode 1 Mode 2 Fax Off Mode 1 Mode 2 5 Lines LCD Model Off Mode 1 Mode 2 Touch Panel Model Menu Adjustment Maintenance Special Processing Special Printing Mode Z Select Copy or Fax Select the mode 5 Lines LCD Model Adjustment Maintenance Special Processing Special Printing Mode Z Select the mode Special Printing Mode G Printed images may fade or streaks may appear when the paper has a lot of pa...

Страница 425: ...de R Printing may be faint when you print on the back of a printed sheet In such cases setting this to On may improve the quality of the printout Off On Menu Adjustment Maintenance Special Processing Special Printing Mode R On If you set to On image quality may be affected or a paper jam may occur when a certain length of time elapses after printing on the front side or depending on the ambient hu...

Страница 426: ...t or other dust particles In such cases setting this to On may improve the quality of the printout Off On Menu Adjustment Maintenance Special Processing Special Printing Mode L On Select Line Width If a printed barcode cannot be read changing this may resolve the problem Auto Thin Slightly Thin Slightly Thick Thick Menu Adjustment Maintenance Special Processing Select Line Width Select the line wi...

Страница 427: ...enance Control Condensation On OK Select Use Fax Memory Lock or Use Fax Mem Lock Do Not Allow Job Print Yes While condensation is being removed blurred images may be printed and print density may decrease When the machine is removing condensation it does not enter sleep mode If Control Condensation is set to On the time set with Auto Shutdown Time is disabled and the machine will not auto shutdown...

Страница 428: ...on Plug and Play P 427 Update Firmware P 428 Initialize Address Book P 428 Initialize Eco Report Counter P 428 Initialize Menu P 428 Initialize All Data Settings P 429 Asterisks Settings marked with 1 may be unavailable or vary or have different defaults depending on your country or region Settings marked with 2 may not be displayed depending on the model you are using or other setting items Netwo...

Страница 429: ...ess packet filtering Use TLS Select whether to use the TLS encrypted communication Configuring the Key and Certificate for TLS P 307 Off On IPv4 Address Filter Enable or disable settings for filtering packets received from devices with specified IPv4 addresses Specifying IP Addresses for Firewall Settings P 299 Inbound Filter Off On Menu System Management Settings Security Settings IPv4 Address Fi...

Страница 430: ...ings MAC Address Filter Inbound Filter Select Off or On Select Country Region 1 Specify the country or region where the machine is used The default setting may vary depending on the setting selected at initial power on Austria AT Belarus BY Belgium BE Czech Republic CZ Denmark DK Egypt EG Finland FI France FR Germany DE Greece GR Hungary HU Ireland IE Italy IT Jordan JO Luxembourg LU Netherlands N...

Страница 431: ...ngs Remote UI Settings Use Remote UI Select Off or On Remote UI Access Security Settings Specify so that entry of a PIN is required for access to the Remote UI Set a PIN of up to 7 digits All users use a common PIN Setting a Remote UI PIN P 294 Off On Remote UI Access PIN Menu System Management Settings Remote UI Settings Remote UI Access Security Settings On Enter a PIN Apply Enter the PIN Confir...

Страница 432: ...egistered in the Address Book Limiting Available Destinations P 326 Off On Restrict Resending from Log Select whether to prevent a destination from being selected from the sent job logs Disabling Use of Previously Used Destinations P 326 Off On One Touch Coded Dial TX Confirmation Select whether to display the details of an entered coded dial number when it is selected as a destination Displaying ...

Страница 433: ...Menu System Management Settings Enable Product Extended Survey Program Select Off or On Displ Consmbls Info RUI Toner Status Set whether to display a button in the Remote UI or Toner Status for accessing the Web site for purchasing toner cartridges etc Also set whether to use Toner Status Displ Consumables Purchase Button RUI Off On Toner Status Settings Off On Displ Purchase Button Off On Menu Sy...

Страница 434: ... 2 You can import an Address Book from a computer or export an Address Book from the machine Importing Exporting Address Book Data with the Supplied Software P 352 PDL Selection Plug and Play Select a page description language so that the machine is detected as a printer that is compatible with that language when it is connected to a computer by using Plug and Play Network Select a page descriptio...

Страница 435: ...e Select how to install the firmware update according to the environment of the machine Updating the Firmware P 354 Via PC Via Internet Version Information Initialize Address Book 2 Select to restore the Address Book settings to the factory defaults Initializing Address Book P 358 Initialize Eco Report Counter Select to restore the Eco Report Counter settings to the factory defaults Initializing E...

Страница 436: ...rinter Settings Adjustment Maintenance System Management Settings Initialize All Initialize All Data Settings Restores all data including logs and setting values to their default settings Initializing All Data Settings P 358 Setting Menu List 429 ...

Страница 437: ...he Feeder 436 Cleaning the Fixing Assembly 440 Cleaning the Machine Interior 441 Replacing the Toner Cartridge 444 Replacing the Drum Cartridge 448 Checking the Remaining Amount of Consumables 452 Relocating the Machine 453 Viewing the Counter Value 455 Printing Reports and Lists 456 Consumables 461 Maintenance 430 ...

Страница 438: ...ng how to clean the machine and adjustment of print quality Basic Cleaning Regular Cleaning P 433 Replacing Consumables Replacing the Toner Cartridge P 444 Replacing the Drum Cartridge P 448 Checking the Remaining Amount of Consumables P 452 Consumables P 461 Maintenance 431 ...

Страница 439: ... Adjusting and Managing the Machine Relocating the Machine P 453 Viewing the Counter Value P 455 Printing Reports and Lists P 456 Maintenance 432 ...

Страница 440: ...nd easily Where to Clean Exterior of the machine and ventilation slots Cleaning the Exterior P 434 Feeder Cleaning the Feeder P 436 Interior of the machine and fixing assembly Cleaning the Fixing Assembly P 440 Cleaning the Machine Interior P 441 Platen glass and the underside of the feeder Cleaning the Platen Glass P 435 Maintenance 433 ...

Страница 441: ...h as documents received and held in memory documents waiting to be sent and reports that are automatically printed after sending or receiving faxes are not deleted 2 Clean the exterior of the machine and the ventilation slots Use a soft well wrung out cloth dampened with water or a mild detergent diluted with water To locate the ventilation slots see Front Side P 95 3 Wait for the exterior of mach...

Страница 442: ...ued print data Data such as documents received and held in memory documents waiting to be sent and reports that are automatically printed after sending or receiving faxes are not deleted 2 Open the feeder 3 Clean the platen glass and the underside of the feeder Clean the areas with a cloth dampened with water Then wipe the area with a soft dry cloth 4 Wait for the cleaned area to dry completely 5 ...

Страница 443: ...ings Notify to Clean Original Scanning Area On 1 Turn off the machine and unplug it from the power outlet Turning the printer OFF erases any queued print data Data such as documents received and held in memory documents waiting to be sent and reports that are automatically printed after sending or receiving faxes are not deleted 2 Open the original supply tray 3 Open the feeder cover MF269dw MF267...

Страница 444: ...ing it out well then wipe the dirty areas Afterwards wipe the areas with a soft and dry cloth MF269dw MF267dw MF264dw 5 Close the feeder cover and original supply tray 6 Open the feeder 7 Wipe the original scanning area Wipe with a cloth that has been moistened with water and wrung out and then wipe with a dry cloth Maintenance 437 ...

Страница 445: ... part and wipe it 1 Hold the tabs at both ends of the transparent plastic part and remove the plastic part by gently lifting the rearward end first The plastic part is rather damageable When removing it be careful not to bend it 2 Wipe the original scanning area 3 Wipe the back side of the transparent plastic part Maintenance 438 ...

Страница 446: ... Make sure of the proper orientation then hold the tabs and place the plastic part back into position by gently lowering the frontward end first 8 Wait for the cleaned area to dry completely 9 Gently close the feeder cover 10 Plug the machine back into the power outlet and switch it on Maintenance 439 ...

Страница 447: ... before performing the following procedure Loading Paper P 132 Cleaning consumes the toner cartridge and the drum cartridge Make sure that there is sufficient amount remaining in the toner cartridge and the drum cartridge beforehand Checking the Remaining Amount of Consumables P 452 1 Display the Menu screen Home Screen P 111 Touch Panel Model Select Menu in the Home screen 5 Lines LCD Model Press...

Страница 448: ...s received and held in memory documents waiting to be sent and reports that are automatically printed after sending or receiving faxes are not deleted 2 Lift the operation panel If you cannot lift the operation panel Make sure the feeder is completely closed If a thick original such as a book is placed on the platen glass remove the original Forcing the operation panel up may cause damage 3 Open t...

Страница 449: ...he same angle as the slot 5 Remove the drum cartridge Do not shake or tilt the drum cartridge Also make sure to avoid applying shocks to the drum cartridge such as by hitting it against something Doing so may cause the toner left in the drum cartridge to leak Remove the drum cartridge gently at the same angle as the slot 6 Using a lint free clean soft dry cloth wipe away toner paper dust from the ...

Страница 450: ...8 Insert the toner cartridge 9 Close the toner cover 10 Lower the operation panel 11 Reconnect the power cord and turn ON the machine Maintenance 443 ...

Страница 451: ...reparing a toner cartridge is recommended Preparing a toner cart is recommended This message notifies you that the toner cartridge needs to be replaced soon Make sure that you have a replacement toner cartridge ready Replace the toner cartridge if you see this message before you start to print a large job When this message is displayed When printing you can continue printing the original Specify w...

Страница 452: ...for Replacing the Toner Cartridge When you replace the toner cartridge simple instructions on the replacement procedure are displayed on the screen See the on screen instructions as well as the following procedure 1 Lift the operation panel If you cannot lift the operation panel Make sure the feeder is completely closed If a thick original such as a book is placed on the platen glass remove the or...

Страница 453: ...r cartridge to leak Remove the toner cartridge gently at the same angle as the slot 4 Remove the new toner cartridge from the protective package 1 Pull the tab of the protective package on a flat place 2 Pull out the toner cartridge 5 Shake the toner cartridge 5 or 6 times as shown below to evenly distribute the toner inside the cartridge and then place it on a flat surface Maintenance 446 ...

Страница 454: ...6 Replace the toner cartridge 7 Close the toner cover 8 Lower the operation panel LINKS Consumables P 461 Maintenance 447 ...

Страница 455: ...Preparing a drum cartridge is recommended Preparing a drum cart is recommended This message notifies you that the drum cartridge needs to be replaced soon Make sure that you have a replacement drum cartridge ready Replace the drum cartridge if you see this message before you start to print a large job When this message is displayed When printing you can continue printing the original Specify when ...

Страница 456: ...for Replacing the Drum Cartridge When you replace the drum cartridge simple instructions on the replacement procedure are displayed on the screen See the on screen instructions as well as the following procedure 1 Lift the operation panel If you cannot lift the operation panel Make sure the feeder is completely closed If a thick original such as a book is placed on the platen glass remove the orig...

Страница 457: ...e gently at the same angle as the slot 4 Remove the drum cartridge Do not shake or tilt the drum cartridge Also make sure to avoid applying shocks to the drum cartridge such as by hitting it against something Doing so may cause the toner left in the drum cartridge to leak Remove the drum cartridge gently at the same angle as the slot 5 Remove the new drum cartridge from the protective bag 6 Replac...

Страница 458: ...7 Insert the toner cartridge 8 Close the toner cover 9 Lower the operation panel LINKS Consumables P 461 Maintenance 451 ...

Страница 459: ...tridge Displays the amount remaining in the toner cartridge Amount Remaining in Drum Cartridge Displays the amount remaining in the drum cartridge The displayed amount remaining in the toner cartridge or the drum cartridge can be used only as a guide and may differ from the actual amount Other internal parts may reach the end of their lifetime before the amount remaining in the toner cartridge or ...

Страница 460: ...ether the cables with are connected depends on your environment If an optional handset is mounted on the machine remove the handset from its mounting Power plug Power cord USB cable LAN cable Optional handset or external telephone cable Telephone cable 3 When transporting the machine across a long distance remove the toner cartridge and the drum cartridge Procedure for Replacing the Toner Cartridg...

Страница 461: ...ng Main Unit P 533 Hold the lift handles and lift up the machine 6 Carefully place the machine at the new installation site For information about how to install the machine after relocating it see Getting Started Manuals and Their Contents P 549 Maintenance 454 ...

Страница 462: ...can check total for the number of pages used for printouts The number of printouts includes printouts of the list as well as printouts of data from computers Device Information Check Counter Check the number of pages printed Maintenance 455 ...

Страница 463: ...to the result Countermeasures for Each Error Code P 505 Reports printed for e mail indicate the transmission result between the machine and the mail server not between the machine and the destination address Communication Management Report Touch Panel Model You can check the fax and e mail logs of sent and received documents by printing a Communication Management Report The report can be printed a...

Страница 464: ...report can be printed either every time a transmission is completed or only when a sending error occurs Menu Output Rprt Report Settings E Mail File TX Result Report Select On or Only When Error Occurs Communication result If an error occurs during transmission by e mail or saving to a shared folder the report does not show the error code To check the error code print a Communication Management Re...

Страница 465: ...Print List User Data List Check that the size and type of paper displayed on the screen is loaded in the machine and select OK Yes 5 Lines LCD Model Output Report User Data List Check that the size and type of paper displayed on the screen is loaded in the machine and select OK Yes Printing Reports and Lists on the Usage Status of the Machine You can print the machine status report the usage log o...

Страница 466: ...s loaded in the machine and select OK Yes PCL Font List You can check the list of fonts available in PCL mode with a report Touch Panel Model Menu Output Rprt Print List PCL Font List Check that the size and type of paper displayed on the screen is loaded in the machine and select OK Yes 5 Lines LCD Model Output Report PCL Font List Check that the size and type of paper displayed on the screen is ...

Страница 467: ...5 Lines LCD Model Output Report Cartridge Log Report Check that the size and type of paper displayed on the screen is loaded in the machine and press Yes Maintenance 460 ...

Страница 468: ...age yield and the weight of the toner cartridge that comes with the machine are shown below Average yield 1 700 sheets Weight Approx 0 3 Kg Replacement Toner Cartridges For optimum print quality using Canon genuine toner cartridges is recommended Canon Genuine Toner Cartridge Average yield and weight of toner cartridge Canon Toner Cartridge 051 Average yield 1 700 sheets Weight Approx 0 3 Kg Canon...

Страница 469: ... sheets Weight Approx 0 2 Kg Replacement Drum Cartridges For optimum print quality using Canon genuine drum cartridges is recommended Canon Genuine Drum Cartridge Average yield and weight of drum cartridge Canon Drum Cartridge 051 Average yield 23 000 sheets Weight Approx 0 2 Kg The average yield is on the basis of our evaluation criteria when printing at 2 sheet intervals 2 sheet intermittent of ...

Страница 470: ... When replacing drum cartridge see Replacing the Drum Cartridge P 448 Maintenance 463 ...

Страница 471: ...7 Printing Results Are Not Satisfactory 479 Paper Creases or Curls 488 Paper Is Fed Incorrectly 490 A Message or a Number Starting with an Error Code Is Displayed 491 Countermeasures for Each Message 492 Countermeasures for Each Error Code 505 Clearing Paper Jams 511 Paper Jams in the Feeder 512 Paper Jams inside the Machine 515 When a Problem Cannot Be Solved 519 Troubleshooting 464 ...

Страница 472: ...or the paper creases or curls When You Cannot Print Properly P 477 A Message or a Number Starting with an Error Code is Displayed This section describes how to take action when a message or error code three digits appears on the display A Message or a Number Starting with an Error Code Is Displayed P 491 Clearing Paper Jams This section describes how to take action when a paper is jammed Clearing ...

Страница 473: ...Troubleshooting 466 ...

Страница 474: ...onnected correctly Check whether these cables are connected correctly Use care not to mistake the phone cord s port for the other cables ports Connecting the Telephone Line P 74 Parts and Their Functions P 94 Is sleep mode activated If you leave the machine unattended for a specific period of time it enters sleep mode for power conservation not allowing you to operate it To cancel sleep mode press...

Страница 475: ...eck that the cable is connected firmly and the IP address is set correctly and then start the Remote UI again Connecting to a Wired LAN P 17 Viewing Network Settings P 38 Are you using a proxy server If so add the machine s IP address to the Exceptions list addresses that do not use the proxy server in the Web browser s proxy settings dialog Is communication not limited by the firewall on your com...

Страница 476: ...tion of other devices Check whether the machine is properly installed and ready to connect to the network When the Machine Cannot Connect to the Wireless LAN P 469 The machine dials up to an unintended connection destination if a dialup router is connected to a network If a dialup router does not need to pass broadcast packets set the dialup router so that the broadcast packets will not pass If th...

Страница 477: ... 20 Setting Up Connection Using WPS PIN Code Mode P 22 Setting Up Connection by Selecting a Wireless Router P 24 Setting Up Connection by Specifying Detailed Settings P 27 When you need to manually set up the connection If the wireless router is set as described below manually enter all the required information for the wireless LAN connection Setting Up Connection by Specifying Detailed Settings P...

Страница 478: ...e Print Server You cannot find the print server to connect to Are the print server and computer connected correctly Is the print server running Do you have user rights to connect to the print server If you are not sure contact the server administrator Is Network discovery enabled Enabling Network discovery P 556 You cannot connect to a shared printer On the network does the machine appear among th...

Страница 479: ...to a wireless LAN are the computer and this machine using the same wireless LAN router SSID If they are different reset the wireless LAN connection settings of this machine Viewing Network Settings P 38 Checking the SSID to Which Your Computer is Connected P 563 Connecting to a Wireless LAN P 18 When you reset wireless LAN connection settings As the wireless LAN router select the one with the SSID...

Страница 480: ...o port to use or you are not sure reinstall the printer driver When you reinstall the printer driver the correct port is created automatically Checking the Printer Port P 561 Installing Drivers P 69 Is bidirectional communication enabled Enable bidirectional communication and restart the computer Checking Bidirectional Communication P 562 Disable security software and other resident software Conne...

Страница 481: ...ogle Cloud Print P 285 It takes a long time before printing starts Did you print to narrow width paper After you print to narrow width paper the machine may cool itself to maintain the print quality As a result it may take some time before the next job is printed Wait until the machine is ready to print Printing will resume when the temperature inside the machine has fallen Troubleshooting 474 ...

Страница 482: ...the machine If so the stored history was deleted Did you set Restrict New Destinations to On If so the history before you set was deleted Did you set Restrict Resending from Log to On If so the destinations in the history cannot be specified A fax cannot be sent on an optical fiber line The machine is compliant with use on analog lines When using an optical fiber line or IP phone line the machine ...

Страница 483: ... fax cannot be received automatically Check that the receive mode is set to Fax Tel Auto Switch Auto Answering Machine or Net Switch Selecting the Receive Mode P 73 Free space in memory may be running low Print or delete data in memory Checking Forwarding Deleting Documents in Memory P 213 Printing Documents in Memory P 212 A fax cannot be received on an optical fiber line The machine is compliant...

Страница 484: ...s with Image Quality Printing Results Are Not Satisfactory P 479 Smudge Marks Appear on the Edge of Printouts P 479 Smudges Appear on Printouts P 479 Afterimages Appear in Blank Areas P 480 Toner Smudges and Splatters Appear P 480 Printouts Are Faded P 481 A Portion of the Page Is Not Printed P 483 Streaks Appear Printing is Uneven P 483 Printouts Are Entirely or Partially Grayish P 484 White Spot...

Страница 485: ...annot Be Read P 487 Problems with Printout Paper Paper Creases or Curls P 488 Paper Creases P 488 Paper Curls P 488 Problems with Paper Feed Paper Is Fed Incorrectly P 490 Printouts Are Skewed P 490 Paper Is Not Fed Two or More Sheets Are Fed Together P 490 Troubleshooting 478 ...

Страница 486: ...f a margin is set to none in the printer driver A margin of 5 mm or less around the edge of paper or 10 mm or less around the edge of envelopes is not printable with the machine Make sure to have margins around the document to print Finishing tab Advanced Settings Expand Print Region and Print Off Smudges Appear on Printouts Are you using appropriate paper Check usable paper and replace with appro...

Страница 487: ...vironment or the deterioration of materials inside the toner cartridge Replacing the Toner Cartridge P 444 Is the amount remaining in the drum cartridge running low Check how much the amount remaining in the drum cartridge is left and replace the drum cartridge as necessary Regardless of the amount remaining in the drum cartridge the drum cartridge may reach the end of its lifetime depending on th...

Страница 488: ... Replacing the Toner Cartridge P 444 Is the amount remaining in the drum cartridge running low Check how much the amount remaining in the drum cartridge is left and replace the drum cartridge as necessary Regardless of the amount remaining in the drum cartridge the drum cartridge may reach the end of its lifetime depending on the use environment or the deterioration of materials inside the drum ca...

Страница 489: ...e front side or depending on the ambient humidity Is the machine installed in the appropriate environment Install the printer in an appropriate location Relocating the Machine P 453 Is the amount remaining in the toner cartridge running low Check how much the amount remaining in the toner cartridge is left and replace the toner cartridge as necessary Regardless of the amount remaining in the toner...

Страница 490: ...int Region and Print Off Do the paper guides align with the edges of the paper If the paper guides are too loose or too tight part of a document may not be printed Loading Paper P 132 Streaks Appear Printing is Uneven Are you using appropriate paper Check usable paper and replace with appropriate paper Available Paper P 538 Loading Paper P 132 Is the platen glass dirty Clean the platen glass and t...

Страница 491: ...em Special Processing P 416 Is the amount remaining in the toner cartridge running low Check how much the amount remaining in the toner cartridge is left and replace the toner cartridge as necessary Regardless of the amount remaining in the toner cartridge the toner cartridge may reach the end of its lifetime depending on the use environment or the deterioration of materials inside the toner cartr...

Страница 492: ...ng Special Printing Mode U or Special Printing Mode G to On may solve the problem Special Processing P 416 A desirable effect may not be attained even with these settings applied Is the machine installed in the appropriate environment Install the printer in an appropriate location Store the toner cartridge in an appropriate location for two to three hours then try printing again This may solve the...

Страница 493: ...h the end of its lifetime depending on the use environment or the deterioration of materials inside the toner cartridge Replacing the Toner Cartridge P 444 Is the amount remaining in the drum cartridge running low Check how much the amount remaining in the drum cartridge is left and replace the drum cartridge as necessary Regardless of the amount remaining in the drum cartridge the drum cartridge ...

Страница 494: ...paper may become smudged during 2 sided printing Setting Special Printing Mode R to On may solve the problem Special Processing P 416 If you set to On image quality may be affected or a paper jam may occur when a certain length of time elapses after printing on the front side or depending on the ambient humidity Printed Barcode Cannot Be Read Are you trying to read a small barcode or one with thic...

Страница 495: ...ck usable paper and replace with appropriate paper Available Paper P 538 Loading Paper P 132 Paper Curls Are you using appropriate paper Check usable paper and replace with appropriate paper Also specify the paper size and type settings properly Available Paper P 538 Loading Paper P 132 Specifying Paper Size and Type P 145 Change the setting of Paper Type to a setting for thinner paper For example...

Страница 496: ...e side to print on front side back side In rare cases the symptom may become worse depending on the paper If this occurs change the side to print on back to the previous side Are you using paper that has absorbed moisture Replace with appropriate paper Loading Paper P 132 Troubleshooting 489 ...

Страница 497: ...ogether Is paper loaded correctly Fan the paper stack thoroughly so that paper is not stuck together Check whether paper is loaded correctly Loading Paper P 132 Check whether the number of sheets of paper loaded is appropriate and whether the appropriate paper is used Available Paper P 538 Loading Paper P 132 Check whether mixed sizes and types of paper are loaded together There are cases where th...

Страница 498: ...played 2KUS 08X When a message appears on the machine s display or a number error code prefixed with appears see the following sections to check the solution Countermeasures for Each Message P 492 Countermeasures for Each Error Code P 505 Troubleshooting 491 ...

Страница 499: ...anon product Only genuine Canon toner cartridges should be used as replacement toner cartridges Consumables P 461 Amount remaining in drum cart cannot be displayed correctly Amount in cart cannot be displ correctly for drum cartridge The drum cartridge is not installed correctly or there is possible trouble on the drum cartridge Reinstall the drum cartridge If this message does not disappear after...

Страница 500: ...An error has occurred while starting Access Point Mode Set an IP address other than 192 168 22 xx If you still cannot connect check the subnet mask setting For details contact your Network Administrator Setting IPv4 Address P 32 Cannot connect using Direct Connection Check the network connection Access Point Mode was started without the device being connected to the access point Start Access Point...

Страница 501: ... of the wireless router Cannot import A file error has been detected Importing the address book failed Check the USB cable connecting the machine to a computer Check if the contents of address book to be imported is correct Importing Exporting Address Book Data with the Supplied Software P 352 Cannot print RX data A received document cannot be printed due to the following Replacement period of the...

Страница 502: ...on for registration Check whether the date and time settings are correctly specified Date Time Settings P 380 Cannot use Google Cloud Print Server communication error Google Cloud Print not avail Server comm err Cloud Print is unavailable due to an error Check whether the machine is correctly connected to a wired LAN or a wireless LAN Connecting to a Wired LAN P 17 Connecting to a Wireless LAN P 1...

Страница 503: ...on settings The authentication method set on the machine does not match the authentication method set on the RADIUS server Check that the same authentication method is set on this machine and the RADIUS server and set the correct authentication method Configuring IEEE 802 1X Authentication Settings P 317 Cooling down Wait a moment then try again The temperature of the fixing assembly is high Wait ...

Страница 504: ...ld not connect using the wireless LAN Turn the main power OFF and ON then configure the settings again Could not connect using the wireless LAN A connection failed due to an error while setting wireless LAN connection Restart the machine and set again If the problem persists even after restarting the machine check whether the machine is properly installed and ready to connect to the network Instal...

Страница 505: ...0 Setting Up Connection by Specifying Detailed Settings P 27 Connect again by selecting a wireless router or by manually changing the WEP authentication method to Open System Setting Up Connection by Selecting a Wireless Router P 24 Setting Up Connection by Specifying Detailed Settings P 27 The authentication method of the machine is set to Shared Key but that of the wireless router is set to Open...

Страница 506: ...tion with the mobile device was interrupted Establish Direct Connection again Connecting Directly Access Point Mode P 268 Drum cart end of lifetime Replacement is recommended Drum cart life end Replcmt recommended The drum cartridge has reached the end of its lifetime Replacement of the drum cartridge is recommended Replacing the Drum Cartridge P 448 Easy Connection via PC ended because the sessio...

Страница 507: ...P 268 No Paper XXXX Drawer 1 or MP Tray is displayed for XXXX Paper is not loaded in the drawer or the multi purpose tray Load the paper Loading Paper P 132 Paper on which reports or lists can be printed is not loaded Reports or lists can be printed on A4 or Letter size paper Load A4 or Letter size paper and set its size Loading Paper P 132 Specifying Paper Size and Type P 145 Paper on which recei...

Страница 508: ...nded Drum cartridge replacement time is near Replace the drum cartridge if you see this message before you start to print a large job Consumables P 461 Preparing a toner cartridge is recommended Preparing a toner cart is recommended Toner cartridge replacement time is near Replace the toner cartridge if you see this message before you start to print a large job Consumables P 461 Set the correct au...

Страница 509: ...new destination with the operation panel or add or edit it in the Address Book you need to set Restrict New Destinations to Off For more information contact your Administrator Restricting New Destinations that Can Be Specified P 326 The connection with the PC has been lost Check the connection The connection to the computer was lost during a scan Check the connection between the machine and the co...

Страница 510: ...network key see the instruction manuals for your networking devices or contact your manufacturer Checking the SSID and Network Key P 30 Setting Up Connection by Selecting a Wireless Router P 24 Setting Up Connection by Specifying Detailed Settings P 27 The WEP key is not set correctly Check the WEP settings The network key the WEP key of a wireless router to be connected is not set to the machine ...

Страница 511: ...rror has occurred with the machine Turn OFF the power switch wait 10 seconds and turn it back ON If the problem persists turn OFF the power switch disconnect the power cord and contact your local authorized Canon dealer or the Canon help line Be sure to provide the displayed Ennn nnnn Use Remote UI to set the information necessary for authentication Use Remote UI to set info necessary for authenti...

Страница 512: ...nt or received due to its large data size When sending a fax Reduce the resolution and scan the original a portion at a time Basic Operations for Sending Faxes P 195 When receiving a fax Ask the sender to divide the original into multiple sections or reduce the resolution before sending 005 A fax could not be sent because the recipient s machine did not respond within 35 seconds When the recipient...

Страница 513: ...that failed to be forwarded remain in memory you can forward it again Registering Destinations P 161 Printing Resending Deleting Documents that Failed to be Forwarded P 214 037 Memory is full If a sending or printing job is queued wait until the job is completed If a received document is stored to memory print or delete it Saving Received Documents into the Machine Memory Reception P 212 If sendin...

Страница 514: ...heck TCP IP Settings and set correctly Network Settings P 362 An IP address is not set Set the IP address correctly Setting IP Addresses P 31 The machine cannot communicate with devices on a network immediately after the machine starts up because the waiting time for the start of the communication is set The machine cannot start communicating immediately after it is turned ON Wait until the set ti...

Страница 515: ... Administrator The incorrect folder name was specified when storing to the shared folder Check the destination settings 806 When storing data to a shared folder an incorrect user name or password was specified The same user name and password as those registered in a shared folder must be registered in the Address Book Setting a Shared Folder as a Save Location P 86 Registering Destinations from Re...

Страница 516: ... side is registered to the machine by using the Remote UI Check that the TLS server certificate on the SMTP server side is valid Check that the TLS server certificate is not a self signed certificate 844 TLS encrypted communication to a POP3 server failed when sending an e mail with POP before SMTP Check the TLS encrypted communication settings in the POP3 server Clear the Use TLS for POP check bo...

Страница 517: ...ges Reduce the number of pages per printing or print when no print job is queued or no document is being printed If you are still unable to print check the document data for any defects Printing was canceled from the computer If you cancel an operation when the print data is being sent to the machine from a computer this error code is displayed but this is not abnormal Print again as necessary A P...

Страница 518: ...nt them from becoming jammed If paper jams repeatedly Tap the paper stack on a flat surface to even the edges of the paper before loading it into the machine Check that the paper is appropriate for the machine Available Paper P 538 Check that no jammed paper fragments remain in the machine If you use paper with a coarse surface set Paper Type to Bond 1 60 104 g m or Bond 2 105 163 g m Specifying P...

Страница 519: ...per from the machine If the jammed paper cannot be removed easily proceed to the next step Paper Jams in the Feeder MF269dw P 512 Paper Jams in the Feeder MF267dw MF264dw P 513 Paper Jams in the Feeder MF269dw 1 Remove the jammed original from the feeder cover 1 Open the feeder cover 2 Move the lever to unlock 3 Gently pull out the original Troubleshooting 512 ...

Страница 520: ...Hold the green knob and open the inner cover 2 Gently pull out the original 3 Close the inner cover 3 Return the lever back in place and close the feeder cover 4 Place the original again Paper Jams in the Feeder MF267dw MF264dw 1 Open the feeder cover Troubleshooting 513 ...

Страница 521: ...2 Gently pull out the original 3 Close the feeder cover 4 Place the original again Troubleshooting 514 ...

Страница 522: ...from the machine If the jammed paper cannot be removed easily proceed to the next step 1 Lift the operation panel The operation panel cannot be opened if the feeder is not completely closed Forcing the operation panel up may cause damage 2 Open the toner cover 3 Remove the cartridges 1 Remove the toner cartridge Troubleshooting 515 ...

Страница 523: ...emove the drum cartridge Do not shake or tilt the drum cartridge Also make sure to avoid applying shocks to the drum cartridge such as by hitting it against something Doing so may cause the toner left in the drum cartridge to leak Remove the drum cartridge gently at the same angle as the slot 4 Gently pull out the paper 5 Check whether paper is jammed inside the paper exit guide 1 Pull out toward ...

Страница 524: ... paper is jammed inside the machine 1 Gently pull out the paper Hold both edges of the paper pull the leading edge of the paper down and then pull it out 7 Check whether paper is jammed in the back cover 1 Open the back cover 2 Gently pull out the paper Troubleshooting 517 ...

Страница 525: ...r 8 Insert the cartridges 1 Insert the drum cartridge 2 Insert the toner cartridge 9 Close the toner cover and lower the operation panel The paper jam message disappears and the machine is ready to print Troubleshooting 518 ...

Страница 526: ...r the machine yourself it may not be covered by warranty When Contacting Canon When contacting us have the following information ready Product name MF269dw MF267dw MF264dw Dealer where you purchased the machine Details about your problem such as what you did and what happened as a result Serial number found on the label on the back side of the machine Checking the serial number from the operation ...

Страница 527: ...30 Specifications 532 Main Unit 533 Feeder 536 Available Paper 538 Fax Function 541 Scan Function 542 Printer Functions 543 Management Functions 545 System Environment 546 Network Environment 548 Manuals and Their Contents 549 Using User s Guide 550 Screen Layout of User s Guide 551 Viewing User s Guide 554 Basic Windows Operations 556 Notice 564 Appendix 520 ...

Страница 528: ...encing the Manual of This Machine See the first of the following sections when you want to be sure of the kinds of the manuals describing the functions of the machine and how to operate the machine When you want to know how to read and use the User s Guide this manual see the second section Manuals and Their Contents P 549 Using User s Guide P 550 Others See the following section s when you want t...

Страница 529: ...Third Party Software 2KUS 096 For information related to third party software click the following icon s Appendix 522 ...

Страница 530: ... leveraging the features of the machine by category You can make use of the features according to your intended purposes and operating environment Going Green and Saving Money P 524 Improving Efficiency P 526 Going Digital P 528 So Much More P 530 Appendix 523 ...

Страница 531: ...printing of multiple pages on one sheet of paper You can print up to 32 pages on a single sheet which is both economical and environmentally friendly Basic Copy Operations P 173 Printing from a Computer P 223 Fax Settings P 389 RX Print Settings Print on Both Sides To really start saving paper shrink multiple pages onto one side of a sheet 2 or 4 pages for copies and up to 16 pages for print jobs ...

Страница 532: ...nto action Entering Sleep Mode P 159 Assume you need paper to fax Those old paper printouts you always make are a thing of the past Send documents by fax just as they are created on your computer It s paperless so it s fast And received documents are first stored in memory allowing you to print out only those needed and eliminating worry about paper getting used on direct mailings etc Sending Faxe...

Страница 533: ...ormation is backed up Registering Destinations P 161 Registering Destinations from Remote UI P 346 Basic Operations for Sending Faxes P 195 Basic Operations for Scanning Originals P 232 Saving Loading Address Book from Remote UI P 350 Take advantage of the shortcut keys on the operation panel so you don t have to reconfigure the same settings over and over again Use Paper Save to save paper by cop...

Страница 534: ...interface that you ll master immediately Save your time and energy for things other than taking care of the machine Managing the Machine from a Computer Remote UI P 333 You can easily specify the page layout as well as binding position switching between 1 sided and 2 sided printing etc intuitively on the preview image in the printer driver The simple click operation allows you to conveniently make...

Страница 535: ... send a fax than mess around with a computer this feature is for you Basic Operations for Scanning Originals P 232 Say you ve got a paper copy of a report for a company wide meeting Scan it convert it and now everyone can see it It s saved directly in a shared folder on your network so there s no need to print out copies and pass them out Once you start talking about hundreds of pages of documents...

Страница 536: ...rwise reproduced you should consult in advance with your legal advisor for guidance Searching of text in a PDF can be done with a searchable PDF By scanning an original with both text and images text portions are converted by OCR into text data In addition to being able to search for text information you can also copy required portions into an Excel spreadsheet or Word document in Microsoft Office...

Страница 537: ...ronments without a wireless LAN router you can connect to the machine with a mobile device wirelessly and directly PCless quick and easy An even broader range of possibilities for work play with functionality made for this age of speed Linking with Mobile Devices P 265 Hook up to Google Cloud Print with your laptop or cell phone send your data and out come your printed documents With this machine ...

Страница 538: ...atible with IEEE 802 11b g n for stress free wireless and also supports WEP and WPA WPA2 PSK TKIP AES CCMP for tighter security Connecting to a Wireless LAN P 18 Never worry about missing a fax when you re out of the office Set a forwarding destination and any fax that comes in on the machine will go right to you Better yet make the forwarding destination the e mail address for your tablet or mobi...

Страница 539: ...or future release Machine Specifications Main Unit P 533 Feeder P 536 Available Paper P 538 Functional Specifications Fax Function P 541 Scan Function P 542 Printer Functions P 543 Management Functions P 545 Environment To Use the Machine System Environment P 546 Network Environment P 548 Appendix 532 ...

Страница 540: ...inals Up to 215 9 mm x 297 0 mm Maximum thickness of original 40 mm Copy Size Copy Paper Paper Sizes Max 215 9 mm x 355 6 mm 1 Min 76 2 mm x 127 mm 1 Margin Top When copying via the platen glass 5 mm 2 0 mm When copying via the feeder 5 mm 3 0 mm Left or Right When copying via the platen glass 5 mm 2 0 mm When copying via the feeder 5 mm 3 0 mm Paper Weight 60 g m to 163 g m Paper Type Available P...

Страница 541: ...utput System Capacity 4 100 sheets 68 g m Multiple Copies 999 sheets Power Source AC 220 V 240 V 2 2 A 50 60 Hz Power Consumption 2 Maximum Power Consumption 1 180 W or less During Sleep Mode Approx 0 8 W USB connection Approx 0 8 W wired LAN connection Approx 0 8 W wireless LAN connection With the Main Power Turned OFF 0 5 W or less Dimensions W x D x H MF269dw 390 mm x 405 mm x 375 mm MF267dw 39...

Страница 542: ...ze paper copied printed with 100 copy print ratio to original on one sided paper Internal testing involved continuously copying printing the same one page of content on plain paper copy speed is tested by copying on the platen glass Copy print speeds may vary depending on paper type paper size or paper feeding direction The device may automatically pause or slow down in order to adjust printer con...

Страница 543: ... 356 mm Min 148 mm x 105 mm Weight of Originals 1 Sided Originals 50 g m to 105 g m 1 Sheet 50 g m to 128 g m Original Tray Capacity A4 MF269dw 50 sheets 80 g m MF267dw MF264dw 35 sheets 80 g m Original Scanning Speed MF269dw Copying 300 dpi x 600 dpi A4 1 Sided Scanning 22 0 pages minute 2 Sided Scanning 8 0 pages minute Scanning 300 dpi x 600 dpi A4 2 1 Sided Scanning Full Color PDF 7 3 pages mi...

Страница 544: ...7 6 pages minute Black and White TIFF 10 1 pages minute 1To maintain the optimum image quality it is recommended to scan A6 size original s from the platen glass 2May vary depending on the environment and conditions under which the machine is being used Appendix 537 ...

Страница 545: ...g table Supported Paper Sizes Available Unavailable Paper Sizes Drawer Multi Purpose Tray Automatic 2 Sided Printing 1 A4 2 B5 A5 3 A6 4 Legal Letter 2 Statement Executive Oficio Oficio Brazil Oficio Mexico Letter Government Legal Government Foolscap Foolscap Australia Legal India 3x5inch Appendix 538 ...

Страница 546: ...m the printer driver 4Available only from the printer driver 5The custom size ranging from 76 2 x 127 0 mm to 215 9 x 355 6 mm is available Supported Paper Types Chlorine free paper can be used with this machine Available Unavailable Paper Type Drawer Multi Purpose Tray Automatic 2 Sided Printing 1 Plain 71 to 89 g m 2 Plain L 61 to 70 g m 2 Plain L2 60 g m 2 Heavy 1 90 to 105 g m 2 Heavy 2 106 to...

Страница 547: ...eplacing paper 2Usable paper sizes are A4 Legal Letter Oficio Oficio Brazil Oficio Mexico Legal India Foolscap Folio and F4A 3When using paper of 121 to 163 g m with Heavy 3 specified select this paper type if toner is not fully fixed and the printouts are faded 4Select this paper type if toner is not fully fixed and the printouts are faded when the paper type is set to Envelope Appendix 540 ...

Страница 548: ...Type Super G3 G3 Max Sending Original Sizes A4 Receiving Paper Sizes Available Paper P 538 Transmission Times Approx 3 0 seconds page 4 1Depending on your locale or your telephone connection you may be unable to perform data communication In this case contact your local authorized Canon dealer or the Canon help line 2Pels stands for picture elements pixels 3With the Automatic Fallback function 4Ba...

Страница 549: ...anning on Platen Glass Same as Scanning Speed in Main Unit Main Unit P 533 Scanning from Feeder Same as Original Scanning Speed in Feeder Feeder P 536 Interface USB USB 1 1 Full Speed USB 2 0 Hi Speed Wired LAN 10BASE T 100BASE TX IEEE 802 3 compliant Wireless LAN IEEE 802 11b IEEE 802 11g IEEE 802 11n Protocol Supported SMB TCP IP SMTP TCP IP USB Output Format Push Scan TIFF MMR JPEG Single Page ...

Страница 550: ...D Port9100 IPP IPPS WSD Resident Fonts None Interface USB USB 1 1 Full Speed USB 2 0 Hi Speed Wired LAN 10BASE T 100BASE TX IEEE 802 3 compliant Wireless LAN IEEE 802 11b IEEE 802 11g IEEE 802 11n PCL Printer Function Type Internal Print Size Available Paper P 538 Print Speed Same as Copy Speed in Main Unit Main Unit P 533 Resolution Data Processing 1200 dpi x 1200 dpi 600 dpi x 600 dpi Page Descr...

Страница 551: ...Resident Fonts 45 Roman Interface USB USB 1 1 Full Speed USB 2 0 Hi Speed Wired LAN 10BASE T 100BASE TX IEEE 802 3 compliant Wireless LAN IEEE 802 11b IEEE 802 11g IEEE 802 11n Appendix 544 ...

Страница 552: ... length RSA 512 bits 2 1024 bits 2048 bits 4096 bits ECDSA P256 P384 P521 Certificate signature algorithm RSA SHA1 3 SHA256 SHA384 4 SHA512 4 MD2 5 MD5 5 ECDSA SHA1 3 SHA256 SHA384 SHA512 1Requirements for the certificate contained in a key are pursuant to CA certificates 2The signature algorithm is available only for SHA1 RSA or SHA256 RSA 3Available only for a generated key and certificate signa...

Страница 553: ... Windows Vista SP2 7 8 8 1 10 Windows Server 2008 Server 2012 Solaris Version 2 6 and later Red Hat Linux 7 2 and later Mac OS X 10 6 and later SMTP Sendmail 8 12 5 and later Sendmail 8 13 x Sendmail 8 14 x Exchange Server 2003 2007 2010 Lotus Domino 6 x 7 x 8 x System Requirements for the Send Function Setting Tool Windows 7 8 1 10 Server 2003 Server 2008 Internet Explorer 7 or later Windows 10 E...

Страница 554: ...nux Firefox iOS Safari 2 Android Chrome 2 1Before changing the settings of the machine set your Web browser to enable all cookies and use JavaScript 2Only when viewing manuals on the Internet Appendix 547 ...

Страница 555: ... IEEE 802 11n Transmission Scheme IEEE 802 11b Modulation system DS SS IEEE 802 11g Modulation system OFDM method IEEE 802 11n Modulation system OFDM method Frequency Range 2 412 GHz to 2 472 GHz Maximum Radio Frequency Power Transmitte 15 9 dBm Communication Mode Infrastructure Mode Access Point Mode Security encryption method Infrastructure Mode 128 104 64 40 bit WEP WPA PSK TKIP AES CCMP WPA2 P...

Страница 556: ...g up the machine User s Guide This Manual This manual describes all the functions of the machine in a manual that is viewed using a Web browser You can browse information by category or enter a keyword to search for pages on a specific topic Using User s Guide P 550 Send Setting Guide This manual describes how to configure settings and prepare for sending scanned images by e mail and saving scanne...

Страница 557: ...n the User s Guide Viewing User s Guide P 554 Specifying How the Appearance of the User s Guide Looks You can change the character size used in the User s Guide and switch the screen layout to fit to the device you use to view the User s Guide If you do not have access to Adobe Reader to view the manuals in PDF format try other programs such as PDF Preview developed by Vivid Document Imaging Techn...

Страница 558: ...e table of contents is displayed each click on switches between hiding and showing the display When the search display is shown each click on switches between hiding and showing the display Click to set parameters to determine how the User s Guide is displayed such as character size or layout Click to display information on how to view the User s Guide how to perform a search and other information...

Страница 559: ...t chapter topic you are currently viewing Click to jump to the corresponding page To return to the previous page click Back on your Web browser When you click the icon the current page may go dark and a pop up window may appear To return to the page click Close in the pop up window Appendix 552 ...

Страница 560: ...d click to display the search results You can search for pages containing all the keywords by separating the keywords by a space blank Also you can only search for pages containing an exact phrase by enclosing the keywords in double quotation marks Search result Displays the search results of the pages that contain the specified keywords From the results locate the page you are looking for and cli...

Страница 561: ...nal explanations for a procedure Indicates useful functions or tips for using the machine Keys and Buttons Used in this Manual Keys on the operation panel and buttons on the computer display appear in the following notation Type Example Keys on the operation panel Settings displayed on the operation panel Timer Settings Paper jammed Buttons and other text interfaces displayed on the computer displ...

Страница 562: ...y differ from the actual displays Also the appearance of drivers and software may differ depending on their version Illustrations Used in This Manual Unless otherwise noted illustrations used in the User s Guide are those for the MF269dw When differences are significant multiple illustrations are used with the model names such as MFXXX MFXXX The illustrations of the toner cartridge are those for t...

Страница 563: ...ct Devices and Printers Windows 8 Server 2012 Right click the lower left corner of the screen select Control Panel View devices and printers Windows 8 1 Server 2012 R2 Right click Start select Control Panel View devices and printers Windows 10 select Windows System Control Panel Hardware and Sound Devices and Printers Windows Server 2008 Start select Control Panel double click Printers Windows Ser...

Страница 564: ...ter select Turn on network discovery under Network discovery Windows Server 2016 Right click select Control Panel View network status and tasks Change advanced sharing settings select Turn on network discovery under Network discovery Displaying Shared Printers in the Print Server 1 Open Windows Explorer Windows Vista 7 Server 2008 Start select All Programs or Programs Accessories Windows Explorer ...

Страница 565: ...k the lower left corner of the screen Run Enter D MInst exe click OK Windows 8 1 Server 2012 R2 Right click Start Run Enter D MInst exe click OK Windows 10 Enter D MInst exe in the search box click D MInst exe displayed as the search result Windows Server 2016 Click enter D MInst exe click D MInst exe displayed as the search result Printing a Test Page in Windows You can check whether the printer ...

Страница 566: ...t or 64 bit Windows follow the procedure below 1 Display Control Panel Windows Vista 7 Server 2008 Start select Control Panel Windows 8 Server 2012 Right click the lower left corner of the screen select Control Panel Windows 8 1 Server 2012 R2 Right click Start select Control Panel Windows 10 Server 2016 Proceed to step 2 2 Display System Appendix 559 ...

Страница 567: ...m is displayed Checking the Computer Name 1 Display Control Panel Windows Vista 7 Server 2008 Start select Control Panel Windows 8 Server 2012 Right click the lower left corner of the screen select Control Panel Windows 8 1 Server 2012 R2 Right click Start select Control Panel Windows 10 Click select Windows System Control Panel Windows Server 2016 Right click select Control Panel 2 Display System...

Страница 568: ...k System 3 Check the computer name Checking the Printer Port 1 Open the printer folder Displaying the Printer Folder P 556 2 Right click the printer driver icon for this machine and click Printer properties or Properties Appendix 561 ...

Страница 569: ...en the connection will be maintained You do not need to add a new port If it is Standard TCP IP Port you need to add a new port Configuring Printer Ports P 45 Checking Bidirectional Communication 1 Open the printer folder Displaying the Printer Folder P 556 2 Right click the printer driver icon for this machine and click Printer properties or Properties 3 In the Ports tab make sure that the Enable...

Страница 570: ...r 2012 R2 Display the charms on the right side of the screen Tap or click Devices Print The driver that you use Print Windows 10 Tap or click Print on the application The driver that you use Print If you print a document or send a fax using this method only a limited number of functions are available If the message The printer requires your attention Go to the desktop to take care of it is display...

Страница 571: ...rective 2006 66 EC and or national legislation implementing those Directives If a chemical symbol is printed beneath the symbol shown above in accordance with the Battery Directive this indicates that a heavy metal Hg Mercury Cd Cadmium Pb Lead is present in this battery or accumulator at a concentration above an applicable threshold specified in the Battery Directive This product should be handed...

Страница 572: ...ation and Canon strongly recommends that you do not disable this function You should continue to use the duplex function to reduce the environmental impact of your work with this product at all times Disclaimers The information in this document is subject to change without notice CANON INC MAKES NO WARRANTY OF ANY KIND WITH REGARD TO THIS MATERIAL EITHER EXPRESS OR IMPLIED EXCEPT AS PROVIDED HEREI...

Страница 573: ...milar item refers to a printing device display device or item respectively that contains PostScript technology created or licensed by Adobe Systems Incorporated and not to devices or items that purport to be merely compatible with the PostScript language Adobe the Adobe logo Adobe LiveCycle Policy Server InDesign PostScript the PostScript Logo and PostScript 3 are either registered trademarks or t...

Страница 574: ... to remain under this license does not apply to any document created using the fonts or their derivatives DEFINITIONS Font Software refers to the set of files released by the Copyright Holder s under this license and clearly marked as such This may include source files build scripts and documentation Reserved Font Name refers to any names specified as such after the copyright statement s Original ...

Страница 575: ...rsion except to acknowledge the contribution s of the Copyright Holder s and the Author s or with their explicit written permission 5 The Font Software modified or unmodified in part or in whole must be distributed entirely under this license and must not be distributed under any other license The requirement for fonts to remain under this license does not apply to any document created using the F...

Страница 576: ...w for more detail and corresponding license conditions Table of Software Names of Software Terms and Conditions of the License See Page Adobe PDF Scan Library 2 bldimake 5 carouFredSel 6 FreeType 7 snmp 12 Incl 15 JPEG 16 jQuery 17 jQuery Mobile 18 math 19 mDNSResponder 20 mDNSResponder part of mDNSShared 24 OpenSSL 25 xpm 29 ...

Страница 577: ...on http www apache org Alternately this acknowledgment may appear in the software itself if and wherever such third party acknowledgments normally appear 4 The names Xerces and Apache Software Foundation must not be used to endorse or promote products derived from this software without prior written permission For written permission please contact apache apache org 5 Products derived from this sof...

Страница 578: ...ated by Ginger Alliance are Copyright C 2000 Ginger Alliance Ltd All Rights Reserved Pursuant to sections 3 2 and 3 6 of the License the Modifications created by Adobe Systems Incorporated are available as Source Code The Modifications may be downloaded via the Internet from http partners adobe com asn tech xml sablotron index jsp The Original Code may be downloaded via the Internet from https sou...

Страница 579: ...r in all copies and that both that copyright notice and this permission notice appear in supporting documentation The author or Addison Wesley Longman make no representations about the suitability of this software for any purpose It is provided as is without express or implied warranty ______________________________________________________________________________________ Updated Information Additi...

Страница 580: ...rtions of the Software THE SOFTWARE IS PROVIDED AS IS WITHOUT WARRANTY OF ANY KIND EXPRESS OR IMPLIED INCLUDING BUT NOT LIMITED TO THE WARRANTIES OF MERCHANTABILITY FITNESS FOR A PARTICULAR PURPOSE AND NONINFRINGEMENT IN NO EVENT SHALL THE OPEN GROUP BE LIABLE FOR ANY CLAIM DAMAGES OR OTHER LIABILITY WHETHER IN AN ACTION OF CONTRACT TORT OR OTHERWISE ARISING FROM OUT OF OR IN CONNECTION WITH THE S...

Страница 581: ... furnished to do so subject to the following conditions The above copyright notice and this permission notice shall be included in all copies or substantial portions of the Software THE SOFTWARE IS PROVIDED AS IS WITHOUT WARRANTY OF ANY KIND EXPRESS OR IMPLIED INCLUDING BUT NOT LIMITED TO THE WARRANTIES OF MERCHANTABILITY FITNESS FOR A PARTICULAR PURPOSE AND NONINFRINGEMENT IN NO EVENT SHALL THE A...

Страница 582: ...ects thus the FreeType font engine the test programs documentation and makefiles at the very least This license was inspired by the BSD Artistic and IJG Independent JPEG Group licenses which all encourage inclusion and use of free software in commercial and freeware products alike As a consequence its main points are that o We don t promise that this software works However we will be interested in...

Страница 583: ...software are copyright year The FreeType Project www freetype org All rights reserved Please replace year with the value from the FreeType version you actually use Legal Terms 0 Definitions Throughout this license the terms package FreeType Project and FreeType archive refer to the set of files originally distributed by the authors David Turner Robert Wilhelm and Werner Lemberg as the FreeType Pro...

Страница 584: ...F MERCHANTABILITY AND FITNESS FOR A PARTICULAR PURPOSE IN NO EVENT WILL ANY OF THE AUTHORS OR COPYRIGHT HOLDERS BE LIABLE FOR ANY DAMAGES CAUSED BY THE USE OR THE INABILITY TO USE OF THE FREETYPE PROJECT 2 Redistribution This license grants a worldwide royalty free perpetual and irrevocable right and license to use execute perform compile display copy create derivative works of distribute and subl...

Страница 585: ...rs nor you shall use the name of the other for commercial advertising or promotional purposes without specific prior written permission We suggest but do not require that you use one or more of the following phrases to refer to this software in your documentation or advertising materials FreeType Project FreeType Engine FreeType library or FreeType Distribution As you have not signed this license ...

Страница 586: ...he library and distribution If you are looking for support start in this list if you haven t found anything to help you in the documentation o freetype devel nongnu org Discusses bugs as well as engine internals design issues specific licenses porting etc Our home page can be found at http www freetype org end of FTL TXT ...

Страница 587: ...NSEQUENTIAL DAMAGES OR ANY DAMAGES WHATSOEVER RESULTING FROM LOSS OF USE DATA OR PROFITS WHETHER IN AN ACTION OF CONTRACT NEGLIGENCE OR OTHER TORTIOUS ACTION ARISING OUT OF OR IN CONNECTION WITH THE USE OR PERFORMANCE OF THIS SOFTWARE Copyright C 1995 1998 Eric Young eay cryptsoft com All rights reserved This package is an SSL implementation written by Eric Young eay cryptsoft com The implementati...

Страница 588: ... cryptographic can be left out if the rouines from the library being used are not cryptographic related 4 If you include any Windows specific code or a derivative thereof from the apps directory application code you must include an acknowledgement This product includes software written by Tim Hudson tjh cryptsoft com THIS SOFTWARE IS PROVIDED BY ERIC YOUNG AS IS AND ANY EXPRESS OR IMPLIED WARRANTI...

Страница 589: ...on notice appear in supporting documentation and that the name of CMU and TGV not be used in advertising or publicity pertaining to distribution of the software without specific written prior permission CMU AND TGV DISCLAIMS ALL WARRANTIES WITH REGARD TO THIS SOFTWARE INCLUDING ALL IMPLIED WARRANTIES OF MERCHANTABILITY AND FITNESS IN NO EVENT SHALL CMU OR TGV BE LIABLE FOR ANY SPECIAL INDIRECT OR ...

Страница 590: ...uded in all copies or substantial portions of the Software THE SOFTWARE IS PROVIDED AS IS WITHOUT WARRANTY OF ANY KIND EXPRESS OR IMPLIED INCLUDING BUT NOT LIMITED TO THE WARRANTIES OF MERCHANTABILITY FITNESS FOR A PARTICULAR PURPOSE AND NONINFRINGEMENT IN NO EVENT SHALL SUNSOFT INC OR ITS PARENT COMPANY BE LIABLE FOR ANY CLAIM DAMAGES OR OTHER LIABILITY WHETHER IN AN ACTION OF CONTRACT TORT OR OT...

Страница 591: ... 16 JPEG this software is based in part on the work of the Independent JPEG Group ...

Страница 592: ...ware is furnished to do so subject to the following conditions The above copyright notice and this permission notice shall be included in all copies or substantial portions of the Software THE SOFTWARE IS PROVIDED AS IS WITHOUT WARRANTY OF ANY KIND EXPRESS OR IMPLIED INCLUDING BUT NOT LIMITED TO THE WARRANTIES OF MERCHANTABILITY FITNESS FOR A PARTICULAR PURPOSE AND NONINFRINGEMENT IN NO EVENT SHAL...

Страница 593: ...whom the Software is furnished to do so subject to the following conditions The above copyright notice and this permission notice shall be included in all copies or substantial portions of the Software THE SOFTWARE IS PROVIDED AS IS WITHOUT WARRANTY OF ANY KIND EXPRESS OR IMPLIED INCLUDING BUT NOT LIMITED TO THE WARRANTIES OF MERCHANTABILITY FITNESS FOR A PARTICULAR PURPOSE AND NONINFRINGEMENT IN ...

Страница 594: ...bute this software is freely granted provided that this notice is preserved copysignf c Copyright c 1993 by Sun Microsystems Inc All rights reserved math_private h Copyright c 1993 by Sun Microsystems Inc All rights reserved powf c Copyright c 1993 by Sun Microsystems Inc All rights reserved scalbnf c Copyright c 1993 by Sun Microsystems Inc All rights reserved ...

Страница 595: ...exercising permissions granted by this License Source form shall mean the preferred form for making modifications including but not limited to software source code documentation source and configuration files Object form shall mean any form resulting from mechanical transformation or translation of a Source form including but not limited to compiled object code generated documentation and conversi...

Страница 596: ... Object form 3 Grant of Patent License Subject to the terms and conditions of this License each Contributor hereby grants to You a perpetual worldwide non exclusive no charge royalty free irrevocable except as stated in this section patent license to make have made use offer to sell sell import and otherwise transfer the Work where such license applies only to those patent claims licensable by suc...

Страница 597: ...all be under the terms and conditions of this License without any additional terms or conditions Notwithstanding the above nothing herein shall supersede or modify the terms of any separate license agreement you may have executed with Licensor regarding such Contributions 6 Trademarks This License does not grant permission to use the trade names trademarks service marks or product names of the Lic...

Страница 598: ...Apache License to your work To apply the Apache License to your work attach the following boilerplate notice with the fields enclosed by brackets replaced with your own identifying information Don t include the brackets The text should be enclosed in the appropriate comment syntax for the file format We also recommend that a file or class name and description of purpose be included on the same pri...

Страница 599: ...s contributors may be used to endorse or promote products derived from this software without specific prior written permission THIS SOFTWARE IS PROVIDED BY APPLE AND ITS CONTRIBUTORS AS IS AND ANY EXPRESS OR IMPLIED WARRANTIES INCLUDING BUT NOT LIMITED TO THE IMPLIED WARRANTIES OF MERCHANTABILITY AND FITNESS FOR A PARTICULAR PURPOSE ARE DISCLAIMED IN NO EVENT SHALL APPLE OR ITS CONTRIBUTORS BE LIA...

Страница 600: ...rials mentioning features or use of this software must display the following acknowledgment This product includes software developed by the OpenSSL Project for use in the OpenSSL Toolkit http www openssl org 4 The names OpenSSL Toolkit and OpenSSL Project must not be used to endorse or promote products derived from this software without prior written permission For written permission please contac...

Страница 601: ...SE OF THIS SOFTWARE EVEN IF ADVISED OF THE POSSIBILITY OF SUCH DAMAGE This product includes cryptographic software written by Eric Young eay cryptsoft com This product includes software written by Tim Hudson tjh cryptsoft com Original SSLeay License Copyright C 1995 1998 Eric Young eay cryptsoft com All rights reserved This package is an SSL implementation written by Eric Young eay cryptsoft com T...

Страница 602: ...ryptographic software written by Eric Young eay cryptsoft com The word cryptographic can be left out if the rouines from the library being used are not cryptographic related 4 If you include any Windows specific code or a derivative thereof from the apps directory application code you must include an acknowledgement This product includes software written by Tim Hudson tjh cryptsoft com THIS SOFTWA...

Страница 603: ... 28 derivative of this code cannot be changed i e this code cannot simply be copied and put under another distribution licence including the GNU Public Licence ...

Страница 604: ...all be included in all copies or substantial portions of the Software THE SOFTWARE IS PROVIDED AS IS WITHOUT WARRANTY OF ANY KIND EXPRESS OR IMPLIED INCLUDING BUT NOT LIMITED TO THE WARRANTIES OF MERCHANTABILITY FITNESS FOR A PARTICULAR PURPOSE AND NONINFRINGEMENT IN NO EVENT SHALL GROUPE BULL BE LIABLE FOR ANY CLAIM DAMAGES OR OTHER LIABILITY WHETHER IN AN ACTION OF CONTRACT TORT OR OTHERWISE ARI...

Отзывы: