CALREC
Putting Sound in the Picture
91
AUTOMIXER
Automixers are designed to control
audio levels for shows where there
are multiple guests or presenters
talking together. Automixers adjust
the individual microphone levels
automatically and dynamically in order
to pick out the people speaking, and
to reduce the level of people that
are not speaking, whilst maintaining
consistent overall mix and ambient
levels. In reality, Automixers only ever
apply attenuation, signals are never
actually boosted.
Automixers are available on Calrec Apollo
& Artemis consoles running software
V1.12 and higher.
Each mixing console has 8 separate
automixers, each of which can control any
number of mono input channels and mono
audio group buses on the control surface.
Stereo and surround paths, and outputs
or buses other than groups cannot be
assigned to automixer control.
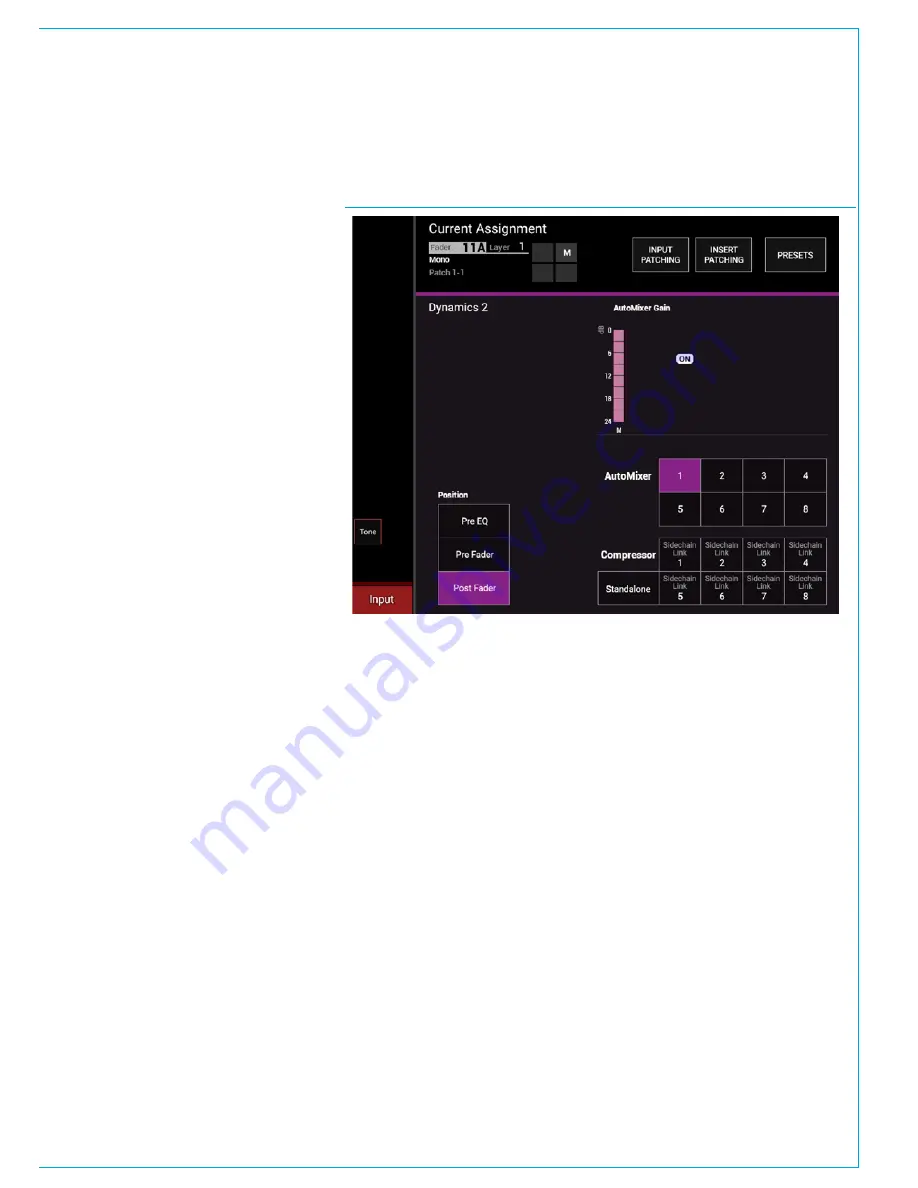
Automixers are embedded within the
‘Dynamics 2’ processing unit and are
assigned using the same menu as the
dynamics side-chain links. See Fig 1.
Paths assigned to automixer control
cannot use the Dynamics 2 processor for
normal compression / limiting at the same
time, however the Dynamics 1 processor
is still available for full use as compressor
/ limiter and expander or gate.
Assigning control
To assign a path to automixer control,
select the PROCESSING-DYNAMICS2
panel mode. In this mode, the TFT screen
displays the settings for the Dynamics 2
processors. Call attention to the chosen
path by pressing its fader assign button.
Select one of the eight Automixer modes
for the dynamics 2 processor by pressing
one of the buttons on the TFT screen note
that these only appear on Mono paths - if
the path is not currently assigned to an
automixer or dynamics 2 side-chain link,
the ‘No Link’ button will be lit. Select the
other faders that need to be in the same
automix group and assign them to the
same automixer number.
To clear a path from automixer control
(and side-chain links), select ‘No Link from
the Dyn Links area on the TFT screen.
To place the path under the control of
a different automixer, simply select a
different numbered automixer.
Gain reduction metering
The Dynamics 2 display area shows a gain
reduction bargraph meter and the In /
Out status of the control for the currently
assigned path. Upstand bargraph meters
for fader inputs will automatically also
show an automixer gain reduction meter
for each path assigned to an automixer, as
shown in Fig 3 on the following page.
A number at the bottom of this meter
indicates which of the 8 automixers is
controlling a path. Automix gain reduction
meters are distinct in colour and display
from standard dynamics gain reduction
meters. If the automixer is not applying
gain reduction to a path, its meter will
display full scale to the 0 point.
When gain reduction applied, the meter
drops to indicate the amount it’s being
reduced by. See Fig 3 on the next page
for an image of the Automixer metering in
the meter bridge.
Adjustment controls
The automixer controls appear when
one of the eight automixers have been
selected. Buttons on the same TFT
screen allow for the processing to occur
post fader, pre fader (post EQ) or pre EQ
(pre fader).
When viewing Dynamics 2 controls with
the currently assigned path assigned to
an automixer, control cells on the panel
provide two sets of controls, some for the
Automixer as a whole and some for the
individual assigned path.
FIG 1 - AUTOMIXER CONTROLS ON THE PROCESSING-DYN2 TFT SCREEN LAYOUT
Содержание Apollo
Страница 7: ...calrec com Putting Sound in the Picture APOLLO INFORMATION...
Страница 11: ...calrec com Putting Sound in the Picture APOLLO INTRODUCTION...
Страница 16: ...16 APOLLO Digital Broadcast Production Console Introduction...
Страница 17: ...calrec com Putting Sound in the Picture APOLLO CONTROL OVERVIEW...
Страница 21: ...CALREC Putting Sound in the Picture 21 FIG 3 ROWS...
Страница 36: ...Control Overview 36 APOLLO Digital Broadcast Production Console FIG 3 EXAMPLE LAYOUTS...
Страница 40: ...40 APOLLO Digital Broadcast Production Console...
Страница 41: ...calrec com Putting Sound in the Picture APOLLO CONTROL PANEL MODES...
Страница 49: ...CALREC Putting Sound in the Picture 49 WILDABLE CONTROLS...
Страница 52: ...52 APOLLO Digital Broadcast Production Console...
Страница 53: ...calrec com Putting Sound in the Picture APOLLO GETTING SIGNALS INTO APOLLO...
Страница 82: ...82 APOLLO Digital Broadcast Production Console Getting Signals into Apollo...
Страница 83: ...calrec com Putting Sound in the Picture APOLLO PROCESSING AUDIO...
Страница 110: ...110 APOLLO Digital Broadcast Production Console...
Страница 111: ...calrec com Putting Sound in the Picture APOLLO ROUTING AUDIO...
Страница 128: ...128 APOLLO Digital Broadcast Production Console...
Страница 129: ...calrec com Putting Sound in the Picture APOLLO PASSING SIGNALS OUT OF APOLLO...
Страница 137: ...calrec com Putting Sound in the Picture APOLLO MONITORING...
Страница 152: ...152 APOLLO Digital Broadcast Production Console...
Страница 153: ...calrec com Putting Sound in the Picture APOLLO COMMUNICATIONS...
Страница 158: ...158 APOLLO Digital Broadcast Production Console...
Страница 159: ...calrec com Putting Sound in the Picture APOLLO METERING...
Страница 168: ...168 APOLLO Digital Broadcast Production Console...
Страница 169: ...calrec com Putting Sound in the Picture APOLLO SHOWS MEMORIES AND PRESETS...
Страница 183: ...calrec com Putting Sound in the Picture APOLLO CONSOLE FACILITIES...
Страница 188: ...188 APOLLO Digital Broadcast Production Console...
Страница 189: ...calrec com Putting Sound in the Picture APOLLO EXTERNAL INTERFACING...
Страница 199: ...calrec com Putting Sound in the Picture APOLLO SYSTEM STATUS...
Страница 202: ...202 APOLLO Digital Broadcast Production Console...
Страница 203: ...calrec com Putting Sound in the Picture APOLLO GLOSSARY OF TERMINOLOGY...
Страница 209: ...calrec com Putting Sound in the Picture APOLLO FEATURES BY SOFTWARE VERSION...


