


Control Overview
38 APOLLO
Digital Broadcast Production Console
USER SPLITS
User splits allow the control surface
to be sectioned, allowing multiple
operators to work without impacting
upon each other.
User splits are also often used to
separate an extended control surface or
sidecar from the main control surface. A
maximum of three user splits can be set
across the combination of main console
and extension/sidecar.
User splits can be placed between control
panels to provide separate areas of
control for up to three operators. User
splits partition faders and the assignable
panel modes PROCESSING & SEND-
ROUTE. The assignable panel modes
can only affect the currently assigned
path within their user area. Each area
can have its own currently assigned
path. Changing the assigned path within
an area does not change or cancel the
assigned path or focus of assignable
panels in other user areas. Also, changing
layers only affects faders within the user
area that the change was made from.
If multiple operators require their own
monitoring, speakers / headphones can
be fed from monitor output 1, monitor
output 2 or miscellaneous monitor
outputs, and each operator then use the
controls relevant to their area. The PFL
and AFL listen outputs of the faders within
each user are can be selected to feed one
of three different APFL bus sets, each of
which can be patched to outputs for local
monitoring, and the two main monitors
can be configured to be interrupted by
different APFL sets, allowing each user
to be able to listen to their paths without
affecting each other’s monitoring. Please
refer to Monitoring section for details on
configuring monitoring for multiple users.
See
“Monitoring for multiple users” on
page 140.
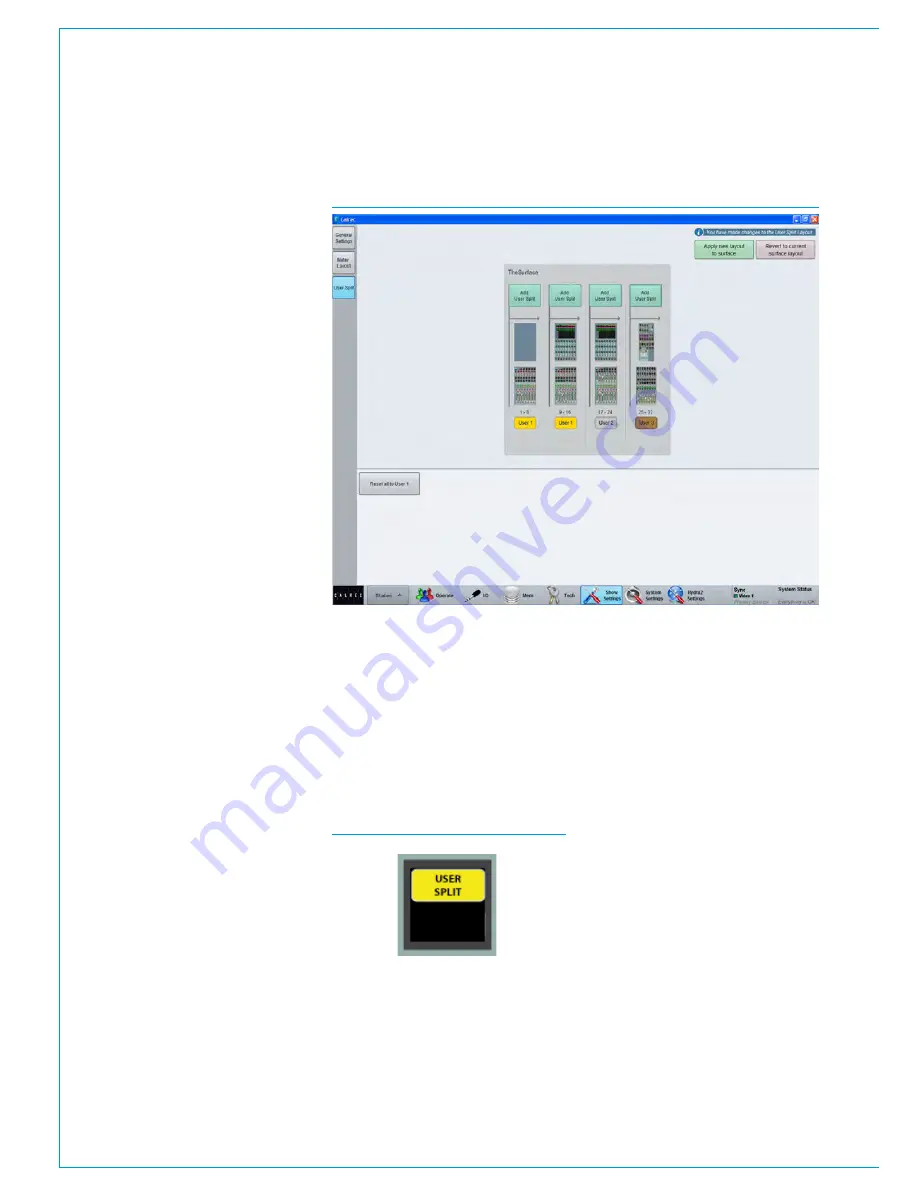
FIG 1 - MAIN APPLICATION, SHOW SETTINGS>USER SPLIT SCREEN
Identifying User Split Locations
The location of active user splits is shown
on the control surface in the left hand
button cell in the Layers Row.
If this display shows ‘USER SPLIT’, the
panels to the left are in a different user
area to the panel with the indication and
the panels to the right. See Fig 2.
FIG 2 - ACTIVE USER SPLIT
ON LAYERS ROW
Creating / removing user splits
User splits are managed from the Main
Application
>Show Settings>User Split
screen. See Fig 1. Clicking on the ‘Add
User Split’ button above any of the panels
allows the choice of users 1, 2 or 3 to be
applied to that panel and to those to the
right of it. Click the ‘Apply new layout to
surface’ button in the top right corner
to apply the user split settings on the
screen to the control surface, or ‘Revert
to current surface layout’ to put it back as
it was.
The User split configuration is saved in
the Show. No changes are applied to
the surface until the ‘Apply new layout to
surface’ button is clicked.
Clicking the ‘Reset all to User 1’ button
will remove all user splits.
Содержание Apollo
Страница 7: ...calrec com Putting Sound in the Picture APOLLO INFORMATION...
Страница 11: ...calrec com Putting Sound in the Picture APOLLO INTRODUCTION...
Страница 16: ...16 APOLLO Digital Broadcast Production Console Introduction...
Страница 17: ...calrec com Putting Sound in the Picture APOLLO CONTROL OVERVIEW...
Страница 21: ...CALREC Putting Sound in the Picture 21 FIG 3 ROWS...
Страница 36: ...Control Overview 36 APOLLO Digital Broadcast Production Console FIG 3 EXAMPLE LAYOUTS...
Страница 40: ...40 APOLLO Digital Broadcast Production Console...
Страница 41: ...calrec com Putting Sound in the Picture APOLLO CONTROL PANEL MODES...
Страница 49: ...CALREC Putting Sound in the Picture 49 WILDABLE CONTROLS...
Страница 52: ...52 APOLLO Digital Broadcast Production Console...
Страница 53: ...calrec com Putting Sound in the Picture APOLLO GETTING SIGNALS INTO APOLLO...
Страница 82: ...82 APOLLO Digital Broadcast Production Console Getting Signals into Apollo...
Страница 83: ...calrec com Putting Sound in the Picture APOLLO PROCESSING AUDIO...
Страница 110: ...110 APOLLO Digital Broadcast Production Console...
Страница 111: ...calrec com Putting Sound in the Picture APOLLO ROUTING AUDIO...
Страница 128: ...128 APOLLO Digital Broadcast Production Console...
Страница 129: ...calrec com Putting Sound in the Picture APOLLO PASSING SIGNALS OUT OF APOLLO...
Страница 137: ...calrec com Putting Sound in the Picture APOLLO MONITORING...
Страница 152: ...152 APOLLO Digital Broadcast Production Console...
Страница 153: ...calrec com Putting Sound in the Picture APOLLO COMMUNICATIONS...
Страница 158: ...158 APOLLO Digital Broadcast Production Console...
Страница 159: ...calrec com Putting Sound in the Picture APOLLO METERING...
Страница 168: ...168 APOLLO Digital Broadcast Production Console...
Страница 169: ...calrec com Putting Sound in the Picture APOLLO SHOWS MEMORIES AND PRESETS...
Страница 183: ...calrec com Putting Sound in the Picture APOLLO CONSOLE FACILITIES...
Страница 188: ...188 APOLLO Digital Broadcast Production Console...
Страница 189: ...calrec com Putting Sound in the Picture APOLLO EXTERNAL INTERFACING...
Страница 199: ...calrec com Putting Sound in the Picture APOLLO SYSTEM STATUS...
Страница 202: ...202 APOLLO Digital Broadcast Production Console...
Страница 203: ...calrec com Putting Sound in the Picture APOLLO GLOSSARY OF TERMINOLOGY...
Страница 209: ...calrec com Putting Sound in the Picture APOLLO FEATURES BY SOFTWARE VERSION...


