CHAPTER 5 EXTENDED OPTION OUTPUT
164
PD-3000
U
U
s
s
e
e
o
o
f
f
e
e
x
x
t
t
e
e
n
n
d
d
e
e
d
d
o
o
p
p
t
t
i
i
o
o
n
n
o
o
u
u
t
t
p
p
u
u
t
t
(
(
A
A
p
p
p
p
l
l
i
i
c
c
a
a
t
t
i
i
o
o
n
n
)
)
On the precondition that a checking board is created, this section describes how to create programs by providing some
examples.
Necessary items (other than for Basics)
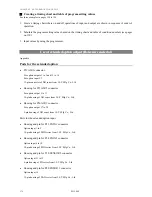
Checking board (See “Reference material”.)
Limitations of extended option output
•
Disabled when an output point count exceeds 20 (including the work clamp output).
•
Disabled when an input point count exceeds 14.
•
Input check during sewing machine operation is disabled. Therefore, on and off operation of the output
detected by input from the foot switch pedal while sewing is not possible.
•
Sequence output during sewing machine operation is disabled.
On and off operation of the output by inputting trigger data out of sewing data is enabled.
Temporarily pausing the sewing machine to run the extended option output by inputting trigger data is enabled.
(Input and output are enabled in this case.)
•
Disabled when many AND conditions are set. For example, operation by switching among multiple
modes and inhibition of output by combining multiple inputs are disabled.
Settings of 2-input AND conditions per option output are enabled; configuration of 3-input AND conditions is
enabled by setting one output as a virtual output. (See “Examples of option outputs”.)
•
Control of the incorporated stepper motor output by the extended option output is disabled.
Examples of option outputs (Application)
Automating the commencement of sewing
If you set memory switch No. 950 to ON, sewing automatically commences after turning on option output No. 1.
Create a program to make the machine commence sewing after the work clamp lowers.
1. Set memory switch No. 950 to ON.
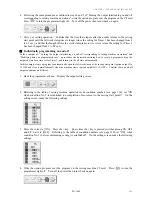
2. Have the programmer at hand. Display the output setting screen.
If any registered option program already exists, delete it using the delete icon. Turn the programmer back on.
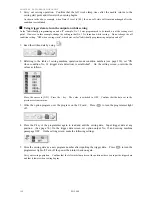
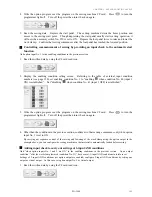
3. Referring to the table of condition numbers of the standard output (see page 150), set the output
condition for No. 1 to "ON when condition No. 31 (after the work clamp lowers) is established". Set
Timer 2 to 100 ms. On the setting screen, make the following settings.
Содержание PD-3000
Страница 8: ...PD 3000 ...
Страница 9: ...PD 3000 Chapter 1 Read Me ...
Страница 12: ...CHAPTER 1 READ ME 4 PD 3000 ...
Страница 13: ...PD 3000 Chapter 2 Setting Up Your Programmer ...
Страница 28: ...CHAPTER 2 SETTING UP YOUR PROGRAMMER 20 PD 3000 ...
Страница 29: ...PD 3000 Chapter 3 Programming with Icons ...
Страница 95: ...PD 3000 Chapter 4 Programming with Commands ...
Страница 152: ...CHAPTER 4 PROGRAMMING WITH COMMANDS 144 PD 3000 ...
Страница 153: ...PD 3000 Chapter 5 Extended Option Output ...
Страница 180: ...CHAPTER 5 EXTENDED OPTION OUTPUT 172 PD 3000 Block diagram Connector layout of the main circuit board ...
Страница 181: ...PD 3000 Chapter 6 Reading Saving Deleting Program and Formatting Media ...
Страница 190: ...CHAPTER6 READING SAVING DELETING PROGRAM AND FORMATTING MEDIA 182 PD 3000 ...
Страница 191: ...Chapter 7 Checking Copying Moving Changing Program ...
Страница 199: ...PD 3000 Chapter 8 Displaying Sewing Machine Program ...
Страница 201: ...PD 3000 Chapter 9 Displaying a Clock ...
Страница 203: ...CHAPTER 9 DISPLAY A CLOCK PD 3000 195 Setting a clock 1 Select Press 2 Select Press 3 Set the time Press ...
Страница 204: ...CHAPTER 9 DISPLAY A CLOCK 196 PD 3000 ...
Страница 205: ...PD 3000 Additional Information ...

