CHAPTER 5 EXTENDED OPTION OUTPUT
PD-3000
165
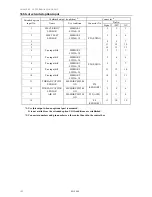
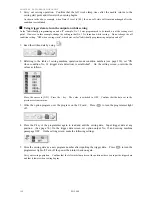
4. Write the option program over the program on the sewing machine CF card. Press
to turn the
programmer light off. Turn off the power then turn it back on again.
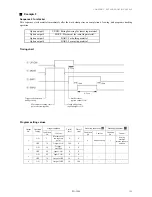
5. Read the sewing data. Depress the start pedal. The sewing machine detects the home position and
moves to the sewing start point. Though depressing the start pedal usually starts sewing operation, it
will not when memory switch No. 950 is set to ON. Depress the foot pedal twice to raise and lower the
work clamp. Confirm that sewing commences after the foot pedal has reached the lowered position.
Controlling commencement of sewing by providing an input check to the automatic start
function
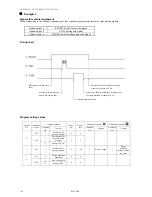
Add option input No. 1 to the enabling conditions in the previous section.
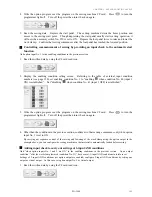
1. Read the written data by using the CF card read icon.
2. Display the enabling condition setting screen. Referring to the table of external input condition
numbers (see page 150), set enabling condition No. 1 to “enabling
when condition No. 40 (input 1
ON) is established”. Set “disabling
when condition No. 41 (input 1 OFF) is established”.
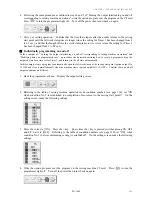
3. Write the option program over the program on the sewing machine CF card. Press
to turn the
programmer light off. Turn off the power then turn it back on again.
4. Other than the conditions in the previous section, confirm also that sewing commences only when option
input No. 1 is set to ON.
By carrying out sequence control of the raising and lowering of the work clamp using the option output in the
example above, you can configure the sewing machine so that material is automatically loaded before sewing.
Adding input check to carry out settings of 3-input AND conditions
Add "when option inputs No. 1 and 2 are ON" to the enabling conditions in the previous section. As an output
condition, "after the work clamp lowered (condition No. 31)" has been set; 3-input AND conditions in total are set.
Settings of 2-input AND conditions per option output are enabled; configure 3-input AND conditions by setting one
output as virtual output. In this case, set option output No. 2 as virtual output.
1. Read the written data by using the CF card read icon.
Содержание PD-3000
Страница 8: ...PD 3000 ...
Страница 9: ...PD 3000 Chapter 1 Read Me ...
Страница 12: ...CHAPTER 1 READ ME 4 PD 3000 ...
Страница 13: ...PD 3000 Chapter 2 Setting Up Your Programmer ...
Страница 28: ...CHAPTER 2 SETTING UP YOUR PROGRAMMER 20 PD 3000 ...
Страница 29: ...PD 3000 Chapter 3 Programming with Icons ...
Страница 95: ...PD 3000 Chapter 4 Programming with Commands ...
Страница 152: ...CHAPTER 4 PROGRAMMING WITH COMMANDS 144 PD 3000 ...
Страница 153: ...PD 3000 Chapter 5 Extended Option Output ...
Страница 180: ...CHAPTER 5 EXTENDED OPTION OUTPUT 172 PD 3000 Block diagram Connector layout of the main circuit board ...
Страница 181: ...PD 3000 Chapter 6 Reading Saving Deleting Program and Formatting Media ...
Страница 190: ...CHAPTER6 READING SAVING DELETING PROGRAM AND FORMATTING MEDIA 182 PD 3000 ...
Страница 191: ...Chapter 7 Checking Copying Moving Changing Program ...
Страница 199: ...PD 3000 Chapter 8 Displaying Sewing Machine Program ...
Страница 201: ...PD 3000 Chapter 9 Displaying a Clock ...
Страница 203: ...CHAPTER 9 DISPLAY A CLOCK PD 3000 195 Setting a clock 1 Select Press 2 Select Press 3 Set the time Press ...
Страница 204: ...CHAPTER 9 DISPLAY A CLOCK 196 PD 3000 ...
Страница 205: ...PD 3000 Additional Information ...


