CHAPTER 5 EXTENDED OPTION OUTPUT
PD-3000
159
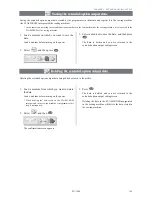
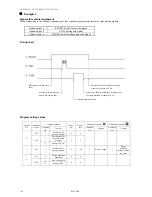
4. Following the same procedure as outlined in steps 4 and 5 of "Turning the output interlocking on and off
corresponding to sewing machine operations", write the option program over the program on the CF card.
Press
to turn the programmer light off. Turn off the power then turn it back on again.
5. Carry out sewing operation. Confirm that the time that elapses after the needle returns to the sewing
start point until the left work clamp rises is longer (since the setting for Timer 1 has been changed from 0
to 0.5 sec.), and that the length of time the work clamp takes to rise is less (since the setting for Timer 2
has been changed from 1 to 0.5 sec.).
Individually programming on and off
In the examples of " Turning the output interlocking on and off corresponding to sewing machine operations" and
"Modifying data you programmed once", a procedure was described outlining how to create a program to keep the
output on state for a time set for Timer 2, and return it to the off state automatically.
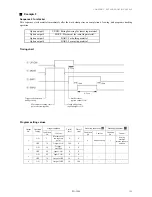
In this example, create a program to automatically open the left work clamp at the sewing start point (option output No.
15 ON) and close it simultaneously when the machine starts.
(option output NO. 15 OFF). Confirm that on and off
output conditions are different.
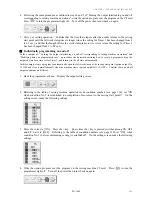
1. Have the programmer at hand. Display the output setting screen.
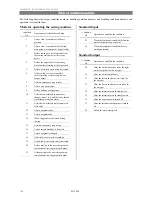
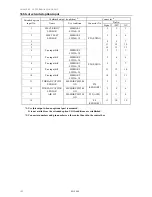
2. Referring to the table of sewing machine operation mode condition numbers (see page 150), set "ON
when condition No. 2 is established (on completion of movement to the sewing start point)". On the
setting screen, make the following settings.
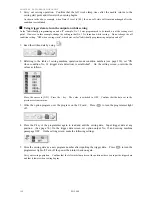
3. Move the cursor to [ON]. Press the + key. Every time the + key is pressed switches among ON, OFF
and F/F. Set it to [OFF]. Referring to the table of condition numbers (see page 150), set "OFF when
condition No. 3 (before commencing sewing) is established". On the setting screen, make the following
settings.
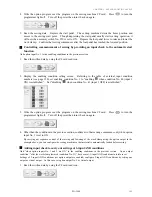
4. Write the option program over the program on the sewing machine CF card. Press
to turn the
programmer light off. Turn off the power then turn it back on again.
Содержание PD-3000
Страница 8: ...PD 3000 ...
Страница 9: ...PD 3000 Chapter 1 Read Me ...
Страница 12: ...CHAPTER 1 READ ME 4 PD 3000 ...
Страница 13: ...PD 3000 Chapter 2 Setting Up Your Programmer ...
Страница 28: ...CHAPTER 2 SETTING UP YOUR PROGRAMMER 20 PD 3000 ...
Страница 29: ...PD 3000 Chapter 3 Programming with Icons ...
Страница 95: ...PD 3000 Chapter 4 Programming with Commands ...
Страница 152: ...CHAPTER 4 PROGRAMMING WITH COMMANDS 144 PD 3000 ...
Страница 153: ...PD 3000 Chapter 5 Extended Option Output ...
Страница 180: ...CHAPTER 5 EXTENDED OPTION OUTPUT 172 PD 3000 Block diagram Connector layout of the main circuit board ...
Страница 181: ...PD 3000 Chapter 6 Reading Saving Deleting Program and Formatting Media ...
Страница 190: ...CHAPTER6 READING SAVING DELETING PROGRAM AND FORMATTING MEDIA 182 PD 3000 ...
Страница 191: ...Chapter 7 Checking Copying Moving Changing Program ...
Страница 199: ...PD 3000 Chapter 8 Displaying Sewing Machine Program ...
Страница 201: ...PD 3000 Chapter 9 Displaying a Clock ...
Страница 203: ...CHAPTER 9 DISPLAY A CLOCK PD 3000 195 Setting a clock 1 Select Press 2 Select Press 3 Set the time Press ...
Страница 204: ...CHAPTER 9 DISPLAY A CLOCK 196 PD 3000 ...
Страница 205: ...PD 3000 Additional Information ...


