


MAKING ADJUSTMENTS
V
ar
ious
St
itc
he
s
97
3
Your stitch pattern may sometimes turn out poorly,
depending on the type or thickness of fabric, the stabilizer
material used, sewing speed, etc. If your sewing does not
turn out well, sew trial stitches using the same conditions
as the real sewing, and adjust the stitch pattern as
explained below. If the stitch pattern does not turn out well
even after making adjustments based on the stitch pattern
described below, make adjustments for each stitch pattern
individually.
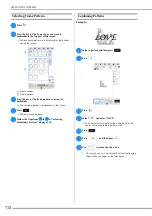
a
Press
and select
(6-284).
b
Attach monogramming foot “N” and sew the stitch
pattern.
Be sure to use monogramming foot “N”. Adjustments
may not be made correctly with any other presser foot.
c
Compare the finished stitch pattern to the illustration
of the correct stitch pattern below.
d
Press
, and then adjust the stitch pattern with the
[Fine Adjust Verti.] or [Fine Adjust Horiz.] displays.
If the stitch pattern is bunched:
Press
in the [Fine Adjust Verti.] display.
The displayed value increases each time the button is
pressed and the stitch pattern will lengthen.
If the stitch pattern has gaps:
Press
in the [Fine Adjust Verti.] display.
The displayed value decreases each time the button
is pressed and the stitch pattern will shorten.
If the stitch pattern is skewed to the left:
Press
in the [Fine Adjust Horiz.] display.
The displayed value increases each time the button is
pressed and the stitch pattern will slide to the right.
If the stitch pattern is skewed to the right:
Press
in the [Fine Adjust Horiz.] display.
The displayed value decreases each time the button
is pressed and the stitch pattern will slide to the left.
e
Sew the stitch pattern again.
*
If the stitch pattern still comes out poorly, make
adjustments again. Adjust until the stitch pattern
comes out correctly.
*
You can sew with the setting screen on the display.
f
Press
to return to the original screen.
MAKING ADJUSTMENTS
Memo
• For details on stitch patterns, refer to “STITCH
SETTING CHART” on page 194.
• This adjustment can be made to
(1-36 Quilting
stippling stitch),
(2-21 Decorative stippling
stitch),
(4-24 Eyelet stitch),
(4-25 Star
eyelet stitch),
(Q-15 Quilting stippling stitch)
and stitch patterns from the following categories.
Содержание 882-W70
Страница 2: ......
Страница 12: ...CONTENTS 10 ...
Страница 56: ...CHANGING THE PRESSER FOOT 54 ...
Страница 57: ...Chapter 2 Sewing Basics ...
Страница 73: ...Chapter 3 Various Stitches ...
Страница 106: ...MY CUSTOM STITCH 104 ...
Страница 107: ...Chapter 4 Basic Embroidery ...
Страница 141: ...Chapter 5 Advanced Embroidery ...
Страница 156: ...EMBROIDERY APPLICATIONS 154 ...
Страница 157: ...Chapter 6 My Design Center ...
Страница 176: ...STIPPLING 174 ...
Страница 177: ...Chapter 7 Appendix ...
Страница 193: ...ERROR MESSAGES 191 Appendix 7 ...
Страница 205: ......
Страница 206: ......
Страница 207: ......
Страница 208: ......
Страница 209: ......
Страница 210: ......
Страница 211: ......