


MY CUSTOM STITCH
102
e
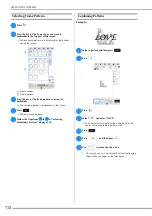
Select whether single stitch or triple stitches will be
sewn between the first two points.
*
To sew three stitches, press the key so that it appears
as .
f
Repeat the steps for each point that you have drawn on
the grid until the stitch design is drawn on the screen
as a continuous line.
g
Once you finish entering the stitch data, press
to
save the stitch pattern.
■
Moving a Point
a
Press
or
to move
to the point that you
want to move.
b
Use
to move the point.
■
Moving Part or All of the Design
a
Press
or
to move
to the first point of the
section that you want to move.
*
To move
to the first point, press
.
*
To move
to the last point, press
.
b
Press .
The selected point and all points that were entered
after it are selected.
c
Press
or
to move the section and press
.
The section will be moved.
■
Inserting New Points
a
Press
or
to move
to a place on the design
where you want to add a new point.
*
To move
to the first point, press
.
*
To move
to the last point, press
.
b
Press
to insert a new point.
c
Use
to move the point.
Содержание 882-W70
Страница 2: ......
Страница 12: ...CONTENTS 10 ...
Страница 56: ...CHANGING THE PRESSER FOOT 54 ...
Страница 57: ...Chapter 2 Sewing Basics ...
Страница 73: ...Chapter 3 Various Stitches ...
Страница 106: ...MY CUSTOM STITCH 104 ...
Страница 107: ...Chapter 4 Basic Embroidery ...
Страница 141: ...Chapter 5 Advanced Embroidery ...
Страница 156: ...EMBROIDERY APPLICATIONS 154 ...
Страница 157: ...Chapter 6 My Design Center ...
Страница 176: ...STIPPLING 174 ...
Страница 177: ...Chapter 7 Appendix ...
Страница 193: ...ERROR MESSAGES 191 Appendix 7 ...
Страница 205: ......
Страница 206: ......
Страница 207: ......
Страница 208: ......
Страница 209: ......
Страница 210: ......
Страница 211: ......