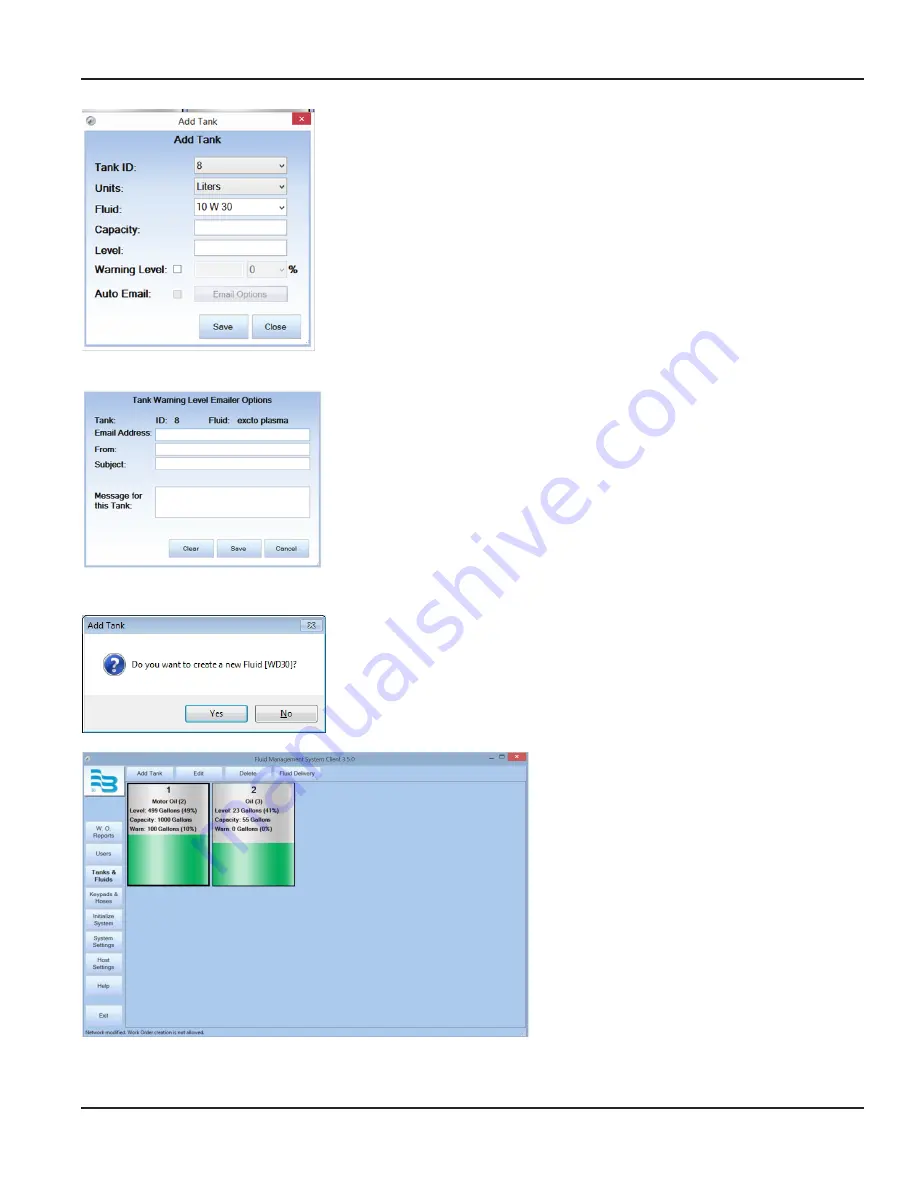
To add a tank:
1 . Click on the
ADD TANK
button .
2 . Chose the tank ID from the drop down menu .
3 . In the
Units
field, select a unit of measure from the drop-down menu . These
are the units that are displayed in the fluid levels and capacity .
4 . In the
Fluid
field, enter a fluid name in the text box or select a fluid from the
drop-down menu .
5 . In the
Capacity
field, enter the total number of units (gallons, liters, pints or
quarts) of fluid that may be stored in the tank .
6 . In the
Warning Level
field, enter the fluid level at which to trigger a low fluid
warning message .
7 . To specify the email setting for the warning message when the fluid reaches
the low level point, check the box next to
Auto Email
, then click
EMAIL OPTIONS
.
8 . Enter the email address of the recipient, separate multiple addresses with
a semicolon .
9 . Enter a subject .
10 . Type a message . (This is optional)
11 . Click
SAVE
to close this screen and return to the
Add Tank
screen .
CLEAR
will
clear the email screen,
CANCEL
will close the email screen without
saving changes .
12 . Click
SAVE
again to save your changes and exit the
Add Tank
screen .
OTEE:
N
If the fluid you entered was not in the drop-down list, you will be asked if
you want to create a new fluid when you exit this screen .
Creating a New Fluid
13 . If the fluid you entered during the
Add Tank
procedure was not in the drop-
down list, click
YES
if you want to create a new fluid .
The new fluid will now appear in the
Fluid Type
drop-down list .
After you set up a tank and fluid(s), the software
displays graphical representation of the tank
level, including:
• The Tank ID
• The fluid type and ID
• The fluid level in units and percentage
To change the information, click on
EDIT
. Change
the appropriate settings, then click
SAVE
.
To add a new tank, click on
ADD TANK
and
repeat the process explained in
To track when fluid is added to the tank, click on
FLUID DELIVERY
or double click the tank .
Using The FMS Software
Page 41
December 2014
FMS-UM-01200-EN-01


