background image

  Axell D-MBR 3007-3008-PS-NFPA 

PRODUCT DESCRIPTION AND USER’S MANUAL 

© Axell Wireless Ltd 

UMCD00013 Rev 2.2 

39 

4.  Click 

Yes

. The User’s name is removed from the list.  

5.2  Repeater and Band Level Information 

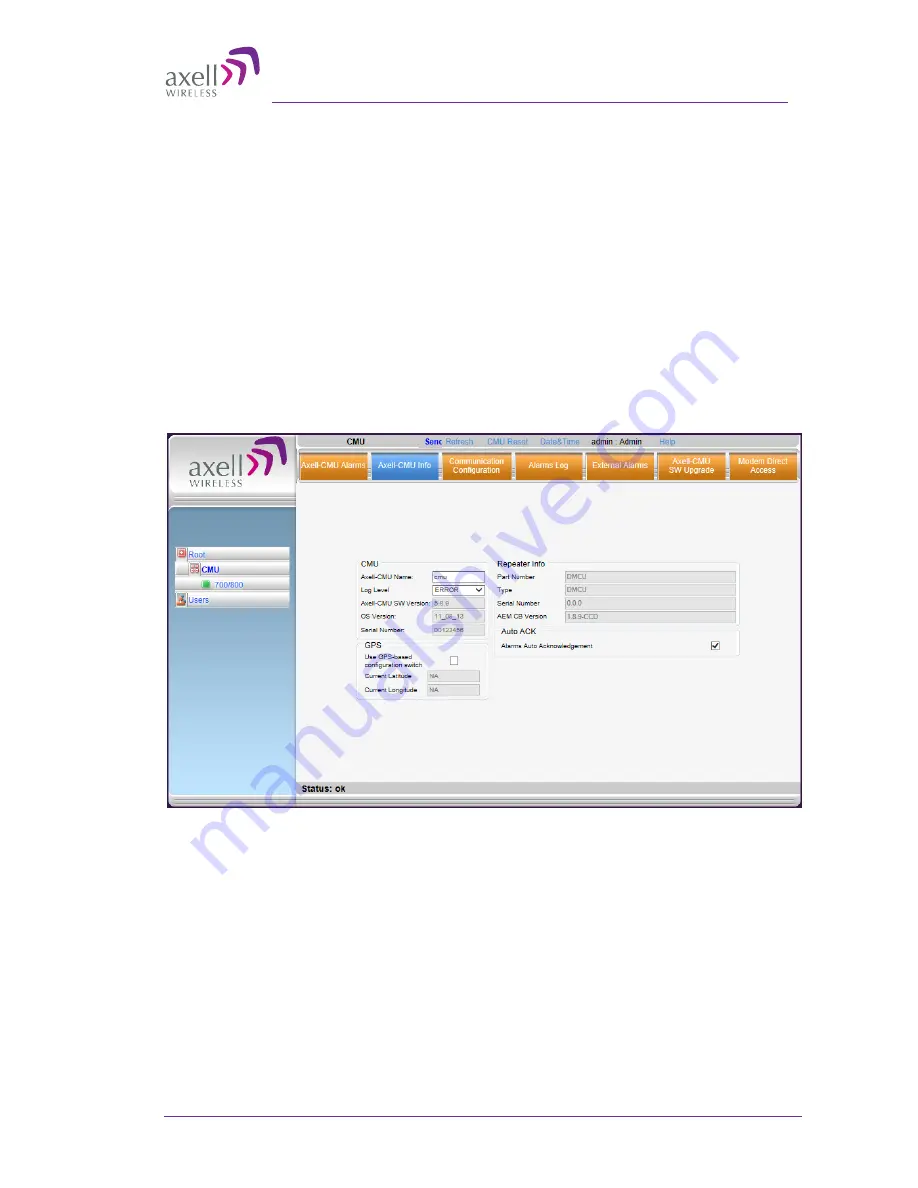
The Web GUI provides Repeater level information (via the CMU Info tab) and band level 
information (via the Band Info tab). 

5.2.1  Viewing Repeater Level Information 

Use  the 

CMU  Info 

screen  to  view  the  hardware  and  software  versions  of  the  Axell  

Repeater and to assign the Repeater a recognizable name. 

To access the Band Information window 

In the Tree Pane, select 

CMU 

and click the 

Axell CMU Info 

tab. 

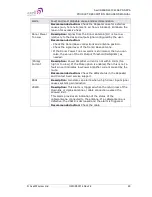
Use  the 

Log  Level 

to  set  the  minimum  fault  level  that  is  logged.  Other  fields  provide 

version and identification information. 


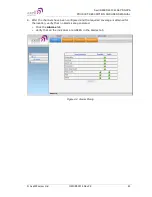
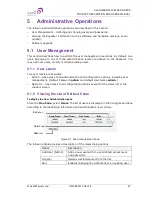
Figure 5-4. CMU Level Info 

5.2.2  Viewing Band Level Info 

Use the 

Repeater Information

 screen to  view the  hardware and software  versions of 

the Axell D-MBR Repeater and to assign the Repeater a recognizable name.  

To access the Repeater Information window 

1.  From the Tree Pane, select the 

Band

 element (i.e. 700/800). 

2.  Select the 

Band Info

 tab. The relevant parameters are displayed.  

Содержание D-MBR 3007-3008-PS

Страница 1: ...ATER PRODUCT DESCRIPTION AND USER S MANUAL SMR 700 800 Digital Multi Channel IP65 NEMA 4 Band Selective Repeater PRODUCT DESCRIPTION AND USER S MANUAL for AXELL D MBR 3007 3008 PS NFPA REPEATER UMCD00013 Rev 2 2 D MBR 3007 3008 PS NFPA ...

Страница 2: ...of errors and the aforementioned advisory services This document has been prepared to be used by professional and properly trained personnel and the customer assumes full responsibility when using them The manufacturer welcomes customer comments as part of the process of continual development and improvement of the documentation in the best way possible from the user s viewpoint Please submit your...

Страница 3: ...right to change the contents without prior notice The information furnished by Axell Wireless in this document is believed to be accurate and reliable However Axell Wireless assumes no responsibility for its use In no event shall Axell Wireless be liable for any damage resulting from loss of data loss of use or loss of profits and Axell Wireless further disclaims any and all liability for indirect...

Страница 4: ...o meet FCC requirements 90 219 d it may be necessary for the installer to reduce the UL and or DL output power for certain installations FCC Part 15 This device complies with part 15 of the FCC Rules Operation is subject to the following two conditions 1 This device may not cause harmful interference and 2 This device must accept any interference received including interference that may cause unde...

Страница 5: ...diator and any person s body Antenna Installation Installation of an antenna must comply with the FCC RF exposure requirements The antenna used for this transmitter must be mounted on permanent structures The FCC regulation mandate that the EIRP of type B signal boosters should not exceed 5W Therefore the max antenna gain allowed for this type of signal booster should be limited to the values give...

Страница 6: ...th the connectors 11dB Gain 2 dBi Assuming 10 service antennas antenna splitter losses 11 dB Based on equation 3 Input antenna noise to the antenna 43 2 11 11 63 dBm The inband input noise to the antenna should be 37 2 11 11 57dbm NOTE In this example you may be required in general to add an external bandpass filter that would attenuate by additional 7 dB the out of band noise Conclusion Good engi...

Страница 7: ...e que la puissance isotrope rayonnée équivalente p i r e ne dépasse pas l intensité nécessaire à l établissement d une communication satisfaisante La puissance de sortie nominale indiquée par le fabricant pour cet appareil concerne son fonctionnement avec porteuse unique Pour des appareils avec porteuses multiples on doit réduire la valeur nominale de 3 5dB surtout si le signal de sortie est retra...

Страница 8: ...ion such as gloves Caution Safety to equipment When installing replacing or using this product observe all safety precautions during handling and operation Failure to comply with the following general safety precautions and with specific precautions described elsewhere in this manual violates the safety standards of the design manufacture and intended use of this product Axell Wireless assumes no ...

Страница 9: ...3 1 Repeater Pre Installation Requirements 13 3 1 1 Safety Guidelines 13 3 1 2 Required BTS Information 13 3 1 3 Installation Location and Environment 13 3 1 4 RF Cable Installation Guidelines 14 3 1 5 Grounding Wires Requirements 14 3 2 Overview of the Installation Procedure 14 3 3 Unpacking 15 3 4 Mounting the D MBR 16 3 4 1 Pre Mounting Procedure 16 3 4 2 Installing the Mounting Bracket 17 3 4 ...

Страница 10: ...37 5 1 User Management 37 5 1 1 User Levels 37 5 1 2 Viewing the List of Defined Users 37 5 1 3 Adding Users 38 5 1 4 Editing a User 38 5 1 5 Deleting a User 38 5 2 Repeater and Band Level Information 39 5 2 1 Viewing Repeater Level Information 39 5 2 2 Viewing Band Level Info 39 5 3 Configuration Files Backup Restore 40 5 3 1 The Backup Restore Tab 41 5 3 2 Backup of Repeater Configuration 42 5 3...

Страница 11: ...rameter of D MBR 3007 3008 PS NFPA A including filter tuning and selection can be controlled via web based management The patented Axell Wireless digital RF filter enables simple initial setup for any channel plan and if necessary allows some basic reconfiguration due to re banding SALC Smart ALC mechanism to protect the digital signal booster from oscillation and shutdown the signal booster when ...

Страница 12: ...ure RF Gain Up to 85dB Gain SALC Smart ALC mechanism to protect the digital signal booster from oscillation and shutdown the signal booster when required Output Power per band DL 30dBm UL 24dBm Composite Output Power DL 33dBm UL 27dBm Web based management GUI SNMP traps Patented DSP filtering technology Supports up to 12 independent filters user programmable bandwidth frequency For SMR700 Programm...

Страница 13: ...olored case D MBR 7 8 PS 30DBM 12F NFPA DC 1 3 NFPA Installation Architecture To meet the National Fire Protection Association NFPA requirements power to the Repeater is provided via a UPS and the status of the UPS Repeater and DAS system antennas is monitored via alarm connections to the Fire Department Control Box NOTE An alternative to the Fire Department Control Box connections is to connect t...

Страница 14: ...econds and re connect 1 5 Interfaces All the Repeater interfaces are located on the units underside panel The following figure shows the interfaces on the D MBR NOTE The NFPA unit is colored RED 1 2 Axell D MBR 3007 3008 PS NFPA Front Panel Interfaces The following table provides a description of the front panel ports and connections Interface Description Base Connection to Base donor side antenna...

Страница 15: ...nit CMU level options corresponding to the selected tree item Operation buttons control and management options The operation buttons at the top are common to all tree items and menus Figure 1 3 Web GUI Overview 1 6 1 Topology Tree Branches The Topology Tree displays CMU Communication parameters 700 800 Repeater configuration and monitoring options Users User management options NOTE The items in th...

Страница 16: ...n Shows the current access level Help Click Help to display an e guide line for the system operation This Help is general by its nature and some features may not be included 1 6 3 Band Pane and Tabs The upper area of each selected pane shows the tabs corresponding to that pane Item Description Values Alarms Displays various alarms generated by the Repeater and enables monitoring See section 6 2 Co...

Страница 17: ...s Repeater level information such as SW and HW versions and identification number In addition enables setting minimum alarm levels See section 5 2 1 Communication Configuration Used to set communication parameters See section 4 5 Alarms Log Log of past and current alarms See section 6 3 External Alarms Used to define any connected external alarms See section 4 4 Axell CMU SW Upgrade Options for CM...

Страница 18: ...énumérés ci dessous et ayant un gain admissible maximal et l impédance requise pour chaque type d antenne Les types d antenne non inclus dans cette liste ou dont le gain est supérieur au gain maximal indiqué sont strictement interdits pour l exploitation de l émetteur 2 1 Base Donor Antenna Requirements The Base Donor antenna is usually installed outdoors and is either a directional antenna such a...

Страница 19: ...siderations should be met Type of installation indoor only Service area type and size and characteristics Height Length and type of coaxial cable required for connecting the antenna to the Repeater and the attenuation 2 2 2 Indoor Antenna Installations 2 2 2 1 Recommended Antennas The following describes the requirements for an omni directional mobile used for indoor applications Specifications On...

Страница 20: ...single pole or horizontal installation In addition isolation between the donor and service antennas must be taken into account when selecting the location of the antennas 2 2 3 1 Recommended Antennas The antenna type depends on the installation For vertical Single Pole installations a high side lobe suppression antenna is required For horizontal installations either on two separate poles or on two...

Страница 21: ...here the BTS is relatively far and the service coverage area is relatively small In Vertical Separation configuration the Donor antenna can be installed either above or below the Service antenna on a COMMON tower It is required to set the distance between them to achieve maximum isolation The figures below illustrate the installations Figure 2 1 Service above Donor Antenna Figure 2 2 Donor above S...

Страница 22: ...paration configuration the Donor and Service antennas are installed on two separate towers at approximately the same height The towers can be either on the same side of the building or on different sides of the building as shown below Figure 2 3 Donor and Service Antennas Installed on Separate Towers Figure 2 4 Service and Donor Antennas Installed on Opposite Sides of the Building ...

Страница 23: ...NINGS The Repeater must always be installed vertically and top down with the connectors on the underside for protection Horizontal installation on a bench for long time may cause damage to the Repeater due to over heating The following criteria should be considered when selecting the Repeater installation site location Application type indoor or outdoor Distance from antenna site It is recommended...

Страница 24: ...hould be aluminum with cross section 10AWG Lug of the protective grounding conductor should be aluminum Washers and screw should be high Cr stainless steel or 12 Cr stainless steel or Cr on Ni on steel tin on steel 3 2 Overview of the Installation Procedure IMPORTANT Be sure to perform the power supply connection last otherwise damage may be caused to the system 1 Select the location for the syste...

Страница 25: ...fy that all of the equipment listed below is included see also the following page Otherwise contact Axell Wireless D MBR PS NFPA A Ethernet cable CD with documentations Mounting Bracket with AC to DC power converter US power plug cables to AC outlet Additional supplied installation components No Description No 1 Flange nut 5 16 4 2 Wedge anchor 12 x 65 mm 4 3 Hex washer head screw 8 mm 4 4 Washer ...

Страница 26: ...e Repeater for maintenance and on site inspection 2 Place the Mounting Bracket against the wall and mark the four holes to be drilled at the extreme four corners of the bracket additional optional installation holes are also provided 3 Drill four holes 12mm in diameter and 65mm in depth The following illustration shows the bracket with the bracket pins NOTE The NFPA bracket may be colored RED Figu...

Страница 27: ...chors and secure with the flat washers spring washers and hex nuts removed in Step 2 5 Verify that the bracket is firmly mounted 3 4 3 Preparing Power Supply Cables 1 Secure the AC DC Converter power cable with kettle socket to the mounting bracket using one of the supplied cable ties 2 Connect the provided AC plug cable EURO UK to the power supply kettle socket routing it to the bottom of the bra...

Страница 28: ... through the Repeater holes until the upper side is locked with the installation head nuts at the top of the bracket See Figure 3 5 3 Release the four captive screws locking the Repeater cover NOTE The NFPA unit is colored RED Figure 3 4 Loosen Captive Screws and Swing Open Door 4 Swing the top cover open Figure 3 5 D MBR 3007 3008 PS NFPA Mounted on Support Bracket 5 Set both clamps with a hex wa...

Страница 29: ...screw of the clamp 8 Insert two hex washer head screws item 3 in Figure 3 1 including spring washers item 4 in Figure 3 1 into the lower orifices of leading inside the Repeater Figure 3 7 Locking Clamp Locations 9 Use the Allen screwdriver 8 in Figure 3 1 to tighten the hex screws 10 Verify that the Repeater is firmly mounted 11 Close the Repeater cover Do not lock yet since you will need to open ...

Страница 30: ... antennas to the Repeater or powering on the Repeater The Repeater should not be operated prior to the verification of the operating parameter in its installation environment 3 6 1 Verifying Isolation between Donor and Mobile Antennas The isolation between the Base Donor and Mobile Service antennas is critical especially for high gain outdoor applications For proper operation of the Repeater it is...

Страница 31: ...nstead of main lobe o Antenna connector or antenna cable faulty o Line of sight problem obstruction etc Register the signal strength of the downlink channel for the system operation phase 3 7 Antenna Connections WARNING Do not connect the antenna cables to the Repeater before verifying the installation parameters specifically the isolation between the antennas DO NOT POWER ON the Repeater without ...

Страница 32: ...ntial for electric shock when installing or using electrically powered equipment To prevent electrical shock when installing or modifying the system power wiring disconnect the wiring at the power source before working with un insulated wires or terminals 3 8 1 Standard Power Connection Power on the Repeater by Connecting the cable from the AC DC converter to the front panel DC Power port Connecti...

Страница 33: ...pproximately four minutes to boot up NOTE The NFPA unit is colored RED Figure 3 10 NFPA Power Connections 3 9 Alarm Connections Notes The alarms can be connected at any time before or after the system is powered on For an illustration of NFPA connections see section 3 9 4 The Repeaters front panel Alarm connector provides two types of alarm connections External Input Alarms connected to external s...

Страница 34: ...d Triggered under one of the following conditions PA Current from FF Temperature High or Built in Test Power Failure Green 5 GND for External Alarm Orange 6 Dry Contact Antenna Malfunction VSWR Alarm Normally Closed Blue 7 Dry Contact Summary Alarm Normally Closed Brown Dry Contact VSWR alarm connection is supported by a pair of wires 3 6 Dry Contact Summary alarm connection is supported by a pair...

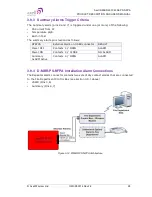
Страница 35: ...t The summary alarm pins respond as follows STATUS External Alarm on USER connector RESULT Power OFF Contacts 4 7 OPEN ALARM Power ON Contacts 4 7 CLOSE NO ALARM Summary ALARM Active Contacts 4 7 OPEN ALARM 3 9 4 D MBR PS NFPA Installation Alarm Connections The Repeater Alarm connector contains two sets of dry contact alarms that are connected to the Fire Department Control Box see section 3 9 1 a...

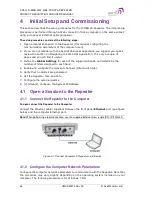
Страница 36: ...gs for each of the supported bands and determine the number of filters assigned to each band 4 Enable and configure the relevant channels Filter Switch tab 5 Verify that no Alarms are generated 6 Set the Repeater time and date 7 Configure the external alarms 8 If relevant configure the System IP Address 4 1 Open a Session to the Repeater 4 1 1 Connect the Repeater to the Computer To open connect t...

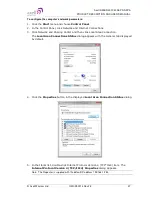
Страница 37: ...ons 3 Click Network and Sharing Center and then click Local Area Connection The Local Area Connections Status dialog appears with the General tab displayed by default 4 Click the Properties button in the displayed Local Area Connection Status dialog 5 In the Items list double click Internet Protocol Version 4 TCP IPv4 item The Internet Protocol Version 4 TCP IPv4 Properties dialog appears Note The...

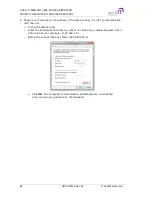
Страница 38: ...dress in the same subnet in order to communicate with the unit In the IP address area Enter the IP address 192 168 1 x where x can be any number between 2 and 250 inclusive For example 192 168 1 9 Define the subnet mask as shown 255 255 255 0 o Click OK The computer communication parameters are now defined and you can open a session to the Repeater ...

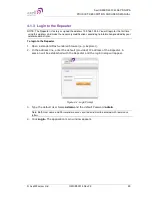
Страница 39: ...ion provided by your network administrator To login to the Repeater 1 Open a standard Flash enabled browser e g Explorer 2 In the address line enter the default provided IP address of the Repeater A session will be established with the Repeater and the login dialog will appear Figure 4 2 Login Prompt 3 Type the default User Name admin and the default Password admin Note Both User name and Password...

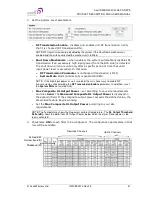
Страница 40: ...rrowband filters 12 5 to 1 000 kHz in 12 5KHz steps Wideband filters 200 to 20 000KHz in 200KHz steps 5MHz filters 5 000KHz 4 2 1 Control Params Tab You can define up to 12 filters according to their bandwidth power gain and gain delta used for noise control The defined filters are graphically displayed in the lower part of the screen To configure the signal level and channels 1 In the topology tr...

Страница 41: ...em Mute alarm Alarms tab is generated RED NOTE If the high input power issue is resolved then it is necessary to enable RF transmission by checkmarking the RF Transmission Enable parameter In addition reset the System Mute alarm click Ack Max Composite DL Output Power set according to your site requirements and click Send The Measured Composite DL Output Power is displayed in the adjacent field If...

Страница 42: ... antennas DL Measured RSSI measured DL signal DL Measured Ch Gain measured DL Gain dB for the selected sub band DL Measured Ch Power measured Power dBm for the selected sub band 6 Set the Uplink parameters NOTE The uplink channels are automatically allocated according to the downlink channel definitions If the site NOISE LEVEL causes interference adjust the noise level as follows Adjust the Gain D...

Страница 43: ...l Wireless Ltd UMCD00013 Rev 2 2 33 8 After the channels have been configured and the required coverage is attained for the location verify that no Alarms are generated Click the Alarms tab Verify that all the indicators are GREEN in the Alarms tab Figure 4 4 Alarms Dialog ...

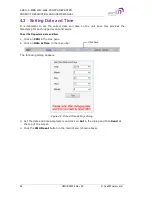
Страница 44: ...nce this provides the timestamp for each logged event and alarm To set the Repeaters date and time 1 Click on CMU in the tree pane 2 Click on Date Time in the menu bar The following dialog appears Figure 4 5 Date Time Settings Dialog 3 Set the date and time parameters and click on Set in the dialog and then Send at the top of the screen 4 Click the CMU Reset button in the main menu shown above Cli...

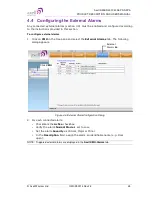
Страница 45: ...xternal alarms 1 Click on CMU in the tree pane and select the External Alarms tab The following dialog appears Figure 4 6 External Alarm Configuration Dialog 2 For each connected alarm Checkmark the Active checkbox Verify the alarm Normal Mode is set to Low Set the alarm Severity as Critical Major or Minor In the Description field assign the alarm an identifiable name e g Door open NOTE Triggered ...

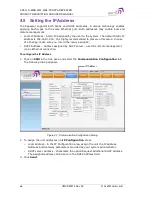
Страница 46: ...e of a change make sure you record the newly assign IP DHCP Address address assigned by DHCP server used for remote management via an Ethernet connection To configure the IP Address 1 Click on CMU in the tree pane and select the Communication Configuration tab The following dialog appears Figure 4 7 Communication Configuration Dialog 2 To assign the unit addresses in IP Configuration area Local ad...

Страница 47: ...vels are available Admin has access to all administration and configuration options including user management Default Password admin and default User Name admin Operator has access to all configuration options except for the Users list or the Loaders screen 5 1 2 Viewing the List of Defined Users To display the User Administration pane From the Tree Pane select Users The list of users is displayed...

Страница 48: ...er Role access level This defines the operations that the user will be able to perform 6 Enter the Password and in Verify Password enter the password again for verification 7 Click OK 5 1 4 Editing a User To modify user definitions 1 From the Tree Pane select Users The list of users is displayed in the User s Pane 2 Select the User to be edited in the list 3 Click Edit The user definitions dialog ...

Страница 49: ...ter and to assign the Repeater a recognizable name To access the Band Information window In the Tree Pane select CMU and click the Axell CMU Info tab Use the Log Level to set the minimum fault level that is logged Other fields provide version and identification information Figure 5 4 CMU Level Info 5 2 2 Viewing Band Level Info Use the Repeater Information screen to view the hardware and software ...

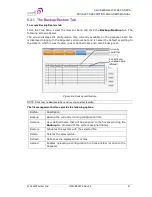
Страница 50: ... backup and restore of the repeater configuration files The procedures are performed via the Backup Restore tab A number of configuration files can be stored on the Repeater for access at any time You can perform the following operations Backup of the currently active configuration Restoring a previously saved file Uploading a configuration file from another location to the Repeater Downloading a ...

Страница 51: ...was created a user defined name can also be assigned Figure 5 6 Backup and Restore NOTE Click links to download files and save to another location The file management buttons provide the following options Button Description Backup Backup the currently running configuration file Remark User defined name that will be assigned to the file saved using the Backup file Instead of the system assigned nam...

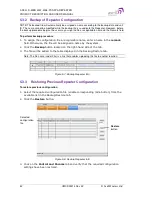
Страница 52: ...mark field Otherwise the file will be assigned a name by the system 2 Click the Backup button located on the right hand side of the tab 3 The file will be added to the table displayed in the Backup Restore tab Note The file name under File is a link that enables uploading the file to another location Figure 5 7 Backup Repeater Info 5 3 3 Restoring Previous Repeater Configuration To restore previou...

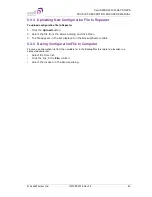
Страница 53: ...ick the Upload button 2 Select the file from the Browse dialog and click Open 3 The file appears in the list displayed in the Backup Restore table 5 3 5 Saving Configuration File to Computer To save a configuration file from the available list in the Backup Restore table to a location in a connected computer Select file from list Click the link in the File column Select the location in the Browse ...

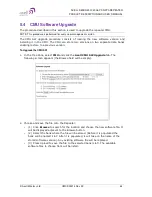
Страница 54: ...ious version To Upgrade the CMU SW 1 In the Tree Pane select CMU and click the Axell CMU SW Upgrade tab The following screen appears the Browse field will be empty 2 Choose and save the file onto the Repeater 1 Click Browse to search for the location and choose the new software file It will be displayed adjacent to the Browse button 2 Select the bank where the file will be stored Before it is popu...

Страница 55: ... 3007 3008 PS NFPA PRODUCT DESCRIPTION AND USER S MANUAL Axell Wireless Ltd UMCD00013 Rev 2 2 45 3 Choose the required software file and click Install 4 The Activity Log will indicate status and upgrade completion ...

Страница 56: ...AXELL D MBR 3007 3008 PS NFPA REPEATER PRODUCT DESCRIPTION AND USER S MANUAL 46 UMCD00013 Rev 2 2 Axell Wireless Ltd ...

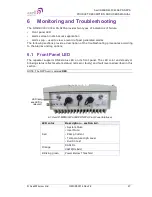
Страница 57: ...n of the troubleshooting procedures according to the Alarms and log options 6 1 Front Panel LED The repeater supports ONE status LED on its front panel The LED color and steady or blinking status reflects system status normal or faulty and fault level as described in this section NOTE The NFPA unit is colored RED 6 1 Axell D MBR 3007 3008 PS NFPA Front Panel Interfaces LED color Description sectio...

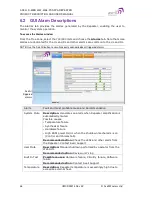
Страница 58: ...ult and most probable cause and Recommendation System Mute Description Generates an alarm when Repeater amplification is automatically muted Possible causes Temperature failure Synthesizer failure Hardware failure High RSSI power DL UL when the shutdown mechanism is on Control and Params tab Recommended action Check the LEDs and other alarm from the Repeater Contact Axell Support User Mute Descrip...

Страница 59: ...n you can raise the value of the DL Output Threshold Delta dBm as needed PAmp Current Description Power Amplifier current is not within limits too high or too low If the Mute option is enabled then this is not a fault since it indicates low Power Amplifier current caused by the mute Recommended action Check the LEDs status in the Repeater and Contact Axell service support RSSI Description Generate...

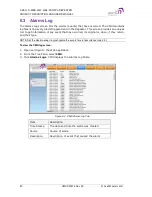
Страница 60: ...ol to get information of any event that has occurred its originator when if they return and their type NOTE Set the clock in order to synchronize the events time of occurrence see 4 3 To view the CMU log screen 1 Open and login to the Web application 2 From the Tree Pane select CMU 3 Click Alarms Logs CMU displays the Alarms Log Table Figure 6 2 CMU Alarms Log Tab Item Description Time Stamp The d...

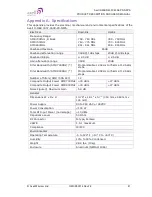
Страница 61: ...uation range 30dB 20dB Filter Bandwidth SMR 700MHz Filter Bandwidth SMR 800MHz Programmable 12 5KHz to 75kHz at 12 5KHz steps Programmable 12 5KHz to 75kHz at 12 5KHz steps Number of filters SMR 700 800 12 Composite Output Power SMR700MHz 30 dBm 27 dBm Composite Output Power SMR800MHz 30 dBm 27 dBm Noise Figure Maximum Gain 5 0 dB General Dimensions W x D x H 13 78 x 18 1 x 5 7 350 mm x 460 mm x 1...

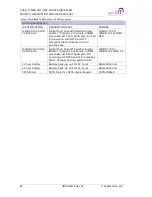
Страница 62: ... 85dB gain AC and DC powering with NFPA and IFC compliant Alarm Outputs and red painted case D MBR 7 8 PS 30DBM 12 FIL NFPA RED D MBR 3007 3008 PS NFPA DC Digital Multi Channel Selective Signal Booster 700 800 12 channels 30dBm composite per band 85dB gain DC powering with NFPA and IFC compliant Alarm Outputs and red painted case D MBR 7 8 PS 30DBM 12F NFPA DC 12 hour battery Battery back up unit ...

Отзывы: