


Setup Pages and Descriptions
50
NXD-700i & NXT-CA7 7” Modero Touch Panels
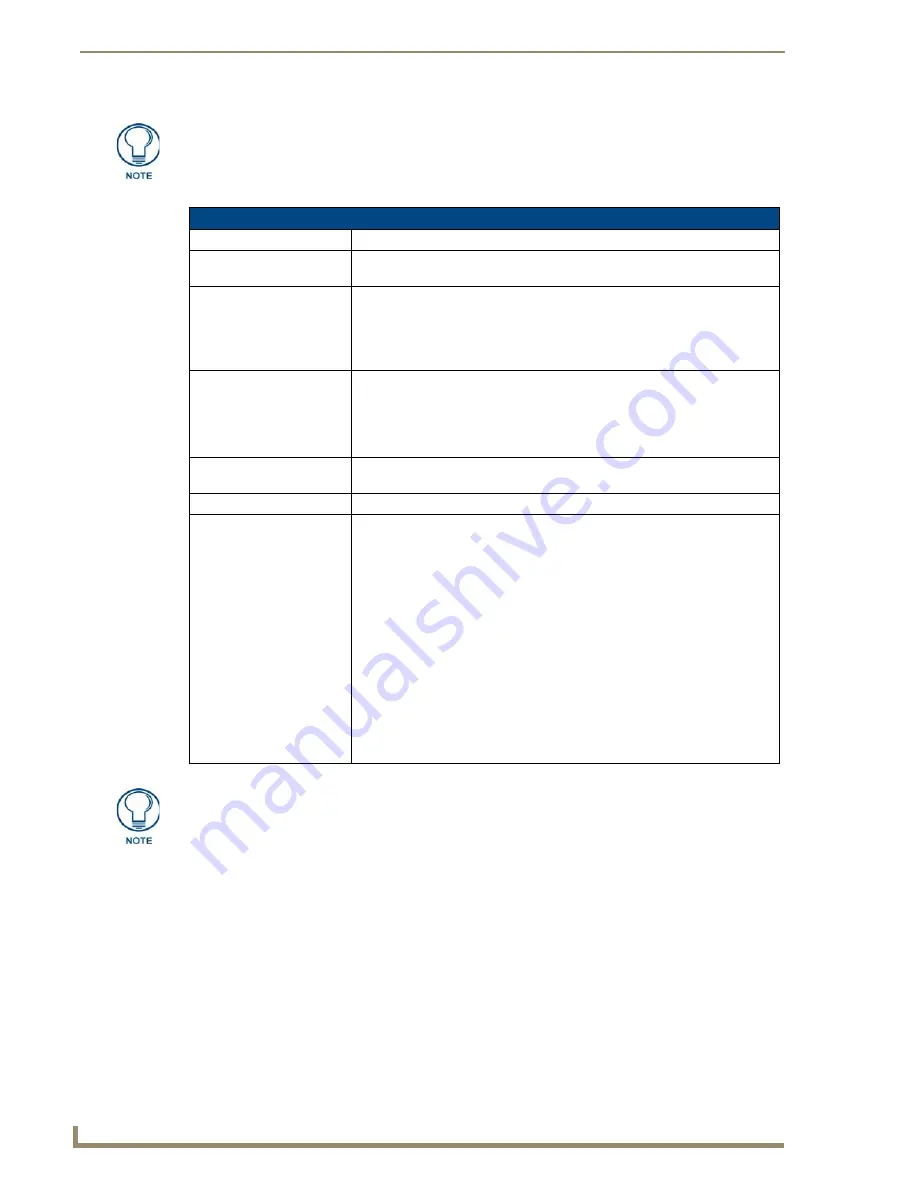
The elements of the
Time & Date Settings
page are as follows:
The only way to modify a panel’s time, without altering the Master, is through NetLinx
code.
Time & Date Settings Page
Back:
Returns to the previously active touch panel page without saving changes.
Wired icon:
The icon to the left of the Connection Status Icon displays that the current
connection to the Master is Wired (image of three networked computers).
Connection Status icon:
This visual display of the connection status allows the user to have a current
visual update of the panel’s connection status regardless of what page is
currently active.
• A Lock only appears on the icon if the panel has established a connection
with a currently secured target Master (
requiring a username and password
).
Time Date Refresh/Set:
This section provides two options:
• The
Get Time/Date
button retrieves the Time and Date information from the
Master.
• The
Set Time/Date
button sets the Master to retain and save any time/date
modifications made on the
Time & Date Setup
page.
Time Display fields:
• These fields display the time in three formats: STANDARD, STANDARD
AM/PM, and 24 HOUR.
Date Display fields:
• These fields display the calendar date information in several different formats.
Set Date/Time:
This section provides a user with both UP/DN arrow buttons to alter the
Master’s calendar date and time. The blue circle indicates which field is
currently selected.
• Select the
Year
field and use the UP/DN buttons to alter the year value
(range = 2000 - 2037).
• Select the
Month
field and use the UP/DN buttons to alter the month value
(range = 1 - 12).
• Select the
Day
field and use the UP/DN buttons to alter the day value
(range = 1 - 31).
• Select the
Hour
field and use the UP/DN buttons to alter the hour value
(24-hour military).
• Select the
Minute
field and use the UP/DN buttons to alter the minute value
(range = 0 - 59).
• Select the
Second
field and use the UP/DN buttons to alter the second value
(range = 0 - 59).
NXD-500i touch panels do not have an onboard clock. This page both receives and
sets the time and date of the NetLinx Master.
Содержание NXD-700i
Страница 4: ......
Страница 12: ...viii NXD 700i NXT CA7 7 Modero Touch Panels Table of Contents...
Страница 30: ...NXT CA7 Installation 18 NXD 700i NXT CA7 7 Modero Touch Panels FIG 19 RJ 45 wiring diagram...
Страница 52: ...Configuring Communication 40 NXD 700i NXT CA7 7 Modero Touch Panels...
Страница 138: ...Programming 126 NXD 700i NXT CA7 7 Modero Touch Panels...
Страница 148: ...Appendix A Text Formatting Codes 136 NXD 700i NXT CA7 7 Modero Touch Panels...
Страница 151: ...Appendix B Complex Script Support 139 NXD 700i NXT CA7 7 Modero Touch Panels...


