


TPI/4 and Panel Interface Setup
27
NXP-TPI/4 NetLinx Touch Panel Interface
TPI/4 and Panel Interface Setup
The information contained within this section refers to the procedures necessary to setup the TPI/4
resolution, assign a touch driver, and calibrate that driver for use with a connected touch panel.
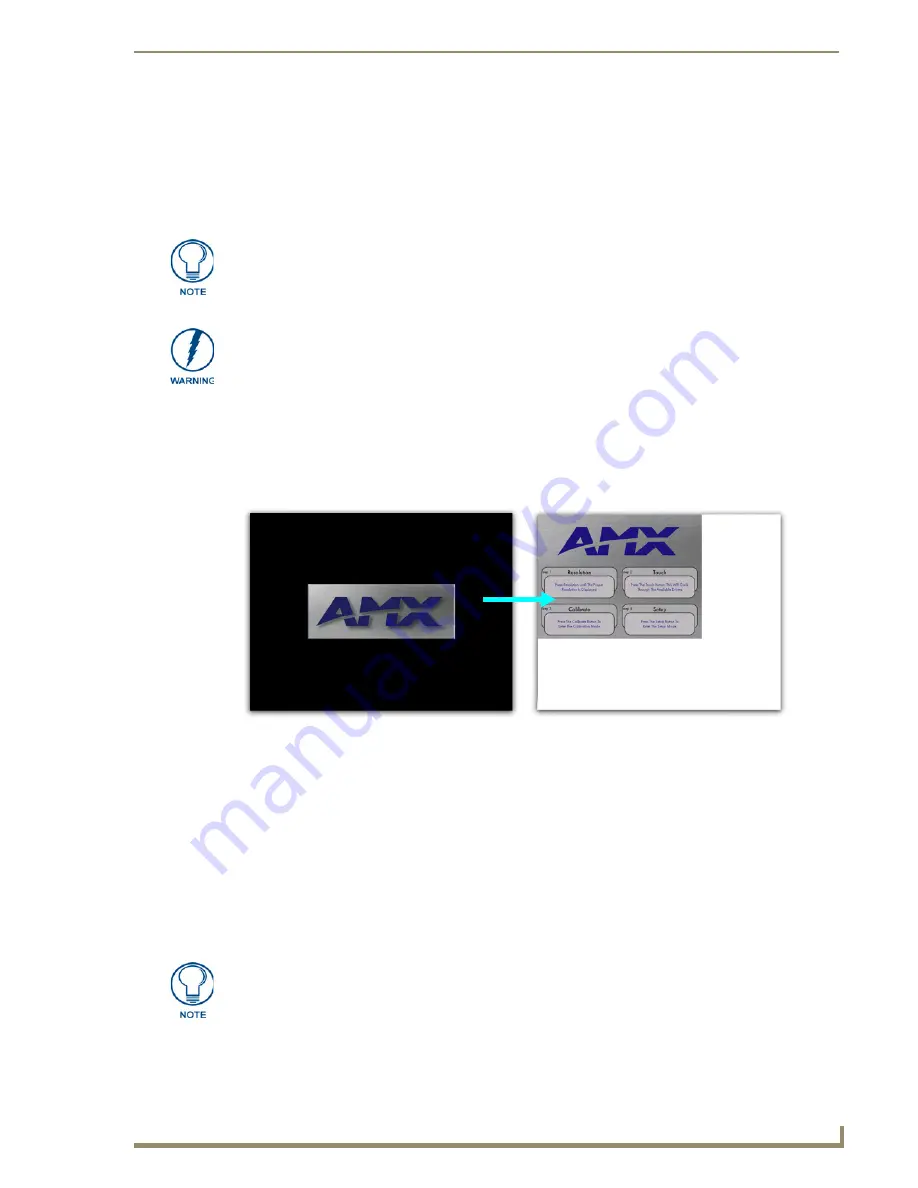
The TPI/4 has not been factory setup with specific touch panel pages. The first splash screen that appears
(FIG. 17) indicates the TPI/4 is receiving power, loading firmware, and preparing to display the default
touch panel page. When the panel is ready, the AMX Splash Screen is replaced by the Initial Panel Setup
page.
TPI/4 Startup Routine and Initial Panel Response
1.
Discharge any acquired static electricity by touching a grounded metal object or by touching the
grounded bolt attached to the rear of TPI/4 unit.
2.
Verify the rear connections are secure and active. Refer to the
Hooking-up the TPI/4 Rear Cable
Connections
section on page 20 for more detailed cable connector information.
3.
Connect the terminal-end of the PSN into an outlet to begin powering-up the unit and initialize the
startup routine.
4.
The initial panel page that appears on the LCD breaks-down the four steps necessary to properly
setup the TPI/4 and use it with either a touch panel or CRT monitor.
The PS/2 or USB mouse must be connected before the initial TPI/4 power-up.
If connected after the unit is powered, the TPI/4 must have power cycled so that it
can detect the newly connected mouse. This detection is most useful when using a
CRT monitor.
Verify you are using the latest NetLinx Master firmware.
Verify you are using the latest TPI/4 firmware (currently is using build 67 or higher.
The TP4 input cards are using the upgraded (version 2) card firmware.
Verify the NetLinx Studio program being used is Version 2.4 or higher.
Verify the TPDesign4 program being used is Version 2.6 or higher.
FIG. 17
Default AMX splash screen and Initial panel page
AMX Splash Screen
(appears during power-up)
Initial Panel Page
(General TPI/4 Setup procedures)
Upon start-up, the panel displays a default page that explains the functions of the four
buttons located on the front of the TPI/4 unit. These on-screen
push-buttons
ARE NOT ACTIVE
and are displayed only for descriptive purposes. Refer to the
following section for more detailed explanations on the use of the front panel buttons.
Содержание NetLinx NXP-TPI/4
Страница 38: ...TPI 4 and Panel Interface Setup 32 NXP TPI 4 NetLinx Touch Panel Interface...
Страница 60: ...Upgrading TPI 4 Firmware 54 NXP TPI 4 NetLinx Touch Panel Interface...
Страница 138: ...Troubleshooting 132 NXP TPI 4 NetLinx Touch Panel Interface...
Страница 147: ...Appendix 141 NXP TPI 4 NetLinx Touch Panel Interface...


