


Configuring Communication
41
NXP-TPI/4 NetLinx Touch Panel Interface
5.
Do not alter the Master Port Number value (
this is the default value used by NetLinx
).
6.
Enter a username and password (
into their respective fields
) if the target Master has been previously
secured.
7.
Press the
Back
button to open the Protected Setup page.
8.
Press the on-screen
Reboot
button to both save any changes and restart the TPI/4.
Master Connection section - NetLinx Master Ethernet IP Address - Listen Mode
In this mode, you must add the TPI/4 IP Address into the URL List of the Master (using NetLinx
Studio). This mode sets the TPI/4 to "listen" for broadcasts from the Master (using the TPI/4’s IP from
its URL list).
1.
Obtain either a Static IP for the TPI/4 (from your System Administrator) or a DHCP Address from
the IP Settings of the System Connection page.
The
DHCP/Static
field (in the IP Settings section of the System Connection page) must be set
to
DHCP
to get Dynamic IP information for the TPI/4.
Press the on-screen
Reboot
button (from the Protected Setup page) to both save any changes
and restart the TPI/4.
After power-up, press the front panel SETUP button to access the Setup page.
Navigate to the
Setup > Protected Setup > System Connection
page and note the newly
obtained Dynamic IP Address information from the IP Settings section. This information is
then entered into the URL List for the connected NetLinx Master.
2.
Toggle the
ICSNET/Ethernet
field until
Ethernet
is selected (
from the Master Connection section of
the System Connection page
).
3.
Press the
Mode
field (to set the connection Mode) until the choice cycles to the word
Listen
.
4.
Enter a username and password (
into their respective fields
) if the target Master has been previously
secured.
5.
Select the
OnLine Tree
tab from the Workspace window.
6.
Select
Diagnostics
>
URL Listing
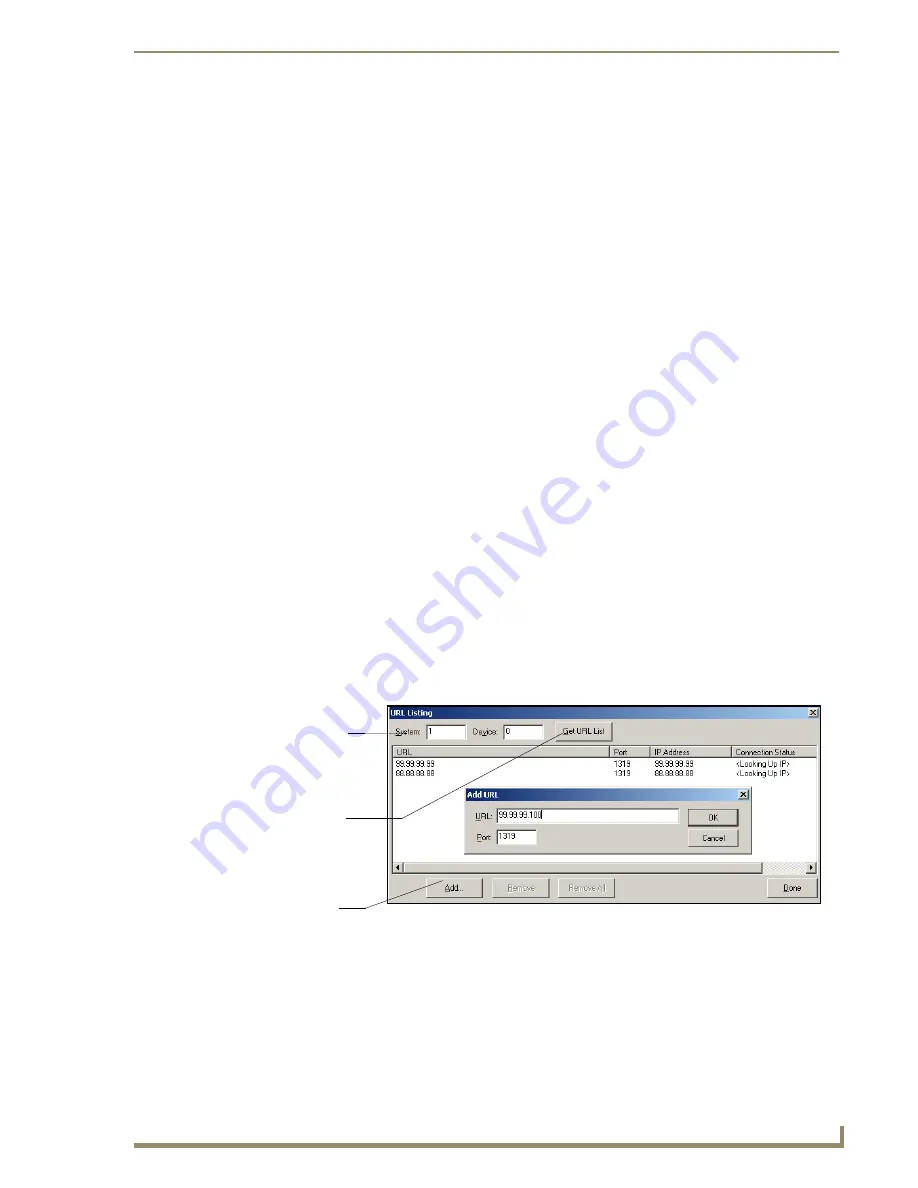
from the Main menu (FIG. 27).
7.
Enter the
System
and
Device
number for the specific Master associated with your TPI/4
(
as seen in the Online Tree tab
).
8.
Click
Add
and enter the IP Address of the TPI/4 into the
Add URL
dialog box.
9.
Click
OK
to enter your IP Address and add it to the list.
10.
Click
Done
once you are finished adding your TPI/4 information to the list.
FIG. 27
URL List dialog
System Address
reflects the value
set in the Device
Addressing tab
Used to obtain an
existing URL
Used to set the
URL List
List from Master
on Master
Содержание NetLinx NXP-TPI/4
Страница 38: ...TPI 4 and Panel Interface Setup 32 NXP TPI 4 NetLinx Touch Panel Interface...
Страница 60: ...Upgrading TPI 4 Firmware 54 NXP TPI 4 NetLinx Touch Panel Interface...
Страница 138: ...Troubleshooting 132 NXP TPI 4 NetLinx Touch Panel Interface...
Страница 147: ...Appendix 141 NXP TPI 4 NetLinx Touch Panel Interface...


