Installation
11
NXP-TPI/4 NetLinx Touch Panel Interface
Step 3: Upgrading the internal EXM memory module
1.
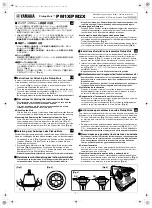
With the housing removed, locate the EXM memory module on the main board. Refer to FIG. 6 for
location information.
2.
Discharge any static electricity from your body by touching a grounded metal object or the
grounding bolt shown in FIG. 4 on page 9.
3.
Firmly grip the metallic braces (located on each side of the memory module) and pull them both
outwards until the previous module pops-up.
4.
Firmly grasp the existing memory module and pull it out at a 45° angle away from the connector
location on the main board.
5.
Remove the memory module upgrade from the anti-static bag.
6.
Firmly grasp the new memory module (
from the edges
) and insert the pins (at a 45° angle) into the
opening on the connector.
FIG. 6
Location of the memory modules
FIG. 7
Removing the memory module
Compact Flash card
Extended memory
Battery
Housing screws
EMI gasket
location
module
Input card
connectors
Pull tabs outward
Module flips upwards
Pull memory
out at a 45° angle
Connector
Alignment
groove
Metallic
braces
Содержание NetLinx NXP-TPI/4
Страница 38: ...TPI 4 and Panel Interface Setup 32 NXP TPI 4 NetLinx Touch Panel Interface...
Страница 60: ...Upgrading TPI 4 Firmware 54 NXP TPI 4 NetLinx Touch Panel Interface...
Страница 138: ...Troubleshooting 132 NXP TPI 4 NetLinx Touch Panel Interface...
Страница 147: ...Appendix 141 NXP TPI 4 NetLinx Touch Panel Interface...