Configuring Communication
22
NXD-500i 5" Modero Wall/Flush Mount Touch Panel with Intercom
8.
Obtain the System Number and Master IP Address from NetLinx Studio. This information must be specific for the
system used with the configured Modero panel.
9.
Press the
Front Setup Access
button for
4 seconds
to open the
Setup
page.
10.
Press the
Protected Setup
button (located on the lower-left of the panel page) to open the
Protected Setup
page.
11.
Press the
System Settings
button (located on the
Protected Setup
page) to open the
System Settings
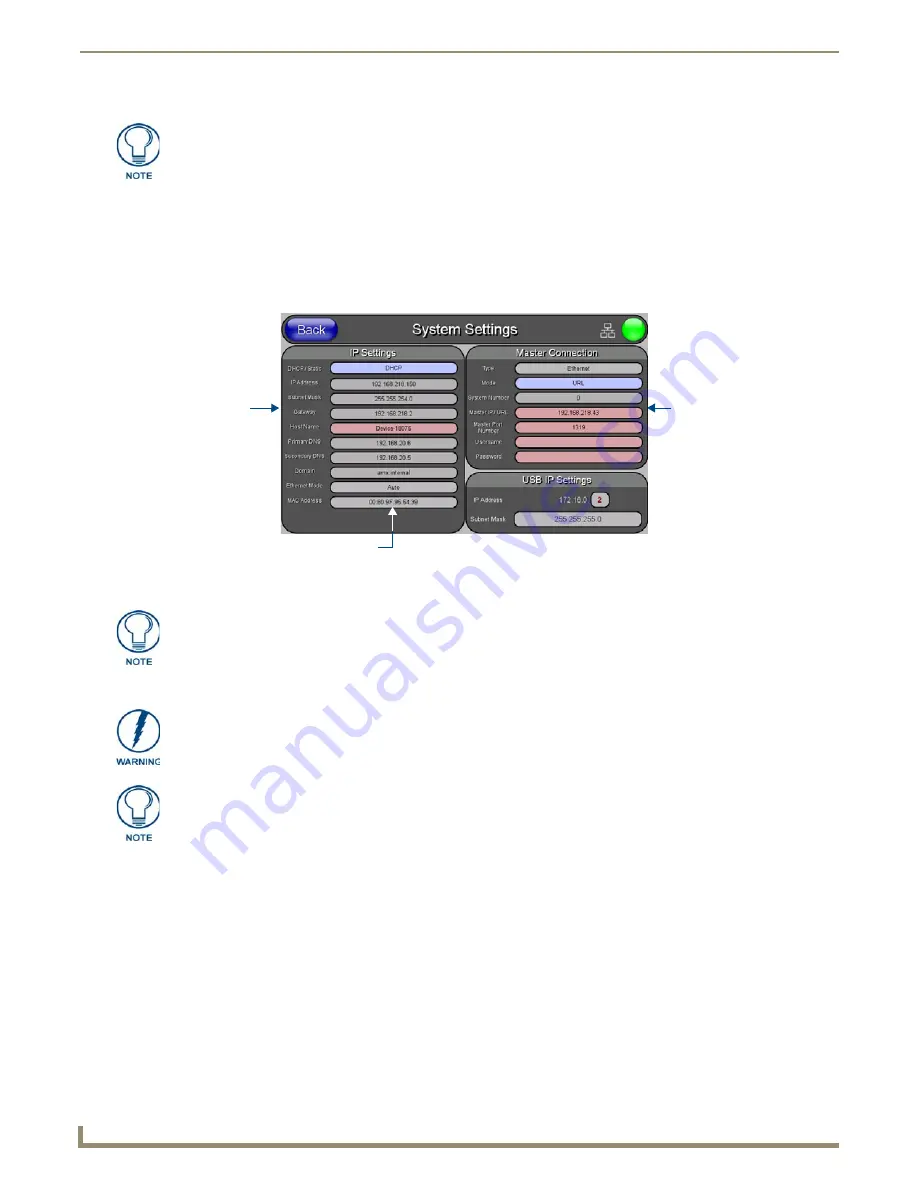
page (FIG. 18)
and begin configuring the communication settings on the panel to match those of the target Master.
Configuring and Using USB with a Virtual Master
NetLinx Studio can be set up to run a Virtual Master where the PC acts as the Master by supplying its own IP Address for
communication to the panel. The PC is first equipped with the USB driver, the panel is then configured for USB
communication, and then Studio is configured to act as the Master.
For a personal computer to establish a connection to a Modero panel via USB, the target computer must have the
appropriate AMX USB driver installed. This installation is bundled into the latest TPDesign4 software setup process or
can be downloaded independently from the main
Application Files
page on
www.amx.com
.
Step 1: Setup the Panel and PC for USB Communication
1.
If you do not currently have the latest version of TPDesign4, navigate to
www.amx.com
>
Tech Center
>
Downloadable Files
>
Application Files
>
NetLinx Design Tools
section of the website and locate the File
Transfer 2 executable (
FT2Setup.exe
). This will install the native RNDIS USB driver when executed.
Before continuing, open NetLinx Studio. This program assists in developing a System
Number, Master IP/URL, and Master Port number. Refer to the NetLinx Master’s
instruction manual for more information.
FIG. 18
System Settings page
MAC Address from panel is factory
NetLinx Master’s
connection
Modero
connection
information
information
set to a unique address
The two possible Master Connection Types available are
USB
or
Ethernet
.
A USB connection type is a
direct connection
from the panel’s mini-USB port to a
corresponding USB port on the PC, which is acting as a Virtual Master.
An Ethernet connection type involves indirect communication from the panel to a
Master via an Ethernet connection to the network.
It is recommended that firmware KIT files only be transferred over a direct connection
and only when the panel is connected to a power supply.
The mini-USB connector
MUST
be plugged into a panel that is already active before
the PC can recognize the connection and assign an appropriate USB driver.
Содержание Modero NXD-500i
Страница 4: ......
Страница 12: ...viii NXD 500i 5 Modero Wall Flush Mount Touch Panel with Intercom Table of Contents...
Страница 30: ...NXD 500i Touch Panel Accessories 18 NXD 500i 5 Modero Wall Flush Mount Touch Panel with Intercom...
Страница 32: ...Panel Calibration 20 NXD 500i 5 Modero Wall Flush Mount Touch Panel with Intercom...
Страница 130: ...Programming 118 NXD 500i 5 Modero Wall Flush Mount Touch Panel with Intercom...
Страница 134: ...Troubleshooting 122 NXD 500i 5 Modero Wall Flush Mount Touch Panel with Intercom...
Страница 140: ...Appendix A Text Formatting Codes 128 NXD 500i 5 Modero Wall Flush Mount Touch Panel with Intercom...
Страница 143: ...Appendix B Complex Script Support 131 NXD 500i 5 Modero Wall Flush Mount Touch Panel with Intercom...


