Amada IS-300CA Скачать руководство пользователя страница 51

CHAPTER 3:  USING PROGRAMMING FUNCTIONS 


IS-300CA INVERTER POWER SUPPLY 

990-418 

3-21


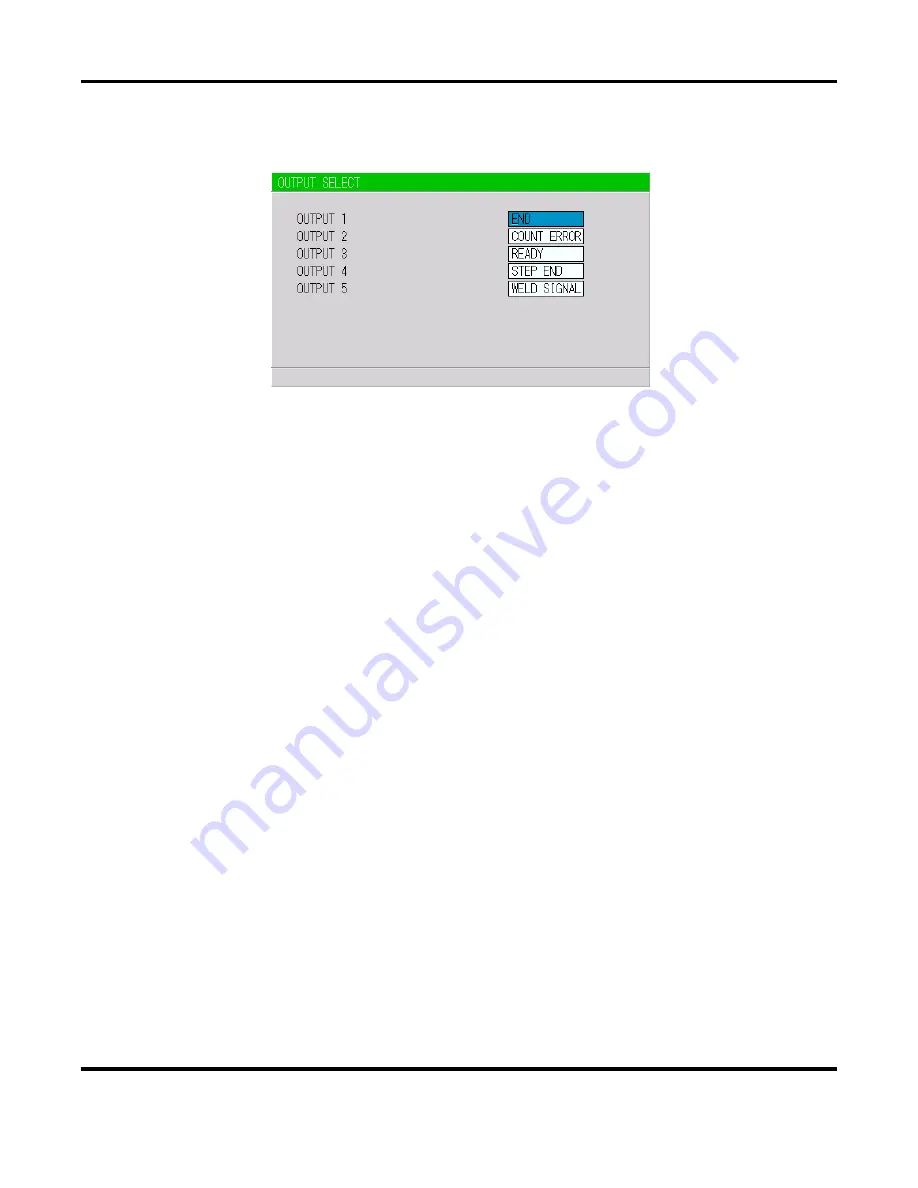
7.  OUTPUT SELECT Screen 

Sets the output signals OUT1 (Pin 28) to OUT5 (Pin 32) of the external output signals.  


NOTE: 

This screen shows initial settings. 


Pressing  the 

+ON

  key  switches  the  signal  in  the  following  order  (in  the  reverse  direction  when 

pressing -

OFF

 key): 


END

 (end signal) 


COUNT ERROR

 (count error signal) 


READY

 (ready signal) 


STEP END

 (step end signal) 


WELD SIGNAL

 (welding timing signal) 


GOOD

 (normal signal) 


COUNT UP

 (count up signal) 


OUT I

 (OUT I timing output) 


OUT II

 (OUT II timing output) 


For output timings of 

END

WELD SIGNAL

GOOD

OUT I

, and 

OUT II

, see the Timing Chart. 


Содержание IS-300CA

Страница 1: ...990 418 REV D INVERTER POWER SUPPLY IS 300CA OPERATION MANUAL...

Страница 2: ...oduced copied exhibited or otherwise used without the written authorization of Amada Weld Tech Printed in the United States of America Revision Record Revision EO Date Basis of Revision A 44980 06 18...

Страница 3: ...o properly and safely operate and maintain the IS 300CA Inverter Power Supply We have made every effort to ensure that the information in this manual is accurate and adequate The contents of this manu...

Страница 4: ...A 660A Program Unit The Pendant 1 6 TROUBLE RESET key 1 6 CURSOR Keys 1 6 ON OFF Keys 1 6 ENTER Key 1 6 MENU Key 1 7 Chapter 2 Installation And Setup Section I Planning 2 1 Environmental Factors 2 1 P...

Страница 5: ...5 UP 1 2 3 3 5 DOWN 1 2 3 3 5 WELD ON OFF 3 8 CTRL 3 8 HEAT 3 10 UF UP SLOPE FIRST 3 10 DL DOWN SLOPE LAST 3 10 NEXT 3 10 PULSATION and transformer screen 3 10 SCHEDULE 3 11 PULSE LIMIT 3 11 PULSATIO...

Страница 6: ...VER DISPL OVER 3 20 7 OUTPUT SELECT Screen 3 21 8 COPY SETUP DATA Screen 3 22 9 MODE SELECT Screen 3 23 DELAY START SET 3 23 START SIGNAL MODE 3 24 END SIGNAL TIME 3 25 END SIGNAL MODE 3 26 WELD TIME...

Страница 7: ...9 3 45 COUNT 1 9 3 45 RP2 3 45 TD 1 9 3 45 CAP CHANGE 3 45 12 PRECHECK Screen 3 46 SCHEDULE 3 46 PRECHECK TIME 3 46 PRECHECK HEAT 3 46 PRECHECK RESISTANCE HIGH 3 46 PRECHECK RESISTANCE LOW 3 46 PRECHE...

Страница 8: ...DISPLACEMENT LIMIT 3 55 DISPLACEMENT DELAY TIME 3 55 DISPLACEMENT MONITOR 3 56 18 PRESSURE REGULATOR Screen 3 56 FORCE CONTROL MODE 3 56 FORCE UNIT 3 57 AIR PRESSURE UNIT 3 57 AIR CYLINDER DIAMETER 3...

Страница 9: ...hen the Welding Does not Start Even if the Start Signal is Input 5 5 Cleaning 5 7 Section II Repair Service Storage Shipment 5 8 Appendix A Technical Specifications A 1 Appendix B Electrical and Data...

Страница 10: ...pabilities of the Power Supply please read this instruction thoroughly before attempting to use it After reading this manual retain it for future reference when any questions arise regarding the prope...

Страница 11: ...ration The meanings of the words and symbols are as follows DANGER DO NOT TOUCH THE INSIDE OF THE POWER SUPPLY UNNECESSARILY High Voltages are present inside the Power Supply Cabinet Do not touch the...

Страница 12: ...y cable The power cable and connecting cables may be damaged which can cause electric shock short circuit or fire If any part needs to be repaired or replaced consult Amada Weld Tech or your distribut...

Страница 13: ...lt if the Power Supply falls over or drops from an uneven surface Keep combustible matter away from the Power Supply Spatter can ignite combustible materials If you cannot remove all combustible mater...

Страница 14: ...ds within three 3 days of Seller s written notice that the Goods have been delivered to the Shipping Point Buyer shall be responsible for all loading costs including freight and insurance costs and pr...

Страница 15: ...ler within thirty 30 days from the date of Seller s invoice If Seller does not have Buyer s financial information and has not provided pre approved credit terms for Buyer the payment must be made in c...

Страница 16: ...INCLUDING ANY a WARRANTY OF MERCHANTABILITY b WARRANTY OF FITNESS FOR A PARTICULAR PURPOSE c WARRANTY OF TITLE OR d WARRANTY AGAINST INFRINGEMENT OF INTELLECTUAL PROPERTY RIGHTS OF A THIRD PARTY WHET...

Страница 17: ...ws rules policies or procedures Buyer shall not transmit export or re export directly or indirectly separately or as part of any system the Goods or any technical data including processes and Services...

Страница 18: ...all be conducted before a panel of three arbitrators Each party shall select one arbitrator and the two arbitrators so selected shall select the third arbitrator who shall act as presiding arbitrator...

Страница 19: ...vanced Unit 200 240 VAC 3 PH 1 325 02 03 IS 300CA ADV 380 480V Advanced Unit 380 480 VAC 3 PH 1 325 02 04 IS 300CA EIP AB 200 240V EtherNet IPTM Unit 200 240 VAC 3 PH 1 325 02 05 IS 300CA EIP AB 380 4...

Страница 20: ...f a variety of items through the menu selection system Applicable to inverter transformers manufactured by various companies by changing the frequency 600Hz to 3000Hz in units of 100Hz for Basic 600Hz...

Страница 21: ...s with built in current coil thermal switch and voltage cable connection The power supply is therefore calibrated for the IT Transformer coils 220ma kA Do not use an external coil connected to the fro...

Страница 22: ...CHAPTER 1 SYSTEM DESCRIPTION IS 300CA INVERTER POWER SUPPLY 1 4 990 418 Front Panel WELD POWER lamp READY lamp START lamp WELD lamp TROUBLE lamp TROUBLE reset key WELD ON OFF key...

Страница 23: ...CHAPTER 1 SYSTEM DESCRIPTION IS 300CA INVERTER POWER SUPPLY 990 418 1 5 NOTE The IS 300CA EtherNet IPTM model connectors are shown here...

Страница 24: ...Control TROUBLE RESET key Pressing this key after the cause of trouble is eliminated while an error message is indicated turns off the error message CURSOR Keys Used to move the cursor or to select an...

Страница 25: ...nd about 5 seconds max to initialize schedules in FLASH ROM During this time do not turn off the power MENU Key Used to display the MENU screen Press this key to return to MENU screen from any other s...

Страница 26: ......

Страница 27: ...90 non condensing Power Requirements Power required for the Power Supply is three phase 200 240 VAC nominal 50 60 Hz or 380 480 VAC nominal 50 60 Hz depending on the model NOTES All items other than I...

Страница 28: ...ture storage or shipment of the Power Supply Electrical Connections DANGER Do not install power to the Power Supply without the input power service being turned off and tagged Serious injury or death...

Страница 29: ...cable to primary of weld transformer 3 If using an IT Series transformer and current and voltage sense is required optional cable 18 046 01 can be connected between the 25 pin D sub on back of the un...

Страница 30: ......

Страница 31: ...l board when a setting is changed or schedule data is copied The READY lamp on the front panel and the external READY signal are turned off during the writing process It takes about 2 seconds max to c...

Страница 32: ...he desired item press the ENTER key to move to the selected screen The numbers 1 to 18 indicate the section number within the chapter 2 POWER SUPPLY STATE Screen This screen is used to display and set...

Страница 33: ...automatically e LANGUAGE Select the language from Japanese and English f MA 660A the Pendant ROM VERSION Indicates the ROM version No of the Pendant g MA 660A the Pendant IS 300CA PROGRAM VERSION Ind...

Страница 34: ...dded to SQZ only for the first weld after start signal in repeat operation SQZ Squeeze time Length of time until proper squeeze is applied to workpiece COOL1 and COOL2 Cooling time 1 and Cooling time...

Страница 35: ...will occur when the Power Supply starts with the following setting When the control methods for the previous and subsequent stages in the multi stage welding are changed The control method for the pr...

Страница 36: ...WELD1 WELD2 and WELD3 Also set the total time of UP and DOWN to be shorter than WELD If not E 10 Schedule setting error will be displayed Upslope Downslope waveform when INT downtime is set to 0 E 10...

Страница 37: ...s set in the pulsation welding The downslope time is set and the HEAT setting of C and the DL HEAT setting of D are different A A B B C D When the upslope time and the downslope times are set in the p...

Страница 38: ...ELD ON OFF signal must all be ON e CTRL Select one from the following six welding current control methods for WE1 WE2 and WE3 respectively Press ON OFF key to switch the setting The initial setting is...

Страница 39: ...coil and the voltage between electrodes with the voltage detecting cable to compare the power calculated by the measured current obtained by calculating with each control frequency and voltage to the...

Страница 40: ...is the as HEAT DL DOWN SLOPE LAST Sets the final current value of downslope The set value is the as HEAT NOTE When UP DOWN is set UF DL becomes effective It becomes a target value in the effective va...

Страница 41: ...AT1 HE AT2 HEAT2 HEAT3 HEAT3 P ULSAT I ON1 PULS AT I O N2 P ULSAT I ON3 V AL VEO U T P U T WEL D C U R RE N T When performing a welding with the setting PULSATION to 02 or more and INT1 to 3 to 0 set...

Страница 42: ...tting to select which of the valves to use Basic models have two valves available while Advanced models have four f CURRENT RANGE Selects the current range in accordance with the welding current to us...

Страница 43: ...ntrol gain the current waveform may experience overshoot On the other hand a smaller control gain suppresses current waveform overshoot but causes a slower increase in current The Power Supply offers...

Страница 44: ...turned off and thus can be checked for the next job b TIME The lengths of periods during which current was supplied in the course of WELD1 WELD2 and WELD3 operations are displayed The latest measured...

Страница 45: ...herefore the value may differ from the measurement value of a weld checker MM 370B etc g STEP The present number of steps is displayed when STEPPER MODE is not OFF on the MODE SELECT screen h STEPPER...

Страница 46: ...screen 1 When WELD2 STOP WELD COUNT is WELD2 STOP and COUNTER is TOTAL TOTAL COUNTER is displayed The count value is incremented by one despite the result of the upper lower limit judgment in monitori...

Страница 47: ...hen WELD2 STOP WELD COUNT is WELD COUNT WELD COUNTER is displayed This is different from WELD COUNTER described above Monitored Value Notes Only the last monitored value and the number of counts of ea...

Страница 48: ...s the settings for 10 kA or 5 kA range In 20 kA CURRENT is 000 0 to 999 9 kA and POWER is 000 0 to 999 9 kW a SCHEDULE Input the number of the SCHEDULE to monitor b TIME Set the upper limit HI and low...

Страница 49: ...herefore when STEPPER MODE is set to ON to perform step up step down for the initial setting the upper lower limit judgment value is stepped up or down automatically EXAMPLE When the current is set to...

Страница 50: ...placement measurement exceeds the upper lower limit DISPL OVER Advanced models ONLY When the final displacement by displacement measurement exceeds the upper lower limit NO CURR When the no current er...

Страница 51: ...ttings Pressing the ON key switches the signal in the following order in the reverse direction when pressing OFF key END end signal COUNT ERROR count error signal READY ready signal STEP END step end...

Страница 52: ...a in IS 300CA is copied to MEMORY of MA 660A When copy is complete END is displayed b IS 300CA MA 660A The data in MEMORY of MA 660A is copied to IS 300CA When copy is complete END is displayed c SCHE...

Страница 53: ...FF OFF OFF ON OFF OFF OFF ON ON OFF 2ND STAGE OFF OFF OFF OFF OFF ON OFF ON ON OFF ON OFF OFF OFF OFF 2ND STAGE OFF SCH1 OFF SCH2 OFF SCH4 OFF SCH8 OFF SCH16 OFF SCH32 OFF SCH64 DELAY START SET Settin...

Страница 54: ...during squeeze time SQZ The welding sequence proceeds to completion when the 2ND STAGE signal stops during Weld 1 time WE1 or later A 2ND STAGE A DELAY START SET Schedule selection 1 2 4 8 16 32 64 1...

Страница 55: ...the end signal output during the start input When OFF is set actually output END time changes depending on the OFF setting even if a value is set for END SIG TIME see below Also this is not output de...

Страница 56: ...e monitored value is outside the upper and lower tolerance limits in the event of an error or when the sequence is interrupted by START SIG MODE MAINTAINED 2 The end signal will be output even when th...

Страница 57: ...osed during the WELD1 sequence operation Refer to Note 2 Current shutoff function When PARITY CHECK is selected Parity check will be performed This check allows for detection of a failure resulting fr...

Страница 58: ...CA INVERTER POWER SUPPLY 3 28 990 418 Closed Blank Open SCHEDULE SCH 1 SCH 2 SCH 4 SCH 8 SCH16 SCH32 SCH64 SCH128 PARITY 1 2 3 4 5 6 7 8 9 10 11 12 13 14 15 16 17 18 19 20 238 239 240 241 242 243 244...

Страница 59: ...WE1STOP signal shuts off current immediately after the WE1 starts the current is supplied for about 1 cycle when input before the WE1 period switching the sequence to COOL1 The WE1STOP signal will not...

Страница 60: ...ied for at least 60ms and neglected for 15ms WELD 5ms INT 10ms This is also effective when the off time OFF is set A welding is stopped when the signal is input before each WE A welding is performed w...

Страница 61: ...s an effect on HEAT only Fixed for UF DL When the HEAT value multiplied by RATIO falls below the UF DL value an error occurs The COUNT value works as each STEP value Example STEP1 0020 STEP2 0010 indi...

Страница 62: ...1 2 4 8 16 T 1 S T S T A GE 2 N D S T A GE Va lve output S OL1 or S OL2 We ld ing sequence Schedu le se lect ion When the 2ND STAGE signal is input the valve signal SOL1 or SOL2 with the selected sch...

Страница 63: ...T The monitor display is not updated When the MONITOR screen is updated the last measured value is displayed Used when the part cycle time is relatively fast Errors are also displayed only when update...

Страница 64: ...ree modes TOTAL GOOD WORK The counter value returns to 0 at the time the setting is changed Count up is done in all cases only when WELD is ON TOTAL Count up increment of 1 is done despite the result...

Страница 65: ...onitoring Judgment in Monitor Counting Manner GOOD normal WELD Counter counts up WORK Counter counts up increment of 1 when WELD Count reached the set value Upper lower limit monitor CAUTION ERROR WEL...

Страница 66: ...key will change the display to the MODE SELECT 1 screen 10 MONITOR MODE Screen NOTE This screen shows initial settings The display surrounded with frame changes depending on the setting of WELD2 STOP...

Страница 67: ...ayed 1 2 3 4 5 6 7 1 2 3 4 5 1 2 1 2 2 2 3 0 1 C A U T I O N C A U T I O N G O O D G O O D G O O D G O O D Judg ment range Nu mber of we lds C O U N T U P C O U N T U P count va lue count va lue E R R...

Страница 68: ...PEN Open at normal Closed at error WELD2 STOP WELD COUNT is WELD2 STOP and COUNTER is WORK Set WELD COUNT and WORK COUNT When PRESET WELD COUNT is set to 0 the weld count is not incremented Also when...

Страница 69: ...signal is output if the number of welds deposited while the external weld count signal is input is smaller than the value set for PRESET COUNT weld count signal is turned off before the number of weld...

Страница 70: ...current or no voltage error The TROUBLE lamp will light up and operation will stop if the monitored current or voltage falls below the level set here In the case of primary current control supplying c...

Страница 71: ...od in the monitored value to be displayed EXCLUDE Slope period will not be included INCLUDE Slope period will be included g WELD STOP OFF TIME Sets the neglecting time of the welding stop signal for e...

Страница 72: ...at to decrease the welding current is called the step down function Set the step up or step down timing based on the number of welds When the set number of welds is complete the step end signal STEP E...

Страница 73: ...g completion of the specified number of welds for STEP2 LINER S T E P2 S TE P1 S TE P4 S TE P3 S TE P5 100 F I XE D Current Nu mber of we lds Set va lue of STE P5 Set va lue of STE P4 Set va lue of ST...

Страница 74: ...is set to ON to perform step up step down for the initial setting the upper lower limit judgment value is stepped up or down automatically RATIO has an effect on HEAT only Fixed for UF DL When the HEA...

Страница 75: ...PTM Models ONLY Set the chip dress for each STEP When TD is set X is displayed For STEP with the tip dress setting the tip dress error occurs following completion of the specified number of welds h CA...

Страница 76: ...ent value To use the pre check function the secondary current voltage needs to be monitored a SCHEDULE Select from 1 to 255 to set the SCHEDULE Normally select 1 first then select additional schedules...

Страница 77: ...hen the corresponding input signal is ON The asterisk disappears if the signal is OFF Set the cursor reading to 0 to turn OFF the output signal and 1 to turn it ON Reception of an input signal while t...

Страница 78: ...screen will reflect the settings shown in this chapter b NO Returns the display to the MENU screen without initializing the Power Supply memory 15 PROGRAM PROTECT MODE Screen When this function is use...

Страница 79: ...3 Turn off the power supply and turn on it again or disconnect the MA 660A with the power supply turned on and connect to the circuit cable again When PROGRAM PROTECT is ON the display of the MENU scr...

Страница 80: ...SCHEDULE Select from 001 to 255 to set the SCHEDULE Normally select 001 first then select additional schedules in sequential order b PROP VALVE Two electro pneumatic proportional valves can be connect...

Страница 81: ...e ENTER key or input the STEP MODE signal The force set in WE1 is output to the electro pneumatic proportional valve ANALOG OUT and WE1 and CONTINUE blink The measured value input in the force input A...

Страница 82: ...lectro pneumatic proportional valve ANALOG OUT output during SQD e SQZ Set the force of the electro pneumatic proportional valve ANALOG OUT output during SQZ f WE1 Set the force of the electro pneumat...

Страница 83: ...on the I O terminal block are used for valve output FORGE VALVE 1 EX SOL1 FORGE VALVE 3 EX SOL3 FORGE VALVE 2 EX SOL2 FORGE VALVE 4 EX SOL4 When VALVE MODE is 2 VALVE FORGE VALVE is fixed to 4 EX SOL4...

Страница 84: ...VE MODE setting on the MODE SELECT screen When VALVE MODE is 1 VALVE The forge valve operates from the end of SQD through the forge delay time elapses When VALVE MODE is 2 VALVE The forge valve operat...

Страница 85: ...QD through the end of SQZ The presence or absence and overlapping of work piece can be detected In WORK DETECT LIMIT set the upper limit HIGH and the lower limit LOW in consideration of the difference...

Страница 86: ...ng set the time in consideration of the timing to make a displacement measurement Up to the time set in HOLD can be set In DISPLACEMENT MONITOR the head travel distance the degree of work piece collap...

Страница 87: ...electro pneumatic proportional valve ANALOG OUT is output Regardless of welding sequence operation the CALIBRATION CONSTANT FORCE setting is output to the electro pneumatic proportional valve ANALOG...

Страница 88: ...DIAMETER or MAX AIR PRESSURE so that the set value and the measured value become the same Set the force used to CALIBRATION CONSTANT FORCE The force is applied by changing UP on the left side of CALI...

Страница 89: ...parts They could get caught and cause injury Before You Start Before operating the Power Supply you must be familiar with the following The principles of resistance welding and the use of programmed...

Страница 90: ...n 6 Move the cursor to SCHEDULE and press the ENTER key 7 Set each item as described in Chapter 3 NOTE For initial set up current settings should be a little lower than predicted to prevent work piece...

Страница 91: ...ply green READY lamp is on 5 Start the weld sequence and confirm that the welding current is flowing normally by checking the red WELD lamp and the Monitor screen 6 Make any necessary adjustments to t...

Страница 92: ......

Страница 93: ...ected Check start signal input cable E 05 TRIP OF EXTERNAL THERMO Temperature of welding transformer rises and external thermostat input circuit opens Lower the transformer temperature When using a wa...

Страница 94: ...etting including RATIO setting is the UF or DL setting Although STEPPER MODE is set to LINEAR or FIXED STEPPER COUNT of STEP is set to 0 The methods of welding current of a series of WELDs without COO...

Страница 95: ...t signal is present Input schedule signal present before start signal See Chapter 3 Section 4 for details E 17 AC 50 60 FREQUENCY FAILURE Frequency of incoming power supply is not stable and equipment...

Страница 96: ...nter E 29 PHASE MISSING An error is detected on the welding power supply Confirm that the welding power supply is input correctly E 30 POWER FAILURE The power is out during welding Check the cause for...

Страница 97: ...THOUT EXTENSION BOARD IS 300CA Advanced ONLY The optional extended board is not connected Recycle power If the E 39 WITHOUT EXTENSION BOARD is displayed again repair is required Contact Amada Weld Tec...

Страница 98: ...the Power Supply to display the monitor error when the monitor data is beyond below the upper lower limit data communication time Tb2 The data communication time at end Tb is shown in the table below...

Страница 99: ...aning CAUTION When cleaning the exterior of the Power Supply do not use paint thinner benzene or acetone These chemicals can damage the surface finish on the Power Supply Use a dry cloth or if it is h...

Страница 100: ...eparation for Storage or Shipment 1 Disconnect power to the Power Supply then wait 20 minutes after power is removed before completing the rest of these procedures 2 Disconnect all load wires 3 Discon...

Страница 101: ...e value control Secondary constant current effective value control Secondary constant power effective value control Primary constant current peak value control Secondary constant voltage effective val...

Страница 102: ...VEx RET SOLx VALVE RELAY SOL RELAY Advanced unit Control gain GAIN 1 9 Setting range HEAT Constant current control Note 2 20kA range 01 0 20 0 kA 10kA range 0 5 9 99 kA 5kA range 0 05 5 00 kA Constant...

Страница 103: ...t is not detected in Secondary constant current effective value control Secondary constant power effective value control or Constant phase control b When a primary current is not detected in Primary c...

Страница 104: ...APPENDIX A TECHNICAL SPECIFICATIONS IS 300CA INVERTER POWER SUPPLY A 4 990 418 Duty Cycles...

Страница 105: ...rations The I O signals can be configured for SOURCING or SINKING The IS 300CA Basic and Advanced come configured as SINKING Customer can change the input terminals to SOURCING The IS 300CA EtherNet I...

Страница 106: ...CA is calibrated with the Amada Weld Tech IT Transformers with built in current coil If a non IT Transformer is used and an external coil is required the COIL IN signal has to be re calibrated RS 232C...

Страница 107: ...S 485 allows multiple Power Supplies to be daisy chained to a host TRANSFORMER SENSING CONNECTOR OF SENSE CABLE TO IT TRANSFORMER PIN DESCRIPTION A Common Thermostat B Thermostat C Voltage D Current E...

Страница 108: ...SUPPLY B 4 990 418 DISPLACEMENT SENSOR CONNECTOR Advanced and EtherNet IPTM Models ONLY Recommended Displacement Sensor Heidenhain St3078 15 pin D sub female PIN DESCRIPTION 1 Asig 2 GROUND 3 Bsig 4 5...

Страница 109: ...FTSW 3 Connect any Amada Weld Tech EZ AIR weld head firing switch Foot switch FTSW 1 to GND FTSW 2 to TB1 16 1st FTSW 4 to TB1 15 COM FTSW 3 to FS 2 Connect Amada Weld Tech footswitch Valve Power IN...

Страница 110: ...dvanced and EtherNet IPTM model Advanced EtherNet IPTM Connector Pin out Comment Displacement See DISPLACEMENT SENSOR CONNECTOR above Analog See 26 pin D Sub ANALOG connector below Firing switch E Sto...

Страница 111: ...B 16 1st FTSW 4 to TB 15 COM FTSW 3 to FS 2 Connect footswitch Valve PWR J2 3 to TB 35 SOL POWER J2 4 to TB 34 SOL COM External 24VDC Power supply Valve OUT Pin 1 VALVE 1 Pin 2 VALVE 2 Pin 3 VALVE 3 P...

Страница 112: ...EP STEP MODE For sourcing connect pin 26 24V to the input switches instead of 24 GND Configure EXT COM on TB1 connector to COM CAUTION EtherNet IPTM default is signal Sourcing If switching to Sinking...

Страница 113: ...10 CURRENT COM CURRENT OUT Current output 0 10 VDC 2 Vout Iout 5000 11 12 VOLTAGE COM VOLTAGE OUT Voltage output 0 10 VDC 2 Vout Vfeedback 2 14 INT 24VDC GND COM COM pin This pin is internally connect...

Страница 114: ...8 9 RY 12 16 17 18 19 20 21 22 24 25 23 13 14 15 11 10 24 V D C E XT C O M S C H16 C O M C O M E R R O R RESET STE P RE SET FL O WS W IT C H 2 N D 1 ST S C H64 S C H32 S C H128 C O M I NT 24 V ST O P...

Страница 115: ...LT SE N S O UT1 O UT2 O UT3 O UT4 O UT5 N G1 E R R O R N G2 C A U T I O N NOTE Signal sinking is shown for I O s For Sourcing connect INT 24V to the input switches instead of COM 24V GND Connect EXT C...

Страница 116: ...h when using starting signal self hold input Open for 20ms or more when stopping 4 COM COM pin This pin is internally connected to the GND chassis 5 6 7 8 9 10 11 12 SCH 1 SCH 2 SCH 4 SCH 8 SCH16 SCH3...

Страница 117: ...an adjust or check the force position When the 2ND STAGE pin is closed after this a welding can be done at the most appropriate force position Maintaining the 1ST STAGE input pin ends even if it is cl...

Страница 118: ...pin This signal is output upon completion of the welding sequence in the event of an operational error If an error occurs operation will halt until the reset signal is input In NORMAL CLOSE the pin is...

Страница 119: ...ween SQD and HOLD When the off time OFF is set this pin is output between SQZ and HOLD after the second sequence The contacts are rated at 120 V AC or 24 V AC DC at 0 5 A semiconductor switches Use a...

Страница 120: ...hen required number of welds are added to make up for insufficiency the count error signal is output until the insufficient number of welds is complete READY Closed when no error occurs and the WELD O...

Страница 121: ...VERTER POWER SUPPLY 990 418 B 17 Input Signal Connections 1 Connection with equipment having a contact input Connect pins 1 and 2 2 Connection with equipment featuring NPN sink open collector output u...

Страница 122: ...nnect the negative side of an external 24 VDC power supply to pin 2 Connection with equipment featuring NPN sink open collector output using external power supply Connect the positive side of an exter...

Страница 123: ...welding sequence from the beginning of initial squeeze delay time through the end of hold time the welding sequence will halt at that point Note that the END signal depends on the END SIG MODE settin...

Страница 124: ...or SOL2 2ND STAGE A DELAY START SET SQD SQZ U U D D WE1 WE2 U D HO CO1 CO2 WE3 Start Signal Input in Pulsed Mode Latched Mode The welding sequence halts if the 2ND STAGE signal stops during squeeze ti...

Страница 125: ...L1 S OL2 E N D B C C B P RE C HE C K HE A T1 HE A T2 HE A T3 P RE C HE C K HE A T1 HE A T2 HE A T3 G O O D A DEL A Y S T A R T SE T Note 1 We ld ing current Current f lo w t i m ing Note 2 Note 2 O U...

Страница 126: ...500 to 3000 0 4 B END SIG TIME setting The output time changes depending on the OFF time See Chapter 3 Section 10 sub section c End Signal Time C Monitored value judgment time 200 s max Note 1 To stop...

Страница 127: ...S QZ A H O WEL D S OL1 S OL2 2 N D S T A GE 1 S T S T A GE We ld ing current TW 2ND STAGE input standby state A DELAY START SET setting Welding preparation time When the 2ND STAGE is input before the...

Страница 128: ...APPENDIX C SYSTEM TIMING IS 300CA INVERTER POWER SUPPLY C 6 990 418 Repeat Operation Repeat operation will occur whenever the Off time is set to any value other than zero 0 Repeat Operation...

Страница 129: ...ULS ATI O N1 P ULS ATI O N2 P ULS ATI O N3 HE A T3 HE A T3 Note 1 Note 2 Note 3 We ld ing current O U T I O U T I I Note 1 Repeat operation times set for PULSATION1 in WELD1 and INT1 set times When P...

Страница 130: ...ER SUPPLY C 8 990 418 Re Weld Re weld will occur when Re Weld is set On Mode Select screen and a current monitor error occurs as a low weld current shown below Under that circumstance a re weld will o...

Страница 131: ...CA INVERTER POWER SUPPLY 990 418 C 9 Interrupt Interrupt will occur when Interrupt is set On Mode Select screen and an Interrupt signal is applied during a weld sequence The weld cycle is immediately...

Страница 132: ...VE Note 3 We ld ing sequence 1 ST ST A GE 2 N D ST A GE E N D F O R GE DEL A Y Note 1 The RELAY SW signal is not output when VALVE is set to 1 It is output from SQD to HOLD only when VALVE is set to 2...

Страница 133: ...t the operation after start is the same In this example the CHAINING settings for SCHEDULE1 2 5 and 6 are ON and those for other SCHEDULEs are OFF Since the 2ND STAGE signal is OFF when the sequence o...

Страница 134: ...ut at the end of each SCHEDULE Example At 1 stage start operation For 2 stage start the start method is different but the operation after start is the same In this example the SUCCESSIVE settings for...

Страница 135: ...me set by DEL A Y S T A R T SE T RE T R A C T I O N 1 2 in 1 S T 2 N D S T A GE in T2 Durat ion of E N D output s igna l C O1 WE2 C O2 WE3 H OL D b c d e DEL A Y T I ME i g h OFF S Q D S QZ a R C C P...

Страница 136: ...r arrives at the set displacement h at the above figure the weld3 stop is stopped to make the sequence move to HOLD e Delay time When the delay time is set on the DISPLACEMENT screen the displacement...

Страница 137: ...set to RS 232C Remote Programming Advanced users may wish to perform programming for custom welding applications The codes needed to perform remote programming are listed in Section II Communications...

Страница 138: ...s of status data Data Transmission ITEM CONTENT Transmission Mode Select only one mode at MODE SELECT screen RS 232C RS 485 requires factory installed RS 485 option Transmission Rate Select either of...

Страница 139: ...number to more than one device Also do not send data simultaneously from two or more devices in the single directional communication mode Otherwise data collision and inappropriate system operations m...

Страница 140: ...Schedule No Fixed to 3 digits 001 to 255 C Unit of monitor time m ms C CYC D Monitor time of WE1 Fixed to 3 digits 000 to 999 ms Fixed to 3 digits 000 to 050 CYC E Monitor current of WE1 Fixed to 4 d...

Страница 141: ...Fixed to 4 digits 0000 to 9999 X COUNTER WORK of TOTAL GOOD WORK Fixed to 6 digits 000000 to 999999 The following additional commands are for IS 300CA Advanced EtherNet IPTM only Y STEP No of VALVE4 F...

Страница 142: ...ed to 3 digits 001 to 255 C 1 Error code 1 Fixed to 3 digits E01 to E39 D 1 Error code 2 Fixed to 2 digits 01 to 39 E 1 Error code 3 Fixed to 2 digits 01 to 39 F 1 Error code 4 Fixed to 2 digits 01 to...

Страница 143: ...CA 1 Schedule numbers SH1 SH2 and SH3 are fixed to 000 However schedule numbers are sent from IS 300CA when E06 Current error E18 Voltage error E19 Electric power error and E07 Pulse width error occur...

Страница 144: ...dule No Screen No Data Example Write data for a schedule of Screen No 01 of Schedule No 008 of the specified device No 01 Host I D 1 I D 2 W S H 1 S H 2 S H 3 S S C 1 S C 2 Data C R L F 0 1 0 0 8 0 1...

Страница 145: ...ELD2 n 3 Control mode of WELD3 n 4 Unit of time 1 n m ms C CYC 5 SQD Squeeze delay time nnnn 0000 to 9999 ms mode 0000 to 0999 CYC mode 6 SQZ Squeeze time nnnn 0000 to 9999 ms mode 0000 to 0999 CYC mo...

Страница 146: ...n 0 50 to 9 99 0 05 to 5 00 kA kW 0 20 to 9 99 V 25 HEAT2 Heat 2 nn n 01 0 to 20 0 kA kW 10 0 to 99 9 n nn 0 50 to 9 99 0 05 to 5 00 kA kW 0 20 to 9 99 V 26 DL2 End heat 2 of downslope nn n 01 0 to 20...

Страница 147: ...en 05 SYSTEM data 3 Screen 02 MONITOR SET data Specific data in accordance with Schedule No Schedule No 001 to 255 Example of data writing Basic Advanced and EtherNet IPTM 01W001S02 999 000 99 99 00 0...

Страница 148: ...L of WE2 lower limit nn nn 00 00 to 99 99 kW nnn n 000 0 to 999 9 kW 18 PULSE H of WE2 upper limit nnn n 010 to 100 19 TIME H of WE3 upper limit nnn 000 to 999 ms mode 000 to 050 CYC mode 20 TIME L of...

Страница 149: ...nnn 050 to 200 15 STEP8 COUNT of VALVE1 nnnn 0000 to 9999 16 STEP8 RATIO of VALVE1 nnn 050 to 200 17 STEP9 COUNT of VALVE1 nnnn 0000 to 9999 18 STEP9 RATIO of VALVE1 nnn 050 to 200 19 START ON STEP o...

Страница 150: ...9999 8 RATIO of STEP3 nnn 050 to 200 9 TIP DRESS of STEP3 n 0 OFF 1 ON X 10 COUNT of STEP4 nnnn 0000 to 9999 11 RATIO of STEP4 nnn 050 to 200 12 TIP DRESS of STEP4 n 0 OFF 1 ON X 13 COUNT of STEP5 nnn...

Страница 151: ...ms mode 000 to 050 CYC mode 8 CURRENT of WELD2 n nn 0 00 to 9 99 kA nn n 00 0 to 99 9 kA 9 VOLT of WELD2 n nn 0 00 to 9 99 V 10 POWER of WELD2 nn nn 00 00 to 99 99 kW nnn n 000 0 to 999 9 kW 11 PULSE...

Страница 152: ...LSE of WELD2 nn n 00 0 to 99 9 12 TIME of WELD3 nnn 000 to 999 ms mode 000 to 050 CYC mode 13 CURRENT of WELD3 nn nn 00 00 to 9 999 kA nnn n 000 0 to 999 9 kA 14 VOLT of WELD3 n nn 0 00 to 9 99 V 15 P...

Страница 153: ...A Basic Screen 06 SYSTEM data Common data Schedule No 000 Item Contents Character String Range 1 1 POWER SOURCE FREQUENCY nn 50 or 60 Hz 2 1 Model name nnnnnnnn IS 300A is same as IS 300CA 3 1 ROM VER...

Страница 154: ...DE 1 INCLUDE 29 WELD STOP OFF TIME of WELD1 nnn 000 to 999 ms 30 WELD STOP OFF TIME of WELD2 nnn 000 to 999 ms 31 WELD STOP OFF TIME of WELD3 nnn 000 to 999 ms 32 OUTPUT MODE of NG SIGNAL SELECT n 0 N...

Страница 155: ...T n 0 WELD2 STOP 1 WELD COUNT 10 WELD3 STOP COUNT RESET n 0 WELD3 STOP 1 COUNT RESET 11 WELD TIME n 0 ms 1 CYC 12 RE WELD n 0 OFF 1 ON 13 SCHEDULE n 0 EXT 1 INT 14 STEPPER MODE n 0 OFF 1 FIXED 2 LINER...

Страница 156: ...ION 40 WORK OVER of NG SIGNAL SELECT N 0 ERROR 1 CAUTION 41 DISPLOVER of NG SIGNAL SELECT n 0 ERROR 1 CAUTION 42 1 PROGRAM PROTECT n 0 OFF1 ON 43 1 CONTRAST n 0 to 9 44 1 CONTROL nn 01 to 31 45 PROGRA...

Страница 157: ...or Error Codes see Chapter 5 Maintenance IS 300CA Advanced EtherNet IPTM Screen 07 Error data Common data Schedule No 000 Error data confirmation Data reading only Item Contents Character String Range...

Страница 158: ...Character String Range 1 1 STEP MODE n 0 OFF 1 ON 2 PROPVALVE n 1 to 2 3 SQD FORCE nnnnn 00000 to 35000 N 00000 to 03569 kgf 00000 to 07868 lbf 4 SQZ FORCE nnnnn 5 WELD1 FORCE nnnnn 6 COOL1 WELD2 FOR...

Страница 159: ...UT DISPLC 99 999 to 99 999 mm WELD STOP INPUT CURR 0000 05 to 0005 00 kA 5kA range 0000 50 to 0009 99 kA 10kA range 00001 0 to 00020 0 kA 20kA range WELD STOP INPUT VOLT 0000 20 to 0009 99 V WELD STOP...

Страница 160: ...W UP DW of VALVE1 n 0 UP 1 DOWN 10 CONSTANT LOW of VALVE1 nnnnn 00000 to 35000 N 00000 to 03569 kgf 00000 to 07868 lbf 11 1 CONSTANT HIGH UP DW of VALVE1 n 0 UP 1 DOWN 12 CONSTANT HIGH of VALVE1 nnnnn...

Страница 161: ...nal sample program of the Allen Bradley 1769 L32E PLC that communicates to the Bus Controller This file is located under the folder IS_Series_AB_EthernetIP RSLogix_PLC 40368 IS_1769_L32E ACD An L5K di...

Страница 162: ...APPENDIX E EtherNet IPTM COMMUNICATIONS IS 300CR INVERTER POWER SUPPLY E 2 990 418 System Hardware Overview...

Страница 163: ...s below to configure the bus controller IP address Setting up the IPAddress of the Bus Controller In order to connect to the bus controller webserver via a web browser at IP address 192 168 100 1 we w...

Страница 164: ...onnection Set the IP address on your PC 192 168 100 x example 192 168 100 10 Note Do not set x to 1 this IP address is reserved for the Bus Controller Connect the PC Laptop directly to the first netwo...

Страница 165: ...lect on Login Enter the User name and Password as shown then select OK User name admin Password X20BC0088 Now the bus controller IP address can be modified to a different IP 10 0 0 1 by setting all th...

Страница 166: ...dley PLC ACD project Option 1 Add an Ethernet communication module to a new ACD project on an Allen Bradley PLC refer to page E 7 Option 2 If the machine builder already has an existing functional All...

Страница 167: ...lder can use these samples as a starting point for an ACD project These sample ACD files are located under the IS_Series_AB_EthernetIP RSLogix_PLC folder of the installation package After the ACD proj...

Страница 168: ...418 Example 2 IS_1769_L32E ACD has the Bus Controller IP address pre assigned with 10 0 0 1 Before downloading this opened ACD project make sure the Project Path to the controller backplane is set cor...

Страница 169: ...ler type The sample steps below demonstrate how to open an existing IS_1769_L32E ACD and convert it to the machine builder PLC assume it is an Allen Bradley 1756 Open the ACD project file IS_Series_AB...

Страница 170: ...select YES to confirm If the ACD project is converted successfully it should include the Ethernet communication module as shown below All of the Controller Tags Task program routines and Data Types sh...

Страница 171: ...ler IP address to connect to is correct by double clicking on the ETHERNET MODULE ST1 to open the Module Properties Report window and verify the IP address If for some reason the ACD controller type c...

Страница 172: ...w to add the Ethernet module through the RSLogix5000 backplane and import the data types tags and program routines To add a new Ethernet communication module first highlight the PLC backplane and perf...

Страница 173: ...UPPLY 990 418 E 13 When the New Module window is opened enter the name LocalENB and IP Address of the Allen Bradley PLC In this example the IP address 10 0 0 2 is used Under the Electronic Keying sele...

Страница 174: ...select and select New Module When the Select Module Type window appears enter the word Generic in the search field to search for all of Generic Ethernet modules and select the Generic Ethernet Module...

Страница 175: ...INVERTER POWER SUPPLY 990 418 E 15 Select the Connection tab and change the highlight fields as shown below Requested Packet Interval RP1 from 10 0ms to 1 0ms Uncheck the Use Unicast Connection over...

Страница 176: ...ser Defined select User Defined and perform a right mouse select Select the Import option from the popup menu When the Import Data Type window appears navigate to the installation package IS_Series_AB...

Страница 177: ...VERTER POWER SUPPLY 990 418 E 17 Select the ANALOG_INPUTS L5X item and select the Import button When the Import Configuration window opens select OK to continue Repeat the import steps until all of L5...

Страница 178: ...perform a right mouse select Select the Import option from the popup menu When the Import Program window is opened navigate to the installation package IS_Series_AB_EthernetIP RSLogix_PLC Importable...

Страница 179: ...IPTM COMMUNICATIONS IS 300CR INVERTER POWER SUPPLY 990 418 E 19 When the Import Configuration window is open select OK to continue Repeat the import steps until all of L5X program items get imported i...

Страница 180: ...to the installation package IS_Series_AB_EthernetIP RSLogix_PLC Importable Tags folder and select the IS800 Controller Tags CSV item Select Import to continue Before downloading this machine builder A...

Страница 181: ...IS 300CR via the bus controller make sure the serial communication mode is configured correctly in the MA 660 Pendant From the Menu screen select the Mode Select screen Navigate to the NEXT button at...

Страница 182: ...ngs Each IS Series type will have a different range of power level and limitations and must be specified so the Allen Bradley Controller PLC knows which IS Series Inverter Power Supply type IS 300CR i...

Страница 183: ...ta groups Controller Tag Definitions IO Parameter Tags ioControl par id Device number tag of the IS 300CR unit to communicate with hardcoded to 1 ioControl par scheduleNumber Schedule number tag 1 255...

Страница 184: ...is read this flag will get reset back to 0 ioControl com errorResetComm Error reset request flag Set this flag to 1 to request a reset of the IS 300CR error via serial communication channel IS 300CR...

Страница 185: ...schedule128DO8_1 Digital bit to select schedule 128 masking bit ioControl do we1StopParityDO9_1 Digital bit to set the weld 1 stop parity flag ioControl do we2StopWeldCountDO10_1 Digital bit to set th...

Страница 186: ...tput Select Menu on the MA 660A pendant ioControl di ng1OutErrorDI1 No good weld output 1 error ioControl di ng2OutCautionDI2 No good weld output 2 caution ioControl di out1DI3 Digital output 1 from t...

Страница 187: ...analogIn2AI2 IS 300CR analog output 2 Output voltage can be 10 volt ioControl ai analogIn3AI3 IS 300CR analog output 3 Output voltage can be 10 volt ioControl ai analogIn4AI4 IS 300CR analog output 4...

Страница 188: ...28 990 418 Screen Data Tags The PLC program can also request screen data for each of the 10 screens Refer to the example in the Screen Data and Weld Control section below for steps to request screen d...

Страница 189: ...set the controller tag resetData 0 to initiate a reset request Once the PLC data gets initialized reset the resetData will automatically toggle back to 1 Reading of Screen Data from the IS 300CR To re...

Страница 190: ...IS 300CR INVERTER POWER SUPPLY E 30 990 418 Once the screen data is successfully read the ioControl com readFromIS800 read request tag will be reset back to 0 The data for screen 1 schedule 1 will be...

Страница 191: ...1 since there is only device 1 of IS 300CR ioControl par scheduleNumber 001 ioControl par screenNumber 01 screen1Data par19_offTime 5000 Update the tag data with new data value Screen1Data parXXXX XX...

Страница 192: ...hdule2DO2_1 1 Set the weld schedule 2 masking bit Is the System READY Monitoring for the digital output ioControl di out1DI3 0 Note the System READY is mapped to the digital output 1 on the pendant OU...

Страница 193: ...col To communicate the user would need to configure the IS 300CR Weld Controller Application with the Allen Bradley PLC IP address that it needs to connect and communicate with Communication Setup By...

Страница 194: ...to 10 0 0 2 Save and close this notepad file when completed From the IS_Series_AB_EthernetIP Windows_EthernetIP_WeldControl folder select the file IS800 IS1400EIPControl reg Double click on this file...

Страница 195: ...at the Allen Bradley PLC is online and running in remote RUN mode From the IS_Series_AB_EthernetIP Windows_EthernetIP_WeldControl folder double click on the IS800 IS1400EIPControl exe to start the Wel...

Страница 196: ...he schedule number and select the Read button Likewise to write the weld schedule to each screen on the IS 300CR select the Write button to update the screen data To continuously poll the IS 300CR sys...

Страница 197: ...APPENDIX E EtherNet IPTM COMMUNICATIONS IS 300CR INVERTER POWER SUPPLY 990 418 E 37 Monitor Set Screen Stepper Count Screen...

Страница 198: ...APPENDIX E EtherNet IPTM COMMUNICATIONS IS 300CR INVERTER POWER SUPPLY E 38 990 418 Monitor Screen READ ONLY Pre Check Screen...

Страница 199: ...APPENDIX E EtherNet IPTM COMMUNICATIONS IS 300CR INVERTER POWER SUPPLY 990 418 E 39 System Mode Screen System Select Screen...

Страница 200: ...APPENDIX E EtherNet IPTM COMMUNICATIONS IS 300CR INVERTER POWER SUPPLY E 40 990 418 Force Setup Screen Displacement Screen...

Страница 201: ...APPENDIX E EtherNet IPTM COMMUNICATIONS IS 300CR INVERTER POWER SUPPLY 990 418 E 41 Pressure Regulator Screen Digital I O Checker Screen...

Страница 202: ...ot been properly configured or there is some communication issue Refer to the X20BC0088 LED Status Indicator section below for the descriptions of each status indicator X20BC0088 LED Status Indicators...

Страница 203: ...UPPLY 990 418 E 43 Bus Controller I O Wiring Diagrams XC20BC0088 Controller Module X20 PS9400 I O Supply Module LED status indicators Network address switches Ethernet IP connection with 2x RJ45 ports...

Страница 204: ...300CR INVERTER POWER SUPPLY E 44 990 418 X20 CS1020 RS 232 Communication Module X20DO9322 Digital Output Module 1 The digital output signals from this module are wired to the digital input pins on the...

Страница 205: ...utput Module 2 The digital output signals from this module are wired to the digital input pins on the IS 300CR terminal block Connection example X20AO2622 Analog Output Module The analog output signal...

Страница 206: ...990 418 X20AI4622 Analog Input Module The analog output signals from the IS 300CR terminal block are wired to this module Connection example X20DI9371 Digital Input Module The digital output signals f...

Страница 207: ...E 82178 Puchheim Germany TEL 49 89 839403 0 FAX 49 89 839403 68 AMADA WELD TECH TAIWAN CO LTD Rm 5 2F No 9 Dehui St Zhongshan Dist Taipei 10461 Taiwan R O C TEL 886 2 2585 0161 FAX 886 2 2585 0162 AMA...

Страница 208: ...AMADA WELD TECH INC 1820 South Myrtle Ave Monrovia CA 91016 U S A TEL 1 626 303 5676 FAX 1 626 358 8048...

Отзывы: