


8
CI/AZ40-EN Rev. A
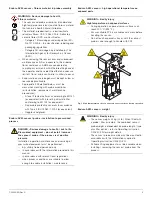
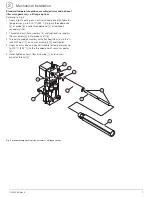
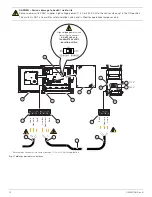
High temperature probe and filter assembly
Referring to Fig. 6:
1. Apply an anti-seize compound (suitable for temperatures up
to 200 °C [392 °F]) to the threaded end of sensor aspirator
A
.
2. Hand-tighten exhaust filter assembly
B
onto sensor
aspirator thread
A
.
3. Fit the flange adapter
C
to sensor assembly
D
using
4 hex nuts / washers.
4. Remove gland nut
F
, bush
G
and lava seal
H
from filter
assembly
I
.
5. Slide the gland nut
F
, bush
G
and lava seal
H
onto
probe shaft
J
with chamfered side towards filter assembly
I
.
6. Apply a light coating of an anti-seize compound (suitable for
temperatures up to 200 °C [392 °F]) to gland nut threads
K
.
7. Slide probe shaft
J
into sealing connector
L
.
8. Slide lava seal
H
, bush
G
into sealing connector
L
then
thread gland nut
F
onto sealing connector
L
and tighten
finger-tight.
9. Adjust probe until the insulator cement joint just contacts
gland nut
F
.
10.Tighten gland nut
F
1
/
2
a turn.
11.Check probe
J
is held firmly. If movement is detected,
carefully tighten gland nut
F
a further
1
/
6
th
of a turn.
12.Repeat step 11 until probe shaft
J
is held firmly.
13. Apply a light coating of an anti-seize compound (suitable for
temperatures up to 200 °C [392 °F]) to the threaded end
M
of probe shaft
J
.
14.Thread the probe with filter assembly into the
1
/
4
inch NPT
port
N
and tighten.
15.Align spacer
O
to support the probe / filter assembly within
the standoff.
Fig. 6 High temperature probe and filter assembly


