


VES-1124 User’s Guide
8-2
Static MAC Forward Setup
Table 8-1 Static MAC Forwarding
LABEL DESCRIPTION
MAC Address Enter the MAC address in valid MAC address format, that is, six hexadecimal character pairs.
Static MAC addresses do not age out.
VID
Enter the VLAN identification number.
Port
Select a port where the MAC address entered in the previous field will be automatically forwarded.
Select
filter
to filter the destination MAC address entered in the previous field. This means that the
switch drops all packets destined for that MAC address on all ports.
Add Click
Add
to save the new rule to the switch. It then displays in the summary table at the bottom of
the screen.
Cancel Click
Cancel
to reset the fields to your previous configuration.
Clear Click
Clear
to clear the fields to the factory defaults.
8.3 Viewing and Editing Static MAC Forwarding Rules
To view a summary of the rule configuration, scroll down to the summary table at the bottom of the
Static MAC
Forwarding
screen.
To change the settings of a rule, click a number in the
Index
field.
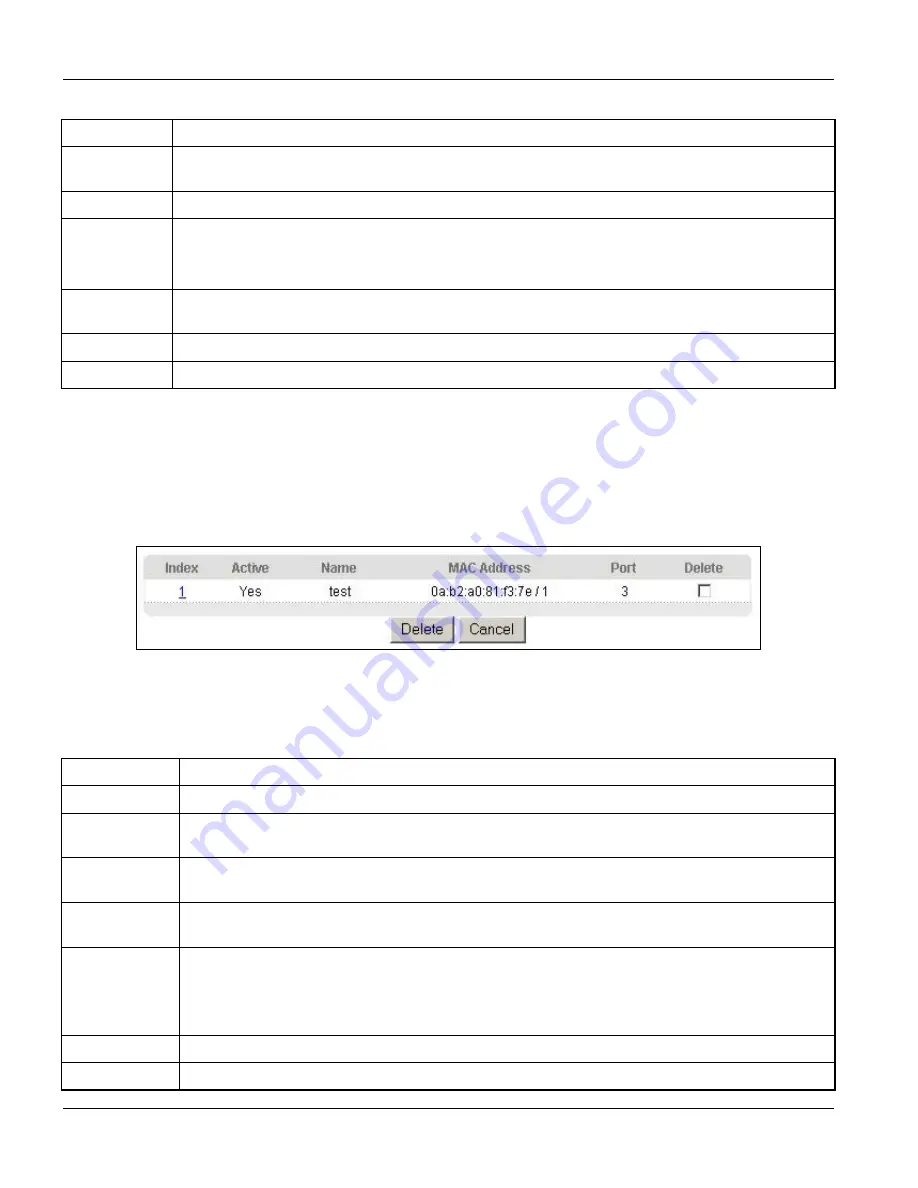
Figure 8-2 Static MAC Forwarding: Summary Table
The following table describes the labels in this screen.
Table 8-2 Static MAC Forwarding: Summary Table
LABEL
DESCRIPTION
Index
Click an index number to modify a static MAC address rule for a port.
Active
This field displays whether this static MAC address forwarding rule is active (
Yes
) or not (
No
).
You may temporarily deactivate a rule without deleting it.
Name
This field displays the descriptive name for identification purposes for this static MAC address-
forwarding rule.
MAC Address
This field displays the MAC address that will be forwarded and the VLAN identification number to
which the MAC address belongs.
Port
This field displays the port where the MAC address shown in the
MAC Address
field will be
forwarded.
This field displays
filter
when the switch is set to drop packets destined for the MAC address
shown in the
MAC Address
field on all ports.
Delete
Check the rule(s) that you want to remove in the
Delete
column, and then click the
Delete
button.
Cancel Click
Cancel
to clear the selected checkboxes in the
Delete
column.
Summary of Contents for VES-1124 -
Page 1: ...VES 1124 24 port QAM 2 band VDSL Switch User s Guide July 2004 Version 3 50 LP 0 ...
Page 18: ......
Page 23: ...VES 1124 User s Guide Getting to know the VES 1124 1 5 Figure 1 2 Curbside Application ...
Page 24: ......
Page 30: ......
Page 32: ......
Page 70: ......
Page 72: ......
Page 81: ...VES 1124 User s Guide VLAN 7 9 VID1 Example Screen Figure 7 6 VID1 Example Screen ...
Page 83: ...VES 1124 User s Guide VLAN 7 11 Figure 7 7 Port Based VLAN Setup All Connected ...
Page 86: ......
Page 98: ......
Page 100: ......
Page 104: ......
Page 116: ......
Page 124: ......
Page 128: ......
Page 130: ......
Page 134: ......
Page 154: ......
Page 170: ......
Page 188: ......
Page 190: ......
Page 194: ......
Page 198: ......


