4-4
<Toc>
<4. Operations>
IM 05E01B02-41E
4.2
Performing/Canceling Auto-tuning
Perform auto-tuning when you have finished creating program patterns. Make sure the
controller is in program (RUN) mode and in automatic (AUTO) mode before carrying out
auto-tuning. See “4.5 Switching between RUN and RESET Modes,” to change to RUN or
“4.6 Switching between AUTO and MAN,” to change to AUTO.
PID constants are obtained by using the current program setpoint value at the start of auto-
tuning.
NOTE
When on-off control is being used, auto-tuning cannot be carried out. Moreover, do not
perform auto-tuning when controlling any of the following processes.
•
Control processes with quick response such as flow control or pressure control
•
Processes where even temporary output on/off results in inconvenience
•
Processes where a large output change at control element results in inconvenience
•
Processes where variations in PV may exceed an allowable range, adversely affect-
ing product quality
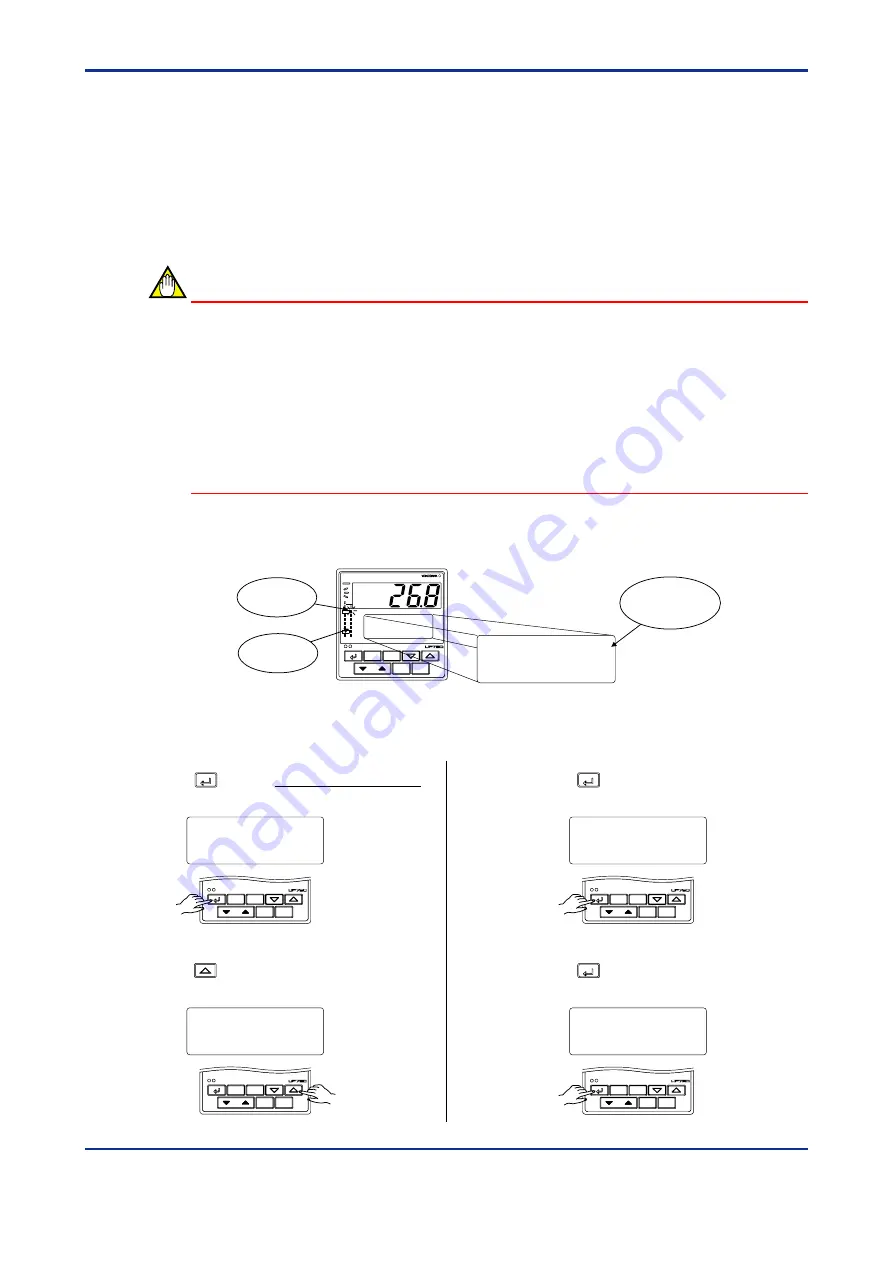
1.
Bring the operating display into view (display appears at power on).
PV
SET/ENT
PT.No
RUN
RESET
DISP
MODE
PVE2
PVE1
PV2
TME
AL
1
1
2
3
4
MAN2
PRG
RST
HLD
LOC
MAN1
CAS
PTNO: 1
TM=0h20
SEGNO: 1/ 3
RCY: 0/ 0
SP:
10.0
°
C
PRG lamp
ON.
MAN1 lamp
OFF.
Displays
target setpoint
“SP”.
In steps 2 and later, illustrations of the LCD are cited to explain the procedure.
1st Edition : May 31,2000-00
2.
Press the
SET/ENT
key for more than 3 seconds
to call up the main menu “PROG”.
SET/ENT
PT.No
RUN
RESET
DISP
MODE
programming
main menu
PROG
3.
Press the
key twice to display the main
menu “LP1”.
SET/ENT
PT.No
RUN
RESET
DISP
MODE
loop 1 parameter
main menu
LP1
4.
Press the
SET/ENT
key once to display the
submenu “PAR”.
SET/ENT
PT.No
RUN
RESET
DISP
MODE
parameter
sub menu
PAR
5.
Press the
SET/ENT
key once again to display
the parameter “AT”.
SET/ENT
PT.No
RUN
RESET
DISP
MODE
MENU:LP1/PAR
#1
auto tuning switch
AT
=
OFF
Summary of Contents for UP750
Page 2: ...Blank Page...
Page 22: ...Blank Page...
Page 120: ...Blank Page...
Page 128: ...Blank Page...
Page 130: ...Blank Page...


