44
8.
Rotate the optical encoder past the zero index point to set the internal correction.
9.
Return to the desired zero mechanical position and verify a zero reading.
This completes the procedure. If the encoder is rotated back to mechanical zero, it should
read zero. Note: Any time the counter is powered up or reset, the optical encoder should be
rotated past the zero index point one time to set the internal correction
If a zero index signal is not available from the encoder, perform the following procedure:
1.
Remove any E10 jumpers to eliminate the Zero Index signal.
2.
Set OFFSET1 = 0.
3.
Adjust the optical encoder to the mechanical zero position and with it in this position,
reset the counter.
SETUP SUMMARY
1.
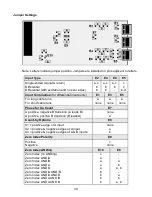
Set the input signal jumpers.
A.
For single-ended signals such as TTL or CMOS, use jumpers
c
of E2, E4 and E6 and
jumper
a
of E6. Input signals are applied as follows:
Channel A, P5-1X (AH)
Channel B, P5-3Y (BH)
Channel Z, P5-5Z (ZH) Zero Index
Ground, P5-6Z
If an excitation voltage is required, use jumper
a
of E2 and jumper
a
of E4.
B.
For differential line driver or balanced input signals, use jumper
b
for E2, E4 and E6. If
120 ohm line termination resistors are desired, place jumpers E1, E3 and E5.
2.
Set the correct counting direction by placing or omitting the Channel B polarity jumper
E7.
3.
Choose X1, X2 or X4 counting and omit
a
and
b
of E9 for X1, place
a
of E9 for X2 or
place
b
of E9 for X4. Determine the scale factor to be used by the counter and set
SCALE1 to this value using the counter Menu. Most often it will be set to 1.00000 with a
multiplier of 1.
4.
If the Zero Index is to be used, do the following:
A.
Temporarily place jumper
c
of E10 and rotate the encoder while watching the Item
indicator of the display. If it is OFF most of the time, the Z polarity is correct. If it is ON
most of the time, the Z polarity is incorrect, so add jumper
c
of E8 if it is missing, or
remove jumper
c
of E8 if it is in place.
B.
From the manufacturer's specifications for the encoder showing the relationship of the
Zero Index signal to the Channel A and Channel B signals, determine from the table
above the desired positions of jumpers
a
and
b
of E8 and
a
,
b
or
c
of E10. If not used
here, remove jumper
c
of E10 that was placed for the test in A. above.
C.
From the manufacture's specifications for the encoder, determine the number of cycles
per revolution. Multiply this by 1, 2, or 4 depending on the selection of X1, X2 or X4
counting and multiply that result by the counter scale factor. Put the final result in the
counter Menu item, PULSES.
5.
Follow the procedure outlined above under the heading MECHANICAL ZERO.
Summary of Contents for 800 plus
Page 63: ...63 SERIAL CONNECTION EXAMPLES ...


