background image


26 


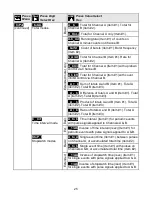
Press 
Menu


Press Digit 
Select Key


Press Value Select 
Key


_

InPut 

(continued) 

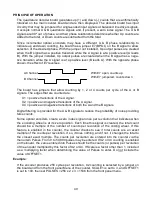
PHASE 

Phase angle modes


E

x

te

n

d

e

d


_

0-360

.  

Span from 0° to 360°. Select for phase 

angles centered around 180° (Item #1).


_

-180+

.  

Span from -180° to +180°. Select for phase 

angles centered around 0° (Item #1).


duty_C 

Duty cycle mode


E

x

t.


A

_

to

_

b


 On or Off period of square waves as a 

percentage of total period (Item #1).


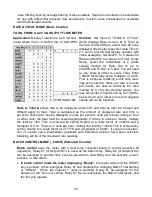
SEtuP 


Setup 

_

0

0000 


Stored totals 

0


  Zero totals at power-on. 

1


 Restore totals at power-on. 


_0

0

000 


Leading zeros 

0


  Blank leading zeros. 

1


 Display leading zeros. 


_00

0

00

 Scaling method 1 

0


  Input scale factor 1 and offset 1. 

1


 Use coordinates of 2 points method. 


_000

0

Scaling method 2 

0


  Input scale factor 2 and offset 2. 

1


 Use coordinates of 2 points method. 


_0000

0


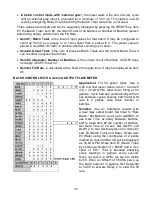
Operation of rear connec-
tor control inputs 1 & 2. 

True

 = 0V or tied to 

digital ground). 

False

 = 5V or open). 


0


1 = Meter Reset*, 2 = Function Reset* 


1 = Meter Reset*, 2 = Meter Hold* 

2


   1 = Meter Reset*, 2 = Peak or Valley Display*


3


1 = Meter Reset*, 2 = External Gate* 

4


1 = Function Reset*, 2 = Meter Hold* 

5


1 = Valley Only Display**, 2=Peak Only Display** 

6


1 = Function Reset*, 2 = External Gate* 

7


1 = Meter Hold**, Peak or Valley Display** 

8


1 = Reset Total A**, 2 = Reset Total B** 

9


1 = Force Alarm1, 2 = Force Alarm2 

A


1 = Meter Reset*, 2 = Display Blank* 

B


1 = Function Reset*, 2 = Display Blank* 

C


1 = Meter Hold*, 2 = Display Blank* 

D


1 = Peak or Valley Display**, 2 = Display Blank** 

E


1 = Display Blank, 2 = External Gate* 

F


1 = Display Item #2, 2 = Display Item #3 

      With 1 and 2 at 5V or open, Display Item #1. 
-------------------------------------------------------------------


*     1 & 2 both at 0V = Meter Reset (can restore 
       totals). 
**    1 & 2 both at 0V for selections 

5

7

8

D

 = 

       Function   Reset* (erases all totals).  


Summary of Contents for 800 plus

Page 1: ...800Plus Universal Digital Counter Series 2 INSTRUCTION MANUAL Now with Ethernet 2 Dart Rd Newnan GA 30265 USA Phone 770 251 8700 Fax 770 251 2088 http www yca com ...

Page 2: ...ls rate 2 channels total up or down 2 channels period 2 channels stopwatch time interval square root of rate or 6 digit remote display Extended counter Above plus rate and total simultaneously custom curve linearization arithmetic func tions A B A B A B A B A B 1 phase angle duty cycle up down counting batch control Process Receiver Totalizer Signal VF1 4 20mA VF2 0 1mA VF3 0 10V Basic counter Rat...

Page 3: ... AC INPUT SIGNAL CONDITIONER FR 13 11 PROCESS RECEIVER TOTALIZER SIGNAL CONDITIONER VF 31 12 QUADRATURE SIGNAL CONDITIONER QD 38 13 SERIAL INPUT METER REMOTE DISPLAY NO SIGNAL CONDITIONER 54 14 DUAL QUAD RELAY OUTPUT OPTIONS 56 15 SINGLE DUAL ANALOG OUTPUT OPTIONS 59 16 SERIAL COMMUNICATION OPTIONS 61 17 EXCITATION OUTPUT POWER SUPPLY 66 18 INSTRUMENT SETUP VIA PC 67 19 CUSTOM CURVE LINEARIZATION ...

Page 4: ...boards allow a meter to be interfaced to a PC and to multiple meters on an RS485 network Meter programming can be via the meter s front panel or a PC running Windows based Instrument Setup Software A serial interface option is required A standard switching power supply allows the meters to be powered worldwide from 85 to 264 Vac An optional power supply operates from batteries or low voltage sourc...

Page 5: ...r is connected The 85 264 Vac mains connector P1 Pins 1 3 is colored Green to differentiate it from other input and output connectors The 12 32 Vac 10 48 Vdc mains connector is colored Black Do not make signal wiring changes or connections when power is applied to the instrument Make signal connections before power is applied If reconnection is required disconnect the AC mains power before such wi...

Page 6: ... Connectors for signal and power are U L rated screw clamp terminal blocks that plug into mating jacks on the printed circuit board Communication connectors are a single RJ11 plug for RS232 dual RJ11 or RJ45 plugs for RS485 and RJ45 for Ethernet ...

Page 7: ...LEX GND ATX ARX BTX BRX GND RS485 INTERFACE HALF DUPLEX 1 2 3 4 5 6 7 8 A RXD0 B RXD1 B TXD1 A TXD0 ISO GND TXD0 TXD1 RXD1 RXD0 GND RS485 MODBUS FULL DUPLEX RS485 MODBUS HALF DUPLEX B TX RXD1 A TX RXD0 ISO GND B TX RXD1 A TX RXD0 GND 6 5 4 3 2 1 6 5 4 3 2 1 ISO GND ATX ARX BTX BRX ISO GND 1 2 3 4 5 6 7 8 P4 DUAL ANALOG OUTPUT provides two unipolar connections at pins 1 2 3 and 4 5 6 ...

Page 8: ...ectronic assembly out through the rear of the case INSTALLING NEW 0PTION BOARDS Options boards plug into the main board at the front of the meter These are plug and play and may be installed in the field They will be recognized by the software which will provide access to the menu items associated with that board If necessary remove rear panel knockouts for new boards Boards plug into connectors a...

Page 9: ...remove any rear panel knockouts for new option boards that may have been installed Ensure that all option boards are properly aligned with the molded board retaining pins on the inside of the rear panel Once the rear panel is in place reinstall the input output screw clamp terminal plugs PANEL MOUNTING Ensure that the panel mounted gasket is in place against the back of the bezel Turn the two moun...

Page 10: ...hrough _Loc 4 need to be set to 0 via the front panel for these menu items to be available See Section 9 The paragraphs below assume that all lockout features have been removed MENU MODE KEY ACTION In the Menu Mode pressing a key momentarily advances to the next item Holding down the key advances through multiple menu items for fast menu navigation KEYS IN RUN MODE MENU Key Pressing MENU from the ...

Page 11: ...ted in the meter If a change has been made to a menu item that change is saved to non volatile memory when the key is pressed next and _StoreE is displayed briefly Right Triangle Key Digit Select Pressing from the InPut menu brings up all meter functions available with the meter s signal conditioner For the dual channel pulse input signal conditioner these are _rAtE_ PEriod _totAL ti_Int Stop_t _P...

Page 12: ...ckout digit to 0 Be sure to reset the lockout digit to 1 if you do not want the menu item to be changed by an operator _Loc 1 _Loc 2 _Loc 3 _Loc 4 Press the MENU key until Loc 1 Loc 2 Loc 3 or Loc 4 is displayed as desired Note the lockout jumper must be removed see above 111111 Press to display the lockout status con sisting of 0 s and 1 s The left digit will flash Press again to step to the next...

Page 13: ... must be outside of the high and low thresholds per the following table or the meter will not operate properly The larger the difference between the high and low thresholds the more immune the meter is to input signal noise A3 B3 A2 B2 Input must be A3 B3 A2 B2 Input must be A3 B3 A2 B2 Input must be below above below above below above a b 12 mV 150 mV 1 15V 12 mV 150 mV 1 15V a a a a b 30 mV 350 ...

Page 14: ...ads zero The longer the time out the lower the minimum frequency the meter can display With a scale factor of 1 and multiplier of 1 frequency is displayed in Hz with no decimal point Appling a multiplier from 1 to 100000 in decade steps and setting the decimal point increases resolution 0 1 to 0 00001 Hz Decreasing the multiplier from 1 to 0 00001 in decade steps and setting the decimal point allo...

Page 15: ...from an input of 36 67 Hz Note that the meter s native rate measurements are in Hz There will be 60 times more gallons per minute than per second Rate in engineering units is displayed from measured frequency by applying an appro priate scale factor and setting the decimal point The scale factor consists of a scale value from 0 00000 to 9 99999 fixed decimal point and settable digits and a scale m...

Page 16: ...power on and coordinates of 2 points method This is the preferred scaling method Set gate time to its minimum of 0 01 sec for smooth display updates Set DecPt1 to two places Then enter low input and desired low reading and high input and desired high reading for display of 1 00 for 36 67 pulses as shown DISPLAY SIMULTANEOUS RATE TOTAL FROM 36 67 PULSE GALLON FLOW METER Application Display flow rat...

Page 17: ...17 345 676 would be displayed as 345 675 in Item 1 and 17 in Item 2 This capability gives the counter 12 digit capability Items 1 2 can also be retrieved via serial communications TOTAL A B A__b__ displays Total A as Item 1 or Total B as Item 2 TOTALS A B A B AxB A B A B Extended counter display arithmetic combinations of Totals A and B as Item 1 Total A as Item 2 and Total B as Item 3 TOTAL A B U...

Page 18: ... moving average filter which will apply to rate only not totals Set DecPt1 and DecPt2 to two decimal places for Items 1 and 3 Batch Total and Rate Scale Item 1 Batch Total by entering a Scale1 of 2 72702 counts per pulse and a Setpoint1 of 55 00 which will serve as the batch setpoint in gallons Scale Item 3 Rate using the coordinates of 2 points method so that 36 67 pulses sec will be displayed as...

Page 19: ...It may be displayed as Item 3 PERIOD MODES PERIOD A ONLY A_OnLy displays period of Channel A as Item 1 PERIOD A B A__b__ displays period of Ch A as Item 1 and of Ch B as Item 2 PERIODS A B A B AxB A B A B Extended counter display arithmetic combinations of Periods A and B as Item 1 Period A as Item 2 and Period B as Item 3 TIMING MODES STOPWATCH TIMING ON TIME OF A MACHINE WITH 0 00 HOUR RESOLUTIO...

Page 20: ...e average of pulse widths The value is updated at the end of each gate time With a scale factor of 1 one count is one microsecond INVERSE TIME INTERVAL __1 Ab Extended counter Takes the inverse of time interval for a reading in second For example if the average time interval for object to travel from point A to point B is 5 seconds the inverse time interval would be 0 2 sec For the average speed o...

Page 21: ...ded counter Measures the phase relationship in degrees between two signals with the same period over a gate time which is selectable from 10 ms to 199 99 s with averaging over multiple integral periods over the selected gate time The two signals are applied to Channels A and B For best accuracy both signals should have the same amplitude The amplitude of sinusoidal signals should be larger that 1V...

Page 22: ...s per sec Set Config to 0200 SCALE and OFFSt are not used Power Factor is stored in the custom curve section of the Extended counter and uses PHASE 180 as the input type Setting ConFiG to X1XX sets up for Phase Angle Setting ConFiG to X2XX enables Power Factor scaling First set up the unit as a phase meter and verify that it is working properly You will need to set the jumpers on the signal input ...

Page 23: ... The native counts will be in percent For a positive on pulse set trigger slope to positive for A and negative for B Select the coordinates of 2 points scaling method Set Hi In1 to 1 00000 percent and Hi Rd1 to 1 00 percent As an alternative select the scale and offset scaling method Then simply select a scale value of 1 00000 and a multiplier of 100 1 RATE MODE FOR TIMING Extended Counter An exam...

Page 24: ...te Item 3 A_Atot Rate for Channel A Item 1 Total for Channel A Item 2 A_btot Rate for Channel A Item 1 Total for Channel B Item 2 _A_ _b Sum of rates A B Item 1 Rate A Item 2 Rate B Item 3 _A_ _b Difference of rates A and B Item 1 Rate A Item 2 Rate B Item 3 _A_ _b Product of rates A and B Item 1 Rate A Item 2 Rate B Item 3 _A_ _b Rate A divided by rate B Item 1 Rate A Item 2 Rate B Item 3 _A b 1 ...

Page 25: ...ence of totals A and B Item 1 Total A item 2 Total B Item 3 _A_ _b Product of totals A and B Item 1 Total A item 2 Total B Item 3 _A_ _b Ratio of totals A and B Item 1 Total A item 2 Total B Item 3 ti__Int Time interval mode Basic A_to_b Time interval Item 1 for periodic events with pulse signals applied to Channels A B Ext __1 Ab Inverse of time interval sec Item 1 for periodic events with pulse ...

Page 26: ... offset 2 1 Use coordinates of 2 points method _00000 Operation of rear connec tor control inputs 1 2 True 0V or tied to digital ground False 5V or open 0 1 Meter Reset 2 Function Reset 1 1 Meter Reset 2 Meter Hold 2 1 Meter Reset 2 Peak or Valley Display 3 1 Meter Reset 2 External Gate 4 1 Function Reset 2 Meter Hold 5 1 Valley Only Display 2 Peak Only Display 6 1 Function Reset 2 External Gate 7...

Page 27: ...h Valley 2nd push ____01 Item to display after Meter Reset 1 Item 1 2 Item 2 3 Item 3 GAtE_t Gate time _000 00 _000 00 _000 00 _000 00 _000 00 Select digit to flash Select 0 thru 9 for flashing digit to set gate time in seconds Decimal point location is fixed for 10 ms resolution ti_Out Time out _000 00 _000 00 _000 00 _000 00 _000 00 Select digit to flash Select 0 thru 9 for flashing digit to set...

Page 28: ... 1 Negative slope ____00 Trigger slope Channel B 0 Positive slope 1 Negative slope dEC Pt1 Decimal pt1 1 11111 Decimal point flashes 1 11111 11 1111 111 111 1111 11 11111 1 111111 Press to shift the decimal point dEC Pt22 Decimal pt2 2 22222 Decimal point flashes 2 22222 22 2222 222 222 2222 22 22222 2 222222 Press to shift the decimal point Scale and Offset scaling method if selected under SEtuP ...

Page 29: ...e decimal point location when flashing Lo_ rd2 Reading at Lo In2 000000 000000 000000 000000 000000 000000 Select digit to flash Select 9 thru 9 for flashing first digit and 0 thru 9 for other flashing digits Decimal point is fixed by dEC Pt1 Hi_In2 High signal input 1 000000 000000 000000 000000 000000 000000 Select digit to flash Select 9 thru 9 for flashing first digit and 0 thru 9 for other fl...

Page 30: ...DEUn4b Menu items related to alarm setup These will only appear if a relay board is detected If so please see Section 14 An_SEt An_Lo An_Hi or An_SEt An_Lo1 An_Hi1 An_Lo2 An_Hi2 Menu items related to analog output These will only appear if a single or dual analog output board is detected If so please see Section 15 _SEr_1 _SEr_2 _SEr_3 _SEr_4 Menu items related to serial communications These will ...

Page 31: ...olution Set Input to VF420 A only Un der Setup select the coordinates of 2 points scaling method Under Config select a dis play of 999999 and filtering Set the decimal point to 3 places For scaling set Hi In1 to 20 0000 and Hi Rd1 to 5 820 Set Gate Time to 0 22 sec which will provide noise aver aging at a display update rate of 4 sec Also set a 1 6 sec adaptive moving average filter to process the...

Page 32: ...Item 1 and total as Item 2 Scale2 and Offset2 apply to total Total is calculated as the product of displayed rate and time in seconds Since rate may be displayed in units per second units per minute units per hour or other units the total must be scaled appropriately If rate is in units per minute multiply the total by 1 60 This is achieved by setting Scale2 to a scale factor of 1 66666 and a mult...

Page 33: ...Item 3 Fill Rate is calculated with a fixed 20 ms gate time It may be displayed as Item 3 BATCH CONTROL WITH A 4 20 mA OUTPUT FLOW METER Application Fill 55 gallon tanks Use a 4 20 mA flow meter where 4 mA 0 and 20 mA 39 20 GPM Slow down filling at 54 gallons Cycle batches automatically with 20 sec between cycles Display batch total fill rate to 2 places Also track number of batches Solution Use a...

Page 34: ... Restore totals at power on _000_0 Leading zeros 0 Blank leading zeros 1 Display leading zeros _000_0 Scale factor 1 setup 0 Input scale factor 1 and offset 1 1 Use coordinates of 2 points method _000_0 Operation of rear connec tor inputs 1 2 True logic 1 0V or tied to digital ground False 0 5V or open 0 1 Meter Reset 2 Function Reset 1 1 Meter Reset 2 Meter Hold 2 1 Meter Reset 2 Peak or Valley D...

Page 35: ...tofFF value avoids totalizing small offsets from 0 rate value or negative rate values 1 Totalize all rates required for bidirectional flow dSPyno Display ____01 PEAK key action 0 Display Peak 1 Display Valley 2 Peak 1st push Valley 2nd push ____01 Item to display after Meter Reset 1 Item 1 2 Item 2 3 Item 3 CutofFF Totalizing cutoff _00000 _00000 _00000 _00000 _00000 Select digit to flash Select 0...

Page 36: ...00 Filter time constant 0 No filter 1 0 1 sec 2 0 2 sec 3 0 4 sec 4 0 8 sec 5 1 6 sec 6 3 2 sec 7 6 4 sec dEC Pt1 Decimal pt1 1 11111 Decimal point flashes 1 11111 11 1111 111 111 1111 11 11111 1 111111 Press to shift the decimal point dEC Pt22 Decimal pt2 2 22222 Decimal point flashes 2 22222 22 2222 222 222 2222 22 22222 2 222222 Press to shift the decimal point Scale and Offset scaling method i...

Page 37: ...0 Select digit to flash Select 9 thru 9 for flashing first digit and 0 thru 9 for other flashing digits Decimal point is fixed by dEC Pt1 Enter 04 000 for square root extraction with a 4 20 mA signal Scale multiplier rESoLn Resolution Flashing 6 digit number in decade steps from 0 00001 to 100000 Press to select This multiplier R appears with the Batch mode and can be applied to Grand Total to set...

Page 38: ...actor Rate is measured over a gate time which is programmable from 10 ms to 199 99 sec Since one of the two channels may not be measuring any pulses over the gate time a timeout from 10 ms to 199 99 sec is also programmable The meter update rate will never be less than every timeout Quadrature rate provides a high resolution high accuracy display A zero index function is available on a separate ze...

Page 39: ...a none a none Phase for Up Count E7 A positive negative B transition A leads B A positive positive B transition B leads A none a Count by Options E9 X1 positive edge of A input X2 positive negative edges of A input X4 positive negative edges of A B inputs none a b Zero Index Polarity E8 Positive Negative c none Zero Index ANDing E10 E8 Zero Index no ANDing Zero Index AND A Zero Index AND B Zero In...

Page 40: ...at are counted are X1 positive transitions of the A signal X2 positive and negative transitions of the A signal X4 positive and negative transitions of both the A and the B signals Digital filtering is provided for the A B signals to reduce the probability of noise providing false counts Some optical encoders create a zero index signal once per revolution that indicates when the encoding wheel is ...

Page 41: ...The total bidirectional counts from the optical encoder since the last counter reset or function reset 2 The correction factor from the last zero index correction calculation 3 OFFSET1 Example Suppose that the encoder contains 30 pulses per revolution and that X1 counting is used Further suppose that when the mechanics are at their 0 position the zero index is at 10 OFFSET 1 10 and the counter is ...

Page 42: ...ng up and then counting down The zero index correction is made on the leading edge transition of the zero index signal When counting down the leading edge is the trailing edge of the signal shown below because time is increasing from right to left A Channel B Channel Zero Index Pulse Up Counts Down Count Up Region Down Region 3 2 1 1 4 2 0 3 5 6 5 4 3 2 1 0 3 4 3 2 1 1 2 3 4 5 4 3 2 1 0 0 5 5 4 3 ...

Page 43: ... the selected phase relationship determined by the presence of or absence of jumper E7 a BPOL Jumper E7 a is selected to cause the display to count in the proper direction If jumper E7 is in place the channel B signal will have the opposite polarity from the channel B output of the encoder MECHANICAL ZERO By using the Counter s OFFSET1 value it is possible to place the mechanical zero zero counter...

Page 44: ...t the correct counting direction by placing or omitting the Channel B polarity jumper E7 3 Choose X1 X2 or X4 counting and omit a and b of E9 for X1 place a of E9 for X2 or place b of E9 for X4 Determine the scale factor to be used by the counter and set SCALE1 to this value using the counter Menu Most often it will be set to 1 00000 with a multiplier of 1 4 If the Zero Index is to be used do the ...

Page 45: ...CCW rotation A Channel B Channel Zero Index Allen Bradley current source CCW rotation A Channel B Channel Zero Index Zero Index gated BEI Models H25 L25 E25 MOD5500 MOD5600 CCW rotation A Channel B Channel Zero Index BEI Models MX 51 MX 21 CCW rotation A Channel B Channel Zero Index BEI Models E20 E11 E15 CMX216 MOD900 CW rotation ...

Page 46: ...n No Zero Index 90 270 deg QUADRATURE RATE Rate and direction may also be displayed using an extended version of the counter Using quadrature to determine rate not only has the advantage of displaying direction but also eliminates errors due to vibration and jitter that cause erroneous readings in standard rate meters The meter uses A B to display quadrature rate Scale 1 is used to set A to the pr...

Page 47: ...ct for position Extended _rAtE_ Quadrature rate SEtuP Setup _00000 Stored totals 0 Zero all totals at power on 1 Restore totals at power on Set PULSES to 0 _00000 Leading zeros 0 Blank leading zeros 1 Display leading zeros _00000 Scaling method 0 Input scale factor 1 and offset 1 1 Use coordinates of 2 points method _00000 Not applicable 0 Set to 0 _00000 Operation of rear connec tor inputs 1 2 Tr...

Page 48: ...s should pulses per revolution x edges per pulse 1 2 or 4 x scale factor GAtE_t Gate time _000 00 _000 00 _000 00 _000 00 _000 00 Select digit to flash Select 0 thru 9 for flashing digit to set the display update rate from 10 ms to 199 99 s dEC Pt1 Decimal pt1 1 11111 Decimal point flashes 1 11111 11 1111 111 111 1111 11 11111 1 111111 Press to shift decimal point Scale and Offset scaling method i...

Page 49: ...00 000000 000000 000000 000000 Select digit to flash Select 9 thru 9 for flashing first digit and 0 thru 9 for other flashing digits dEC Pt1 is used When the meter counts up and reaches the Preset it reverts to Offset1 When the meter counts down and reaches Offset1 it reverts to Preset Set to 0 for no Preset _CALib Time base calibration Not applicable to Total Do not change value Option dependent ...

Page 50: ...et Input to Quadrature Rate Set Gate Time to 22 sec so that the display update rate becomes 22 sec 30 ms 1 period Set Time out to 1 sec so that pulse rates under 1 Hz are displayed as 0 Set both DecPt1 and DecPt2 to 3 places Under Setup select coordinates of 2 points scaling method Set both Hi In1 and Hi In2 to 1024 0 pulses sec and both the desired Hi Rd1 and Hi Rd2 to 1 782 feet sec Note the dup...

Page 51: ...Reset 2 External Gate 4 1 Function Reset 2 Meter Hold 5 1 Valley Only Display 2 Peak Only Display 6 1 Function Reset 2 External Gate 7 1 Meter Hold Peak or Valley Display 8 1 Reset Total A 2 Reset Total B 9 1 Force Alarm1 2 Force Alarm2 A 1 Meter Reset 2 Display Blank B 1 Function Reset 2 Display Blank C 1 Meter Hold 2 Display Blank D 1 Peak or Valley Display 2 Display Blank E 1 Display Blank 2 Ex...

Page 52: ...nal _00000 Adaptive filter setup 0 Set adaptive filter for normal noise 1 Set adaptive filter for presence of high transients _00000 Filter time constant 0 No filter 1 0 1 sec 2 0 2 sec 3 0 4 sec 4 0 8 sec 5 1 6 sec 6 3 2 sec 7 6 4 sec dEC Pt1 Decimal pt1 1 11111 Decimal point flashes 1 11111 11 1111 111 111 1111 11 11111 1 111111 Press to shift decimal point of reading dEC Pt22 Decimal pt2 2 2222...

Page 53: ... Lo_In1 Lo_ rd2 Reading at Lo In2 Make the same as Lo_rd1 Hi_In2 High signal input 2 Make the same as Hi_In1 Hi_rd2 Reading at Hi In2 Make the same as Hi_rd1 Other setup parameters rESoLn Reading multiplier Flashing 6 digit number in decade steps from 0 00001 to 100000 Press to select a decade multiplier R for the rate reading Set to 1 _CALib Time base calibration Do not change See Calibration sec...

Page 54: ...ctions of the Custom ASCII Protocol Serial Communications Manual With an optional dual or quad relay output board contact or solid state relays the serial input meter can provide remote alarm or control capability The meter can be programmed so that the relays respond to the displayed reading or to received control characters For setup information please see the Dual Quad Relay Output Options Sect...

Page 55: ...enu Press Digit Select Key Press Value Select Key SEtuP Setup _000_0 Control inputs 1 and 2 F 1 Tare enable 2 Tare Control input 1 must be at 0V or grounded for Tare to operate ConFiG Configu ration __0000 Display mode 6 Remote display H K L commands 7 Single value remote display 8 Show 1st string value slaved to another meter 9 Show 2nd string value slaved to another meter A Show 3rd string value...

Page 56: ...tpoint is displayed conversion stops and the setpoint can be changed After pressing you have 30 seconds or the meter reverts to the normal display To view setpoints menu item Loc4 digit 4 must have been set to 0 To change setpoints menu item Loc2 digit 6 must have been set to 0 Press Alarms Key Press Digit Select Key Press Value Select Key 3950 00 Press Alarms to display Alarm 1 setpoint 3950 00 C...

Page 57: ...AL1 latching AL2 non latching 2 AL1 non latching AL2 latching 3 AL1 latching AL2 latching 00000 Alarm operates at and above setpoint active high or at and below setpoint active low see Glossary 0 AL1 active high AL2 active high 1 AL1 active low AL2 active high 2 AL1 disabled AL2 active high 3 AL1 active high AL2 active low 4 AL1 active low AL2 active low 5 AL1 disabled AL2active low 6 AL1 active h...

Page 58: ...eviation mode see Glossary 0 AL3 band deviation AL4 band deviation 1 AL3 hysteresis AL4 band deviation 2 AL3 band deviation AL4 split hysteresis 3 AL3 hysteresis AL4 hysteresis 00000 Number of consecutive readings in alarm zone to cause an alarm 0 After 1 reading 4 After 16 readings 1 After 2 readings 5 After 32 readings 2 After 4 readings 6 After 64 readings 3 After 8 readings 7 After 128 reading...

Page 59: ...e low analog output 0 mA 4 mA 0V or 10V may be set to correspond to any low displayed reading _An_Lo The high analog output 20 mA 0V or 10V may be set to correspond to any high displayed reading _An_Hi The meter will then apply a straight line fit between these two end points to provide an analog output scaled to the meter reading The decimal point location is fixed by the dEC Pt1 selection KEYSTR...

Page 60: ...tput 0000 Source of analog output 1 0 Filtered item 2 Item 2 1 Item 1 3 Item 3 An_Lo1 Low displayed value for 0V 0 mA or 4 mA output 0 00000 0 00000 0 00000 0 00000 0 00000 0 00000 Select digit to flash Select 0 thru 9 for flashing digit An_Hi1 High displayed value for 10V or 20 mA output 0 00000 0 00000 0 00000 0 00000 0 00000 0 00000 Select digit to flash Select 0 thru 9 for flashing digit dEC P...

Page 61: ...e with Type A and Type B connectors Upon first connection your computer may display Found new Hardware and automatically download and install the required USB driver from the Internet If installation is not automatic download the driver file with a name like CDM v2 10 00 WHQL Certified zip from http www ftdichip com Drivers VCP htm Unzip it into its own directory and point to that directory as the...

Page 62: ...h no jumpers installed RS485 Modbus Board Full Duplex Operation b e Bias jumpers should be installed on 1 board a d Installed on last meter in long cable run RS485 Modbus Board Half Duplex Operation b e bias jumpers installed on 1 board c f installed for half duplex operation a installed on last meter in line with long cable runs Note Board is shipped with no jumpers installed Modbus b a c d e RJ4...

Page 63: ...63 SERIAL CONNECTION EXAMPLES ...

Page 64: ... output rate rr reading rate rr depends on gate time and input frequency 0 Output at reading rate rr 1 Output at rr 2 5 Output at rr 32 2 Output at rr 4 6 Output at rr 64 3 Output at rr 8 7 Output at rr 128 4 Output at rr 16 8 Output at rr 256 Ser 2 Serial Setup 2 __0000U Line feed 0 No LF after carriage return 1 LF after carriage return __0000U Alarm data with readings 0 No alarm data 1 Alarm dat...

Page 65: ... characters _00000URTS mode 0 Normal RTS 1 Single transmission _00000U CR LF termination cha racters 0 Only at end of all items 1 At end of each item _00000U Data sent in continuous mode 0 All Active Items 1 Item 1 only 2 Item 2 only if active 3 Item 3 only if active 4 Peak only 5 Displayed Item 6 Valley only 7 All Active Items Peak Valley Ser 4 Serial Setup 4 ___000U Modbus ASCII gap timeout 0 1 ...

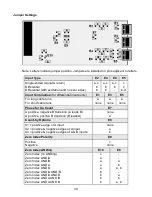
Page 66: ...pply to the universal power supply 85 264 Vac or 90 300 Vdc and to the low voltage power supply 12 32 Vac or 10 48 Vdc 1 Letters indicate jumper position Jumpers are installed on pins adjacent to letters Excitation output Jumper locations 5 Vdc 5 100 mA max 10 Vdc 5 120 mA max 24 Vdc 5 50 mA max b d e b d f c 2 SELECTION OF OTHER JUMPERS Jumper a Front panel menu lockout locked when installed See ...

Page 67: ...p exe which will install the software on your PC PREREQUISITES FOR CONNECTED USE 1 PC with an available RS232 or USB port 2 Meter to be set up 3 RS232 or USB board in the meter This board can be removed following meter setup 4 RJ11 to DB9 cable from the meter to a PC RS232 com port or a USB cable to a PC USB port see Section 1 Ordering Guide 5 Instrument Setup software ESTABLISHING COMMUNICATIONS ...

Page 68: ...et up in the same way You will find that Instrument Setup software is very user friendly with separate tab selectable windows for Input Display Scaling Filter Relay Alarms Communications Analog Out and Lockouts If the required hardware such as the analog output board is not sensed the corresponding tab will be grayed out ADDITIONAL FEATURES WHEN CONNECTED The Commands pull down menu allows you to ...

Page 69: ...oard type in the frequency value in Hz and press Enter METER SETUP WITH AN UNCONNECTED PC Instrument Setup software is also of benefit when the PC is not connected to a meter Upon launching the software click on None for Communications then on Counter Timer and Series 2 Click on File Default Setup to retrieve a default setup file from disk or on File Open Setup to retrieve a previously saved setup...

Page 70: ...zation To do so press the key to get to ConFG then set the fifth digit to 1 This digit will only be displayed with an Extended meter Set the meter baud rate to 9600 To do so press the key to get to SEr 1 then set the entry to __050 Set the meter address to 1 To do so press the key to get to SEr 2 then set the entry to _0011 To execute the program from Windows simply double click on curve exe No so...

Page 71: ...n equipment certified to NIST standards If recalibration is required the meter may be returned to the factory or to any authorized distributor For frequency and rate measurements with the dual channel signal conditioner a calibration correction to the quartz crystal oscillator is stored in EEPROM on the main board Calibration constants are also stored in EEPROM in the process receiver totalizer si...

Page 72: ...sures magnetic pickups Max Pulse Rate 1 MHz on Channel A 250 kHz on Channel B Channel Isolation Channel A channel B share common ground Low Pass Filter 250 Hz or 30kHz selectable Hysteresis 15 mV to 2 2 Vp p selectable Trigger Level 15 mV to 1 7 V selectable Debounce Circuitry 0 3 50 ms selectable PROCESS RECEIVER TOTALIZER SIGNAL CONDITIONER Input Signal Levels 4 20 mA 0 1 mA 0 10 V jumper select...

Page 73: ... by meter Setpoint Setup Via front panel pushbuttons or RS232 485 Update Rate 56 s at 60 Hz 47 s at 50 Hz Response to Input Signal min Display update rate Input Signal selectable Filtered or unfiltered input signal Actuation Modes selectable Above or below setpoint latching or non latching disabled Output Time Delay selectable 1 to 128 readings Front Panel Enable Lockout Modes selectable 1 Display...

Page 74: ...onverter Power to Interface Option Powered by meter RS485 Wiring Half or full duplex Baud Rates 300 600 1200 2400 4800 9600 19200 Serial Protocols Custom ASCII Modbus RTU Modbus ASCII selectable Signal Levels Meet RS232 RS485 USB Ethernet standards Isolation rating between signal common and serial I O 250V ac Insulation dielectric strength between signal common and serial I O 3 5 kV ac for 5 sec 2...

Page 75: ...tomatically when the reading falls below a limit Autofilter A selectable digital filter mode which auto matically selects an appropriate moving aver age filter time constant from 0 08 sec to 9 6 sec for the encountered noise condition Batch control An operating mode of the Extended counter with a relay board where the counter is used to control repetitive fill operations by counting up from zero t...

Page 76: ...counts Setting up a pass band around a setpoint is often used for component testing Deviation limits are pro grammed by entering menu item dEUn1b for Alarm 1 and dEUn2b for Alarm 2 Duty cycle ON or OFF period of square waves as a percentage of total period over a gate time which is selectable from 10 ms to 199 99 sec With the dual input signal conditioner the same signal is applied to Channels A a...

Page 77: ...nd Total B is Item 3 When the meter is reset Item 1 is always displayed To view another Item press the RESET key For Item 1 the yellow View V LED is unlit For Item 2 the V LED is lit For Item 3 the V LED flashes Menu mode Meter programming mode used for input and range selection setup and confi guration Entered into from the Run mode by pressing the MENU key The Menu mode can be locked out complet...

Page 78: ... or 4 if the count by 2 or 4 is selected on the signal conditioner times the scale factor Process signal An analog signal whose display requires setup of scale and offset for display in engineering units such as psi The process receiver totalizer signal condi tioner accepts 0 1 mA 4 20 mA or 0 10 V process signals Quadrature A quadrature encoder generates 2 signals that are 90 out of phase based o...

Page 79: ... high input The meter then applies a straight line fit Scaling scale and offset method A scaling method where scale and offset are entered manually Setpoint A value compared to the reading to determine the state of a relay Term often used interchangeably with alarm setpoint Stopwatch mode A timing operating mode for single events Stopwatch A to A measures time between the same positive or negative...

Page 80: ...ranty shall not apply to defects resulting from 1 Improper or inadequate maintenance by Buyer 2 Unauthorized modification or misuse 3 Operation outside the environmental specifications of the product 4 Mishandling or abuse The warranty set forth above is exclusive and no other warranty whether written or oral is expressed or implied Yokogawa specifically disclaims the implied warranties of merchan...

Reviews: